
takahashi_kunn が 2024年10月28日12時14分59秒 に編集
コメント無し
本文の変更
___カレンダー式思い出写真日記___ #### はじめに > 今回は、Raspberry Pi4のカメラで撮影した写真を自動でカレンダーに日付ごとに写真を整理してくれるものを作成しました。 ### 概要 ・Raspberry Pi4のカメラを使って写真を撮影 ・撮影された写真は自動で日付ごとにカレンダーに整理 ・思い出を簡単に振り返ることができます ## 設計イメージ図 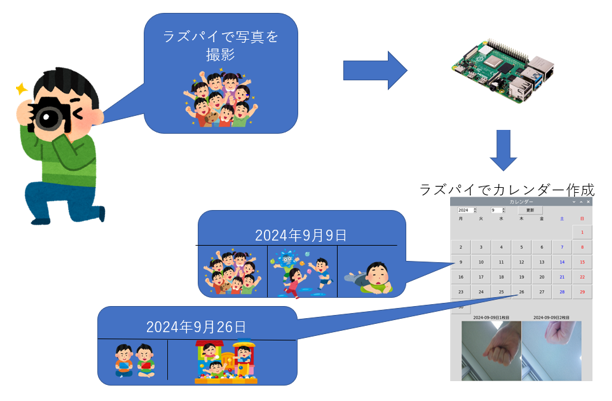
## 実行写真 
## 動作画面 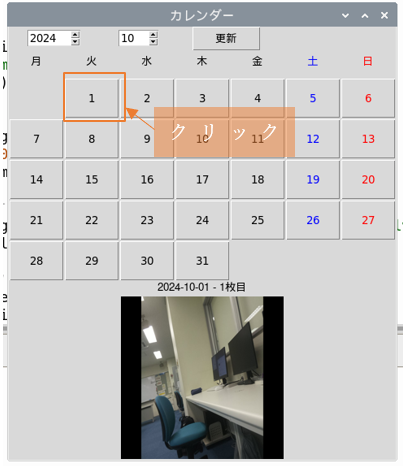 特定の日付をクリックし、写真が入っていれば写真が表示されます。 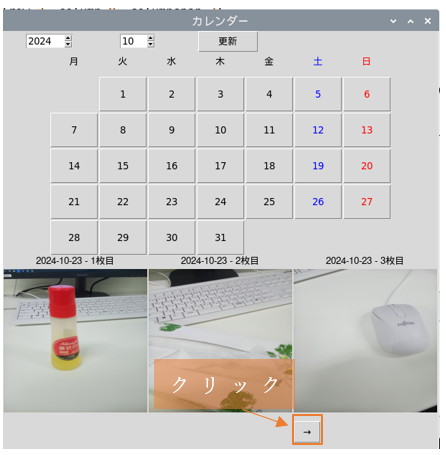 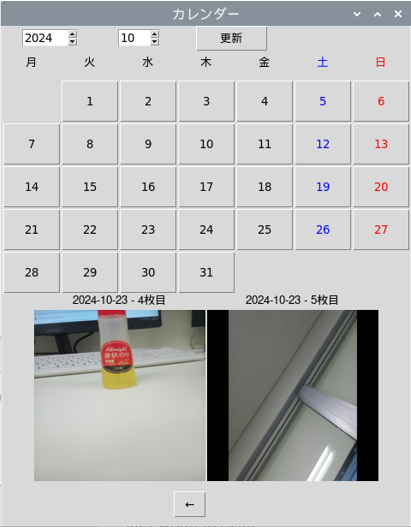 写真が4枚以上の時は「→」をクリックすると4枚目以降の写真が表示されます。最大100枚まで見ることが可能です。 ## 使用した部品 - Raspberry Pi4 - Raspberry Pi カメラモジュール - IoT学習HAT(SW1使用) ### ソースコード ```arduino:カレンダー作成コード import tkinter as tk from tkinter import ttk import calendar from datetime import datetime from PIL import Image, ImageTk import os # メインウィンドウを作成 root = tk.Tk() root.title("カレンダー") # 現在の年月を取得 current_year = datetime.now().year current_month = datetime.now().month # 曜日ラベルのリスト weekdays = ["月", "火", "水", "木", "金", "土", "日"] # 表示中の画像のページ番号 current_page = 0 # カレンダーの日付ごとにボタンを表示する関数 def show_calendar(year, month): for widget in days_frame.winfo_children(): widget.destroy() for col, weekday in enumerate(weekdays): fg_color = "black" if col == 5: fg_color = "blue" elif col == 6: fg_color = "red" tk.Label(days_frame, text=weekday, width=5, height=2, font=("Courier", 10), fg=fg_color).grid(row=0, column=col) cal = calendar.monthcalendar(year, month) for row, week in enumerate(cal): for col, day in enumerate(week): fg_color = "black" if col == 5: fg_color = "blue" elif col == 6: fg_color = "red" if day == 0: day_button = tk.Label(days_frame, text=" ", width=5, height=2) else: day_button = tk.Button(days_frame, text=str(day), width=5, height=2, fg=fg_color, command=lambda d=day: on_day_click(year, month, d)) day_button.grid(row=row+1, column=col) def on_day_click(year, month, day): global current_page current_page = 0 # ページ番号をリセット show_images(year, month, day, current_page) def show_images(year, month, day, page): global current_page current_page = page date_str = f"{year}-{month:02d}-{day:02d}" for widget in image_frame.winfo_children(): widget.destroy() images_per_page = 3 start_index = page * images_per_page + 1 end_index = start_index + images_per_page image_exists = False for i in range(start_index, end_index): image_path = f"/home/pi/album/{date_str}_{i}.png" if os.path.exists(image_path): image_exists = True try: img = Image.open(image_path) img = img.resize((200, 200)) img = ImageTk.PhotoImage(img) # 日付と画像番号を表示するラベル label = tk.Label(image_frame, text=f"{date_str} - {i}枚目", font=("Helvetica", 10)) label.grid(row=0, column=i - start_index) # 画像ラベルを作成してフレームに配置 image_label = tk.Label(image_frame, image=img) image_label.image = img image_label.grid(row=1, column=i - start_index) except Exception as e: print(f"エラー: {e}. 画像 '{image_path}' の表示中に問題が発生しました") if not image_exists: tk.Label(image_frame, text="画像がありません").grid(row=0, column=0) total_images = sum([os.path.exists(f"/home/pi/album/{date_str}_{i}.png") for i in range(1, 100)]) if total_images > images_per_page: if page > 0: prev_button = tk.Button(image_frame, text="←", command=lambda: show_images(year, month, day, page - 1)) prev_button.grid(row=2, column=0, pady=10, sticky="e") if end_index <= total_images: next_button = tk.Button(image_frame, text="→", command=lambda: show_images(year, month, day, page + 1)) next_button.grid(row=2, column=2, pady=10, sticky="w") def update_calendar(): year = int(year_var.get()) month = int(month_var.get()) show_calendar(year, month) days_frame = tk.Frame(root) days_frame.grid(row=1, column=0, columnspan=7) image_frame = tk.Frame(root) image_frame.grid(row=2, column=0, columnspan=7) year_var = tk.StringVar(value=current_year) month_var = tk.StringVar(value=current_month) year_spinbox = ttk.Spinbox(root, from_=1900, to=2100, textvariable=year_var, width=5) year_spinbox.grid(row=0, column=0, padx=5) month_spinbox = ttk.Spinbox(root, from_=1, to=12, textvariable=month_var, width=3) month_spinbox.grid(row=0, column=1, padx=5) update_button = ttk.Button(root, text="更新", command=update_calendar) update_button.grid(row=0, column=2) show_calendar(current_year, current_month) root.mainloop() ``` # ### カレンダーの写真を撮影するプログラム ディレクトリは/home/pi/album/を作成する 。 ```arduino:写真撮影ソースコード # python3 # coding:utf-8 import os import sys import RPi.GPIO as GPIO import datetime from time import sleep from PIL import Image TSW = 24 # TrrigerSW(白SW)のBOAED番号 GPIO.setmode(GPIO.BCM) GPIO.setup(TSW, GPIO.IN, pull_up_down=GPIO.PUD_DOWN) SAVE_DIR = '/home/pi/album/' print("CAMERA START") try: while True: if GPIO.input(TSW) == GPIO.HIGH: d = datetime.datetime.now() date_str = d.strftime('%Y-%m-%d') # 連番は指定フォルダのファイル数を元に設定 i = len([name for name in os.listdir(SAVE_DIR) if date_str in name]) + 1 temp_filename = 'temp_image.png' newfilename = f'{SAVE_DIR}{date_str}_{i}.png' # 写真撮影 os.system(f'libcamera-still -n -o {temp_filename} --width 1024 --height 768 --quality 100') # 画像回転処理 (expand=True で黒枠を防止) img = Image.open(temp_filename) img_rotate = img.rotate(90, expand=True) img_rotate.save(newfilename) # 一時ファイルの削除 os.remove(temp_filename) sleep(1) except KeyboardInterrupt: print("\nCAMERA STOP") GPIO.cleanup() sys.exit() ``` ## 撮影手順 1. 撮影する前に、PCで立ち上げThonnyを開き上のプログラムを実行させる。 2. 白スイッチを押してください。 3. それから約6秒後に撮影が完了できます。 4. カメラを終了するときは、「Ctrl+C」で終了してください。  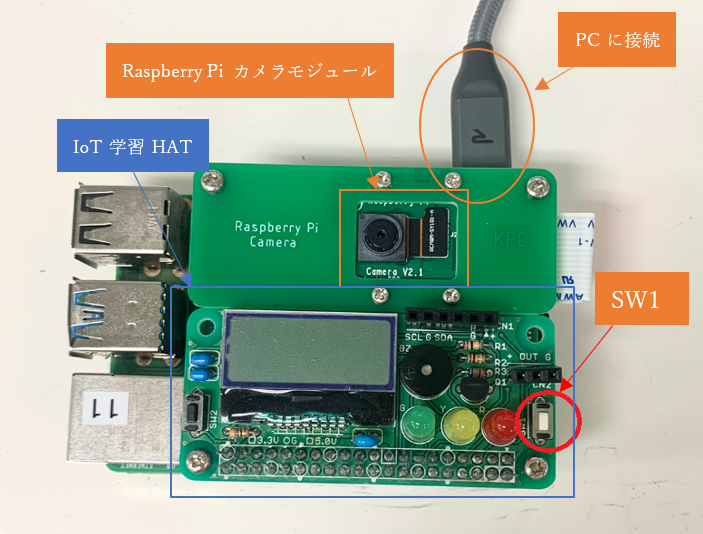 今回はIoT学習HATの白スイッチ(SW1)を使用します。 ## 参考文献 [初心者がラズパイにカメラつけて写真撮ってみた](https://inupy.com/raspi-008/) [IoT学習HATの入出力対応表](https://akizukidenshi.com/goodsaffix/iotlearninghatkit_io.pdf) #### まとめ >今回は、ラズパイを起動させて、写真を撮り、カレンダーで整理するものでした。次に作成するときには、iPhoneなどの写真をGoogle フォトなどを利用して今回作成したカレンダーと組み合わせてより使いやすいものを作成したいと考えています。