S1TA が 2025年01月27日17時36分42秒 に編集
コメント無し
本文の変更
# 0.はじめに はじめまして、Unity/XRエンジニアの高原と申します。 業務でUnityを使ってXR系のアプリ開発をしています。(最近はAppleVisionProで色々やってます。) 普段ハードウェア系の開発には携わっていないのですが、今回弊社でSPRESENSE™ 活用コンテストに参加するというお話を伺ったため、 Unity/XRエンジニアとしてコンテンツ開発に協力することになりました。 本記事ではコンテストに応募するために制作した「空間監視カメラ」について解説をしていこうと思います。 # 1.空間監視カメラとは? Todo:埋め込み動画 空間監視カメラはSPRESENSE(Spresense HDRカメラボード)を活用し、通常は2Dでしか見られない監視カメラの映像を3D空間内の情報として確認することができる監視カメラVRビューワーアプリです。(Quest3スタンドアロンVRアプリ) 通常の監視カメラではカメラのある地点からの映像しか確認することができませんが、空間監視カメラは物理的なカメラの設置場所に関係なく、3D空間内の自由な視点から監視が可能となります。 仕組みとしては、まず監視対象となる空間をあらかじめ3Dスキャンして3Dモデルを作成します。 そしてSpresense HDRカメラボードのリアルタイムの監視映像から動体を検出し、3D空間上に反映します。 この時、動体の深度情報も計測することで3D空間内の適切な位置に配置することが可能となります。VRアプリとしているため、ユーザーは任意の視点から空間を自由に確認することが可能です。 また、今回ビューワーにカメラ映像を表示するだけでなく、画像を生成AIモデルであるClaude Sonnet 3.5に入力し、現在カメラに写っている映像について文章で説明する機能も実装しました。 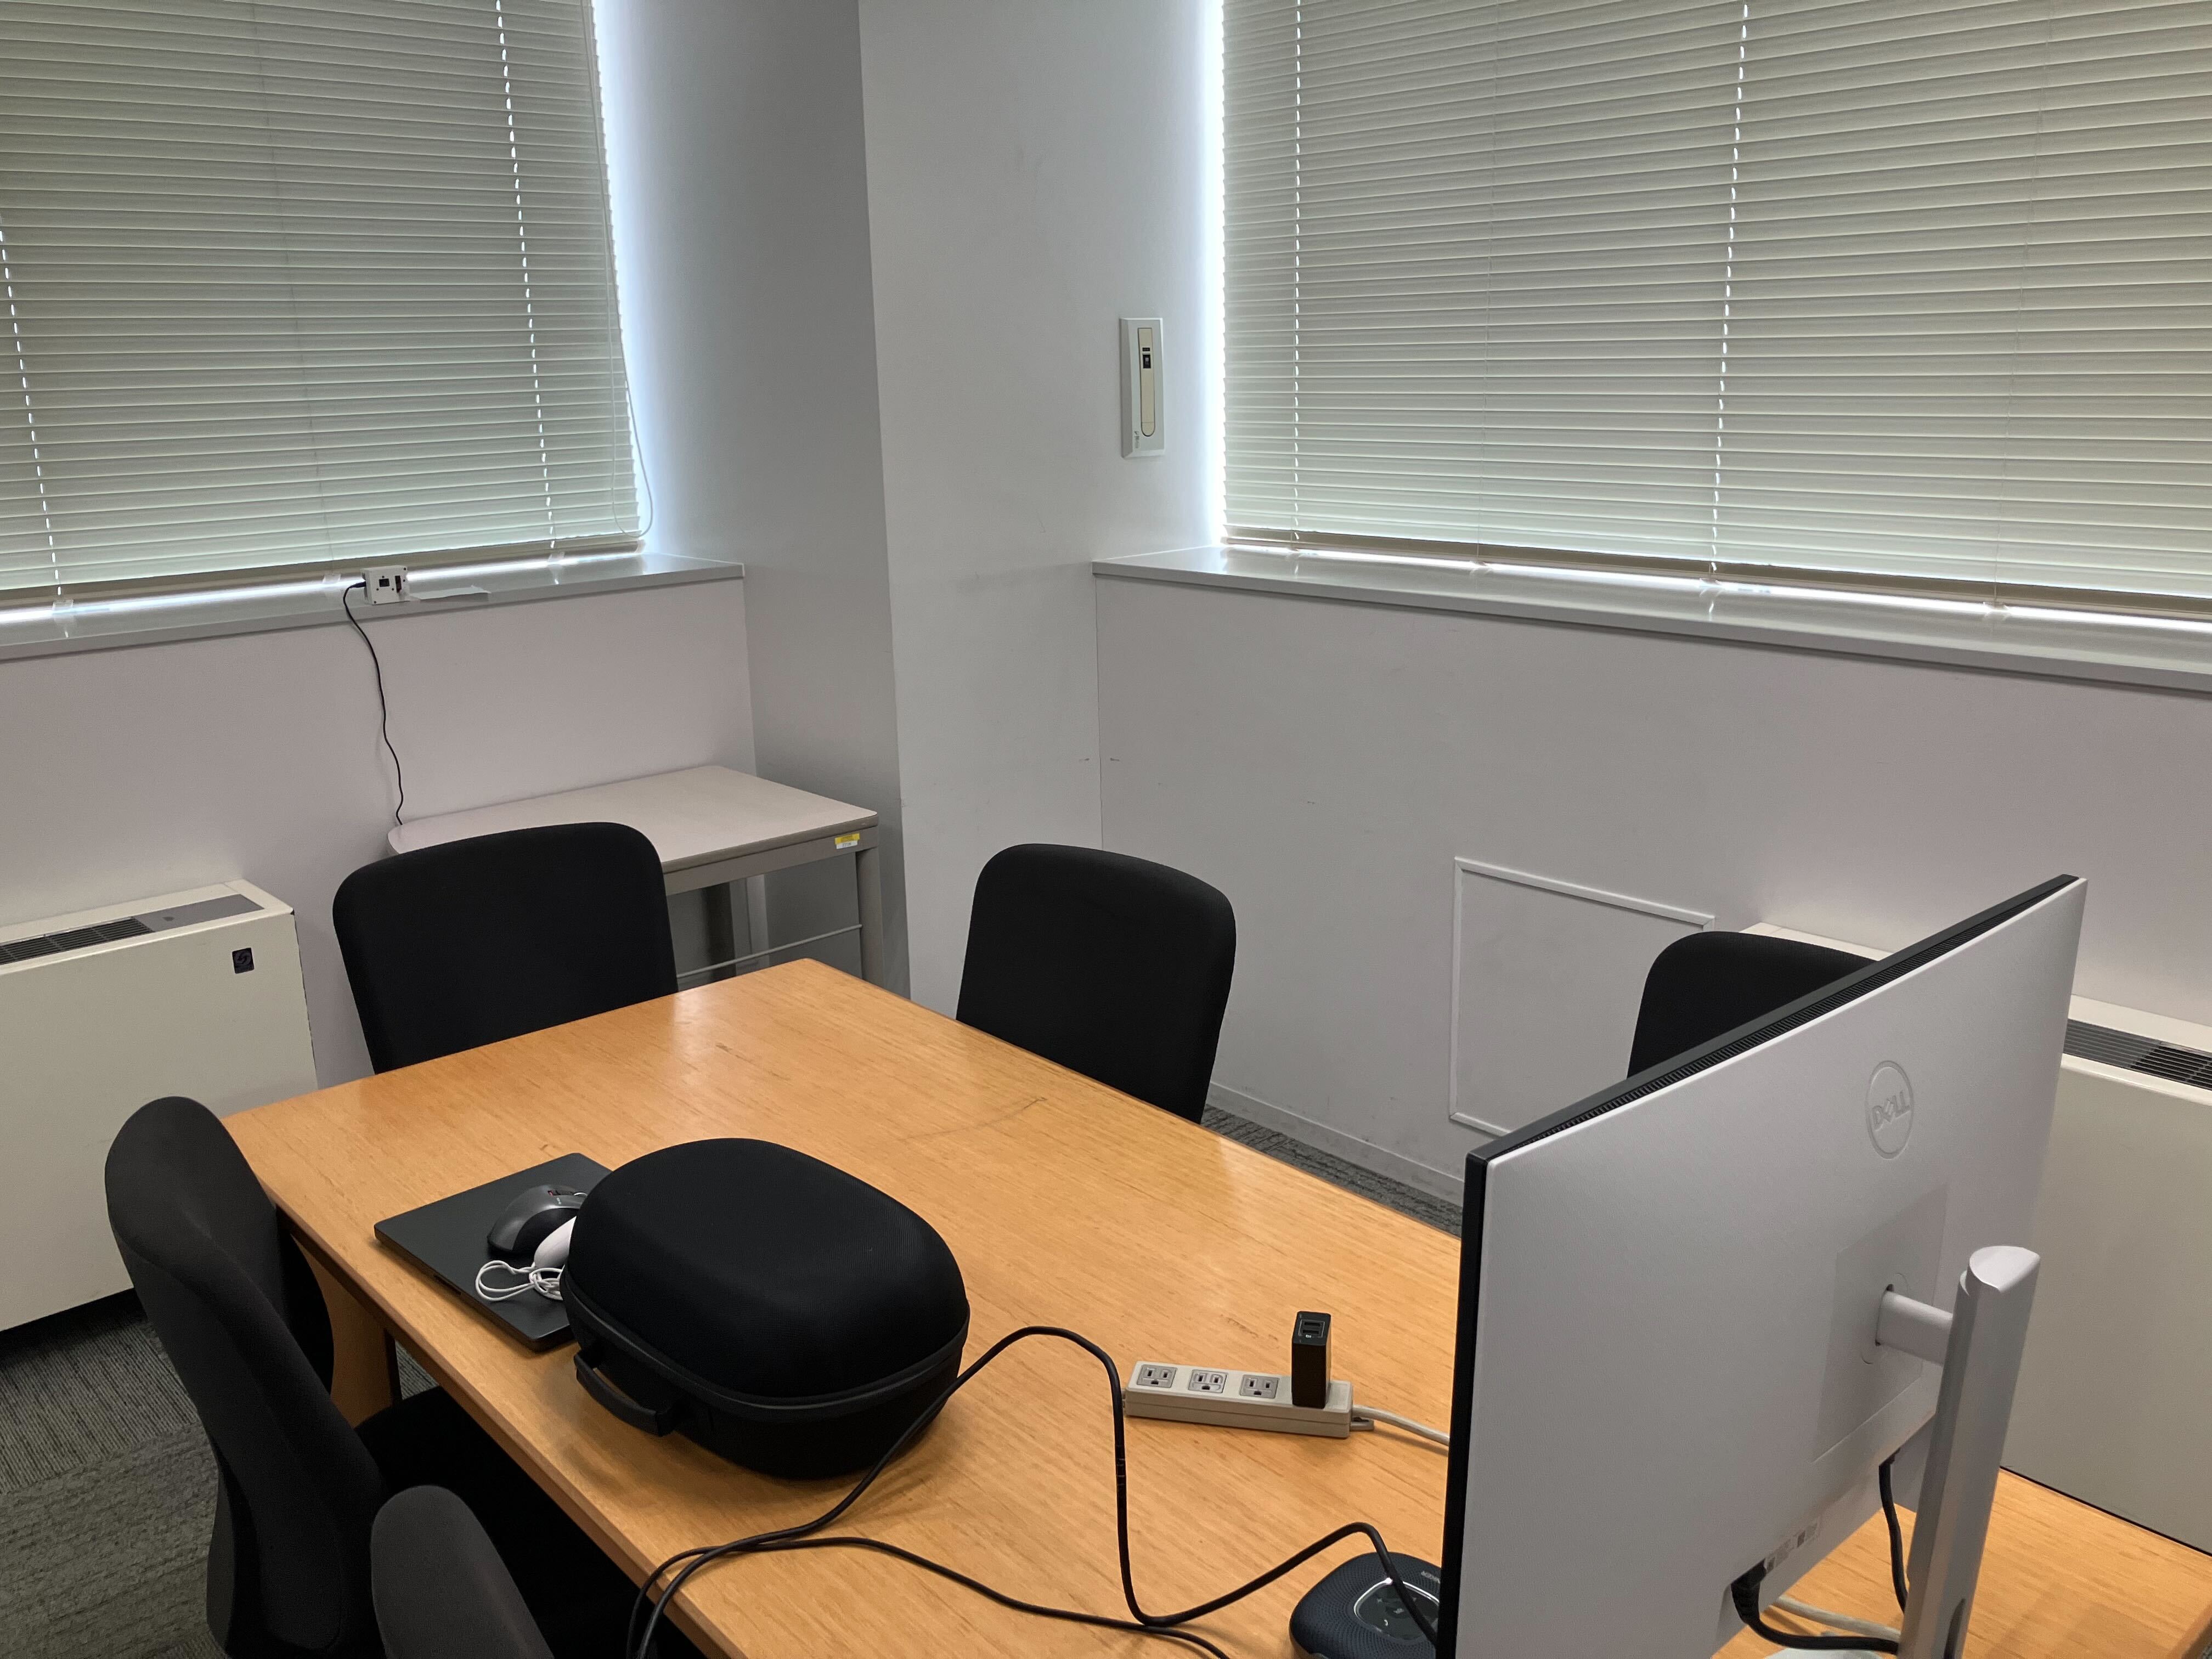 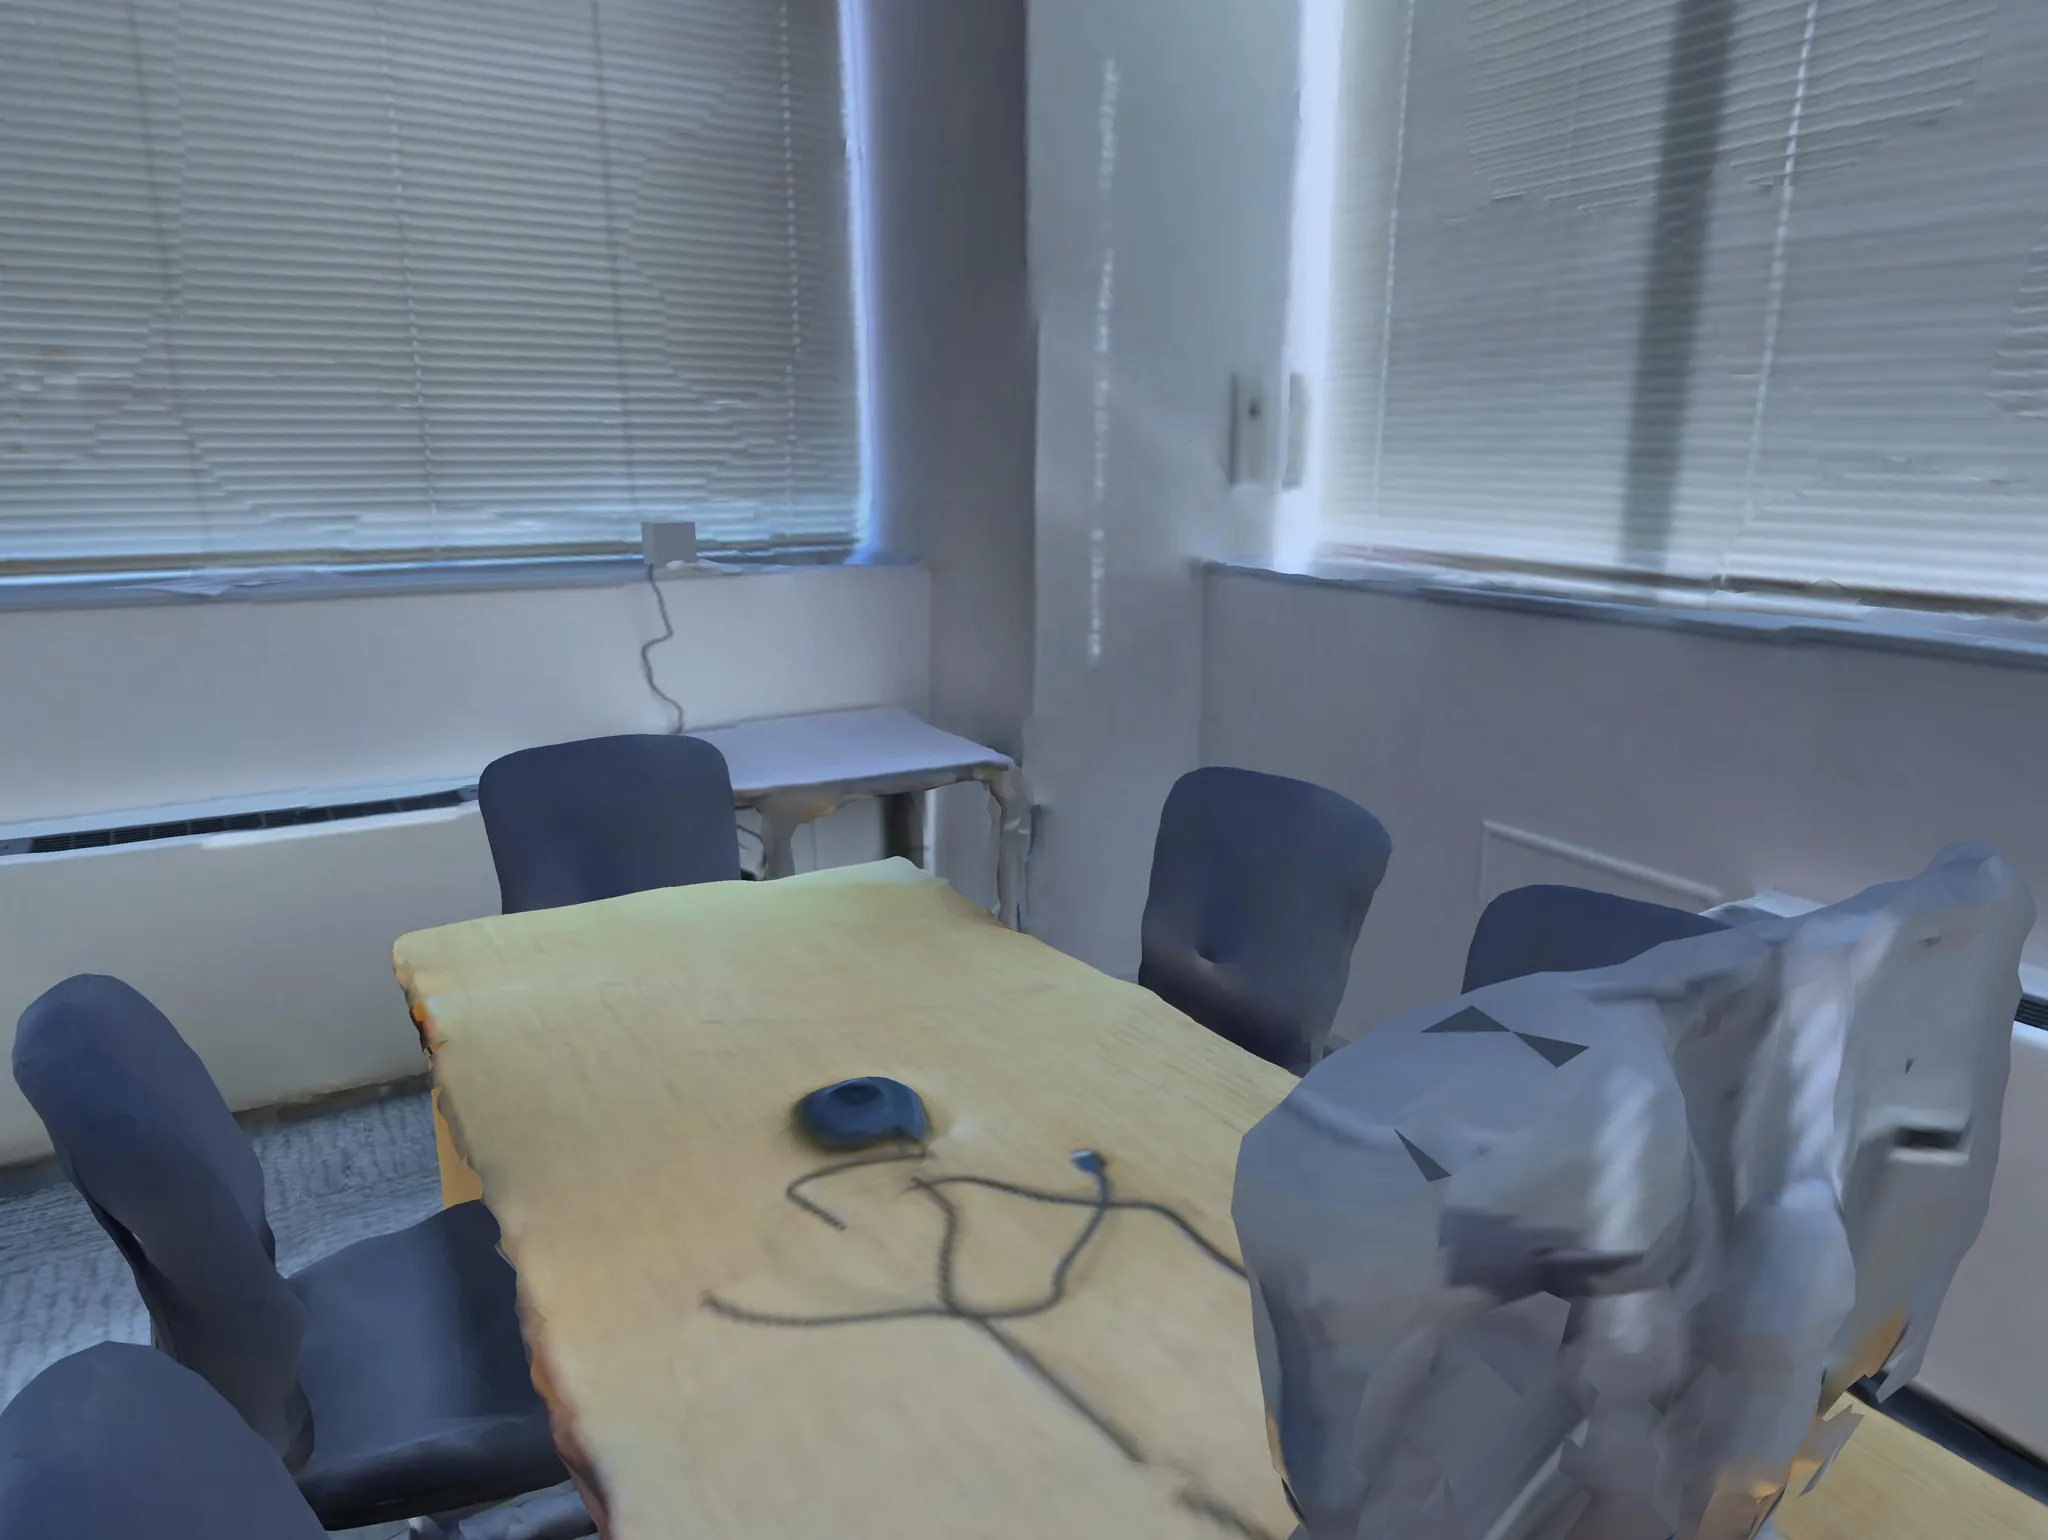 # 2.全体処理構成 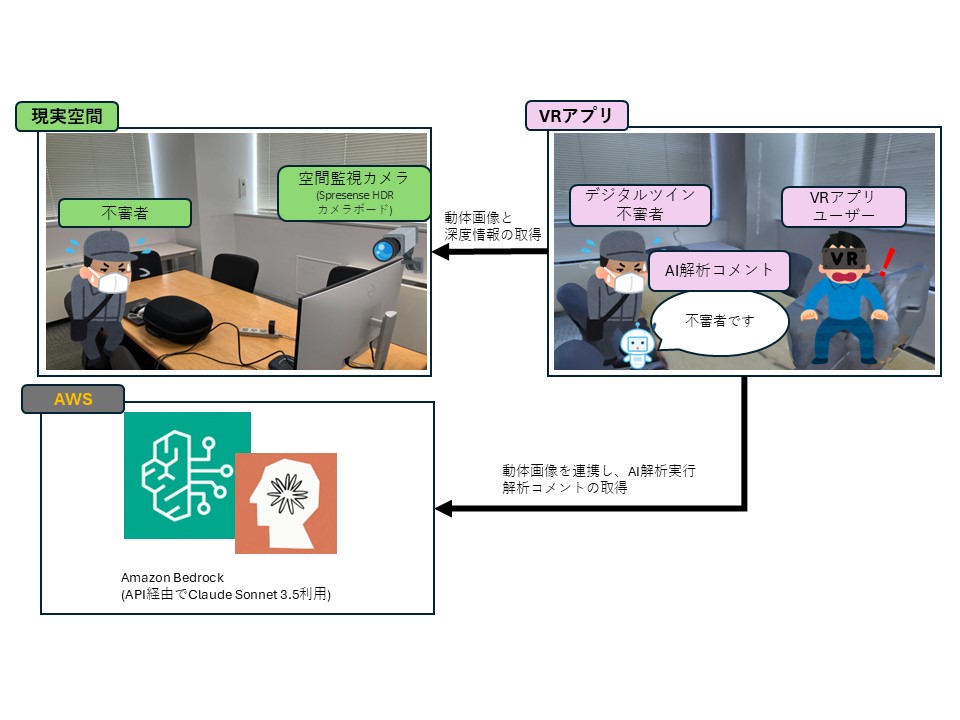 # 3.カメラハードウェア側構成 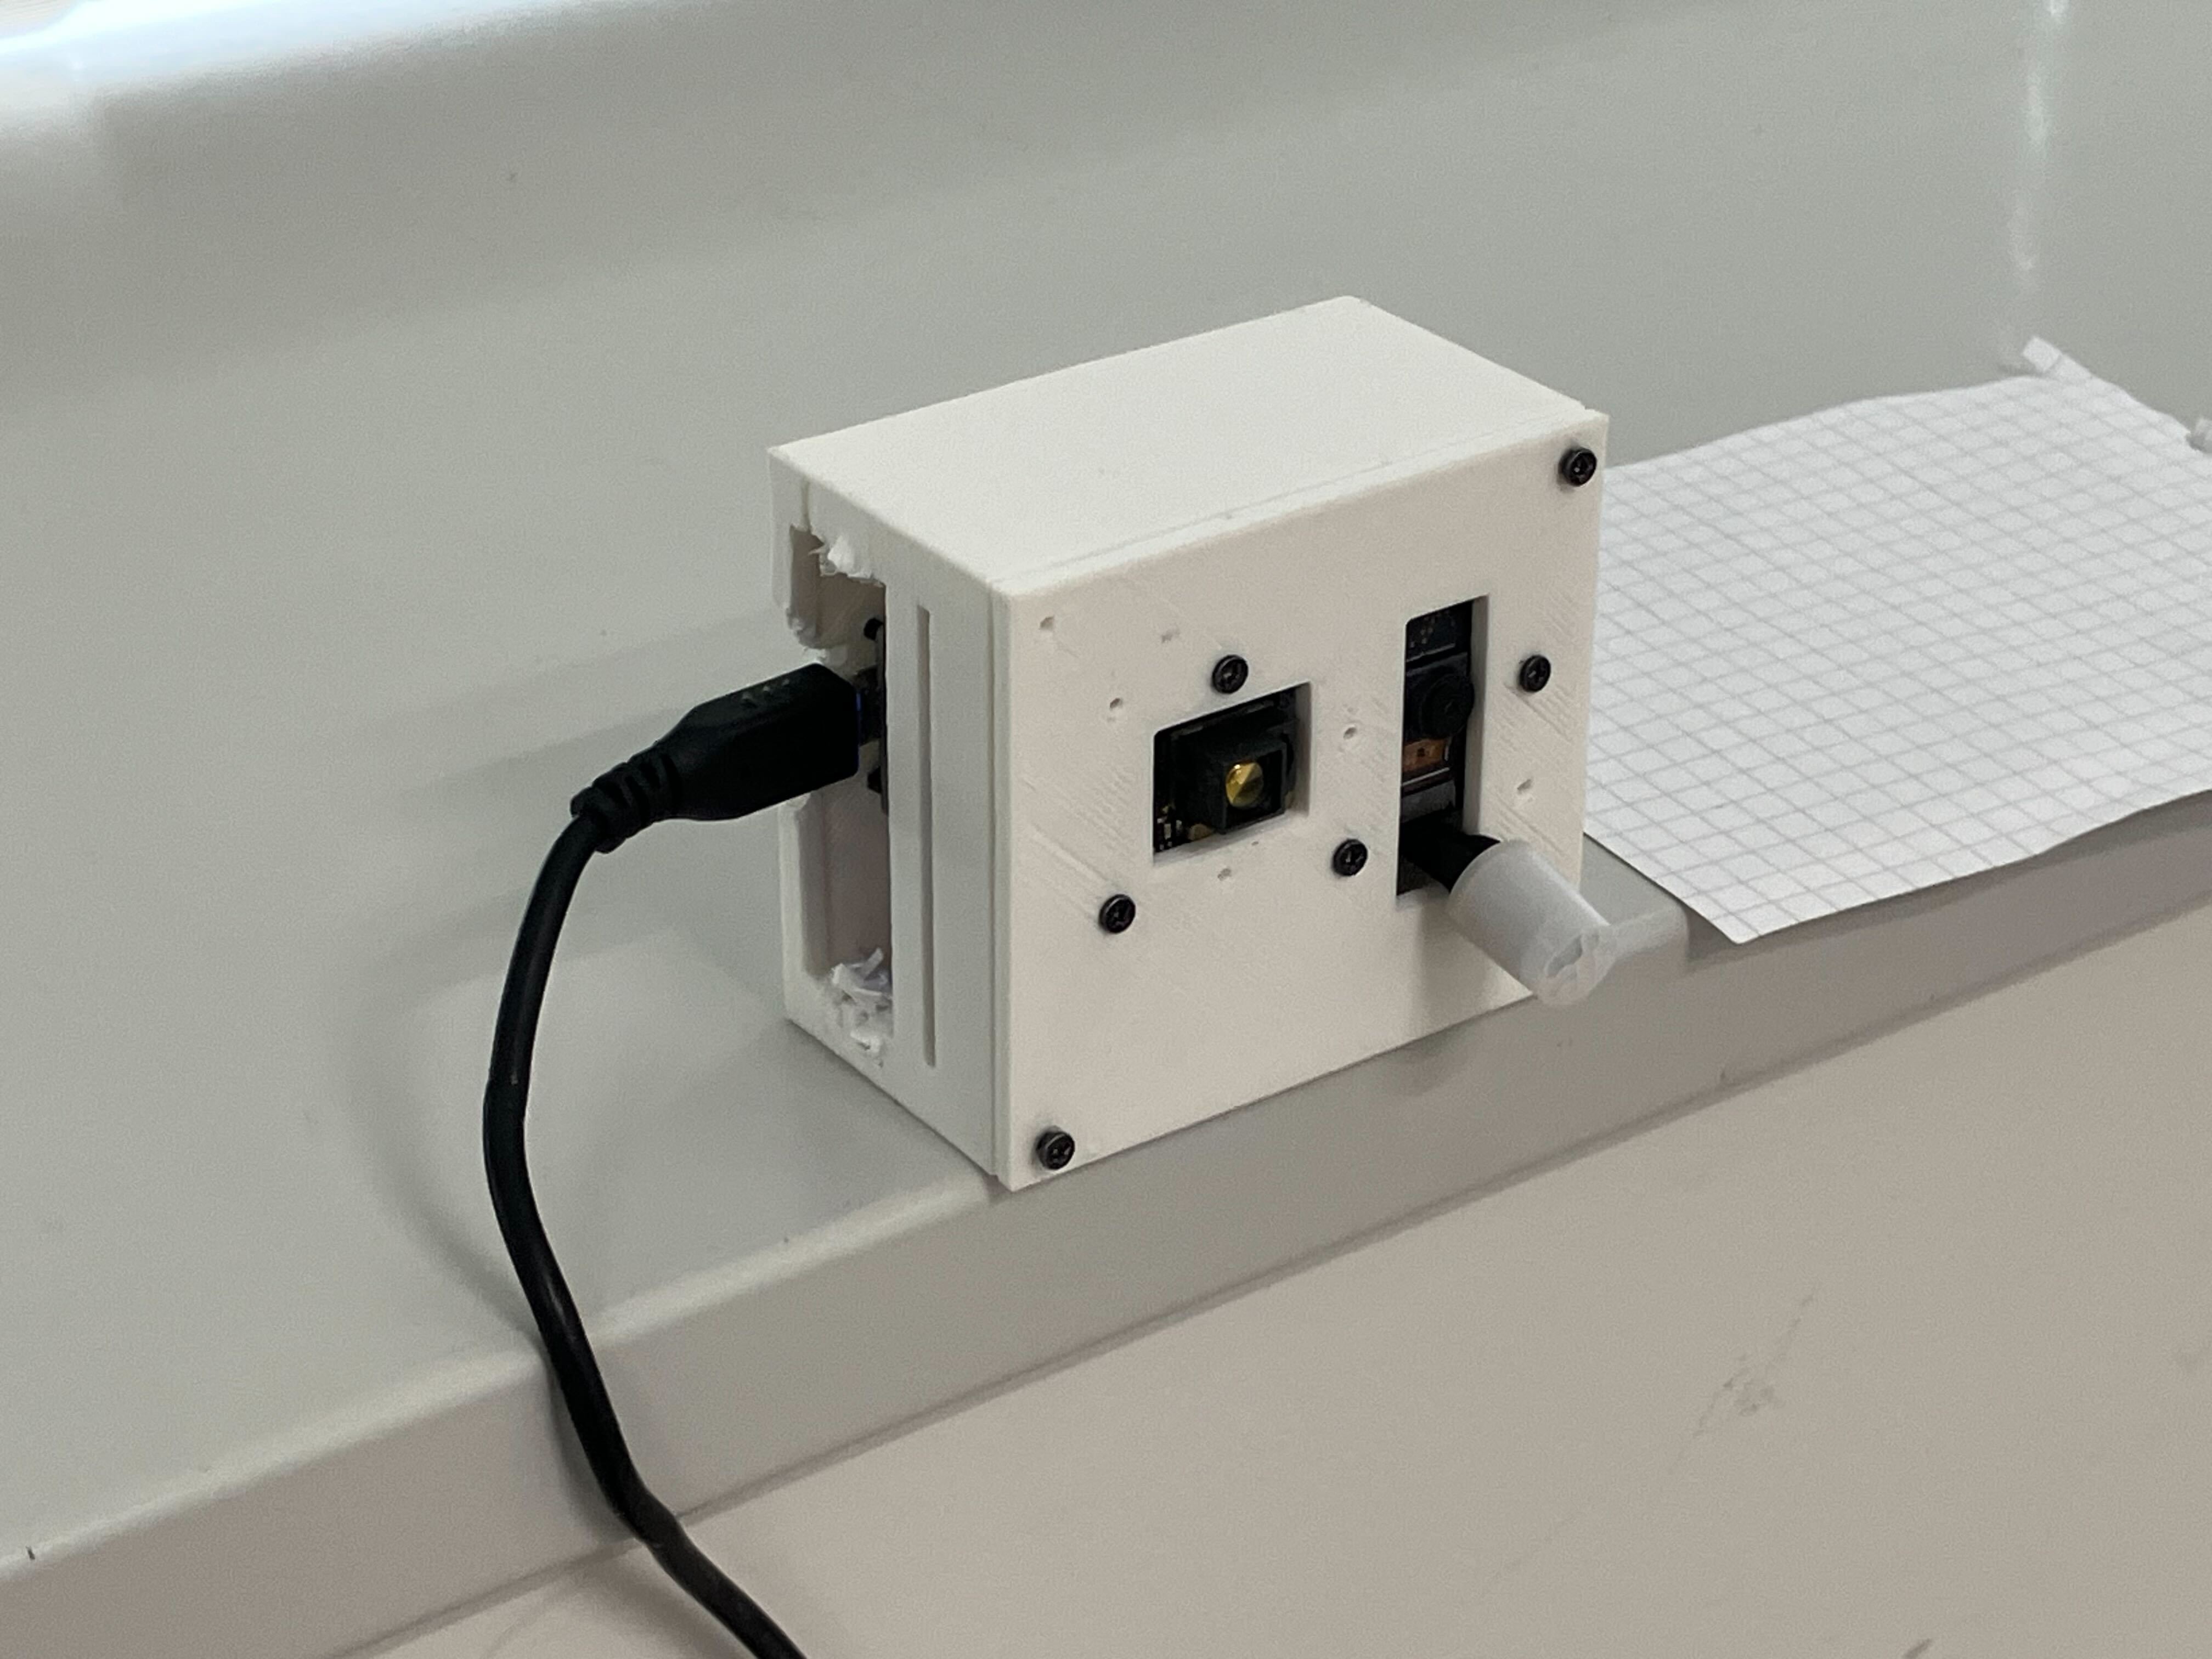 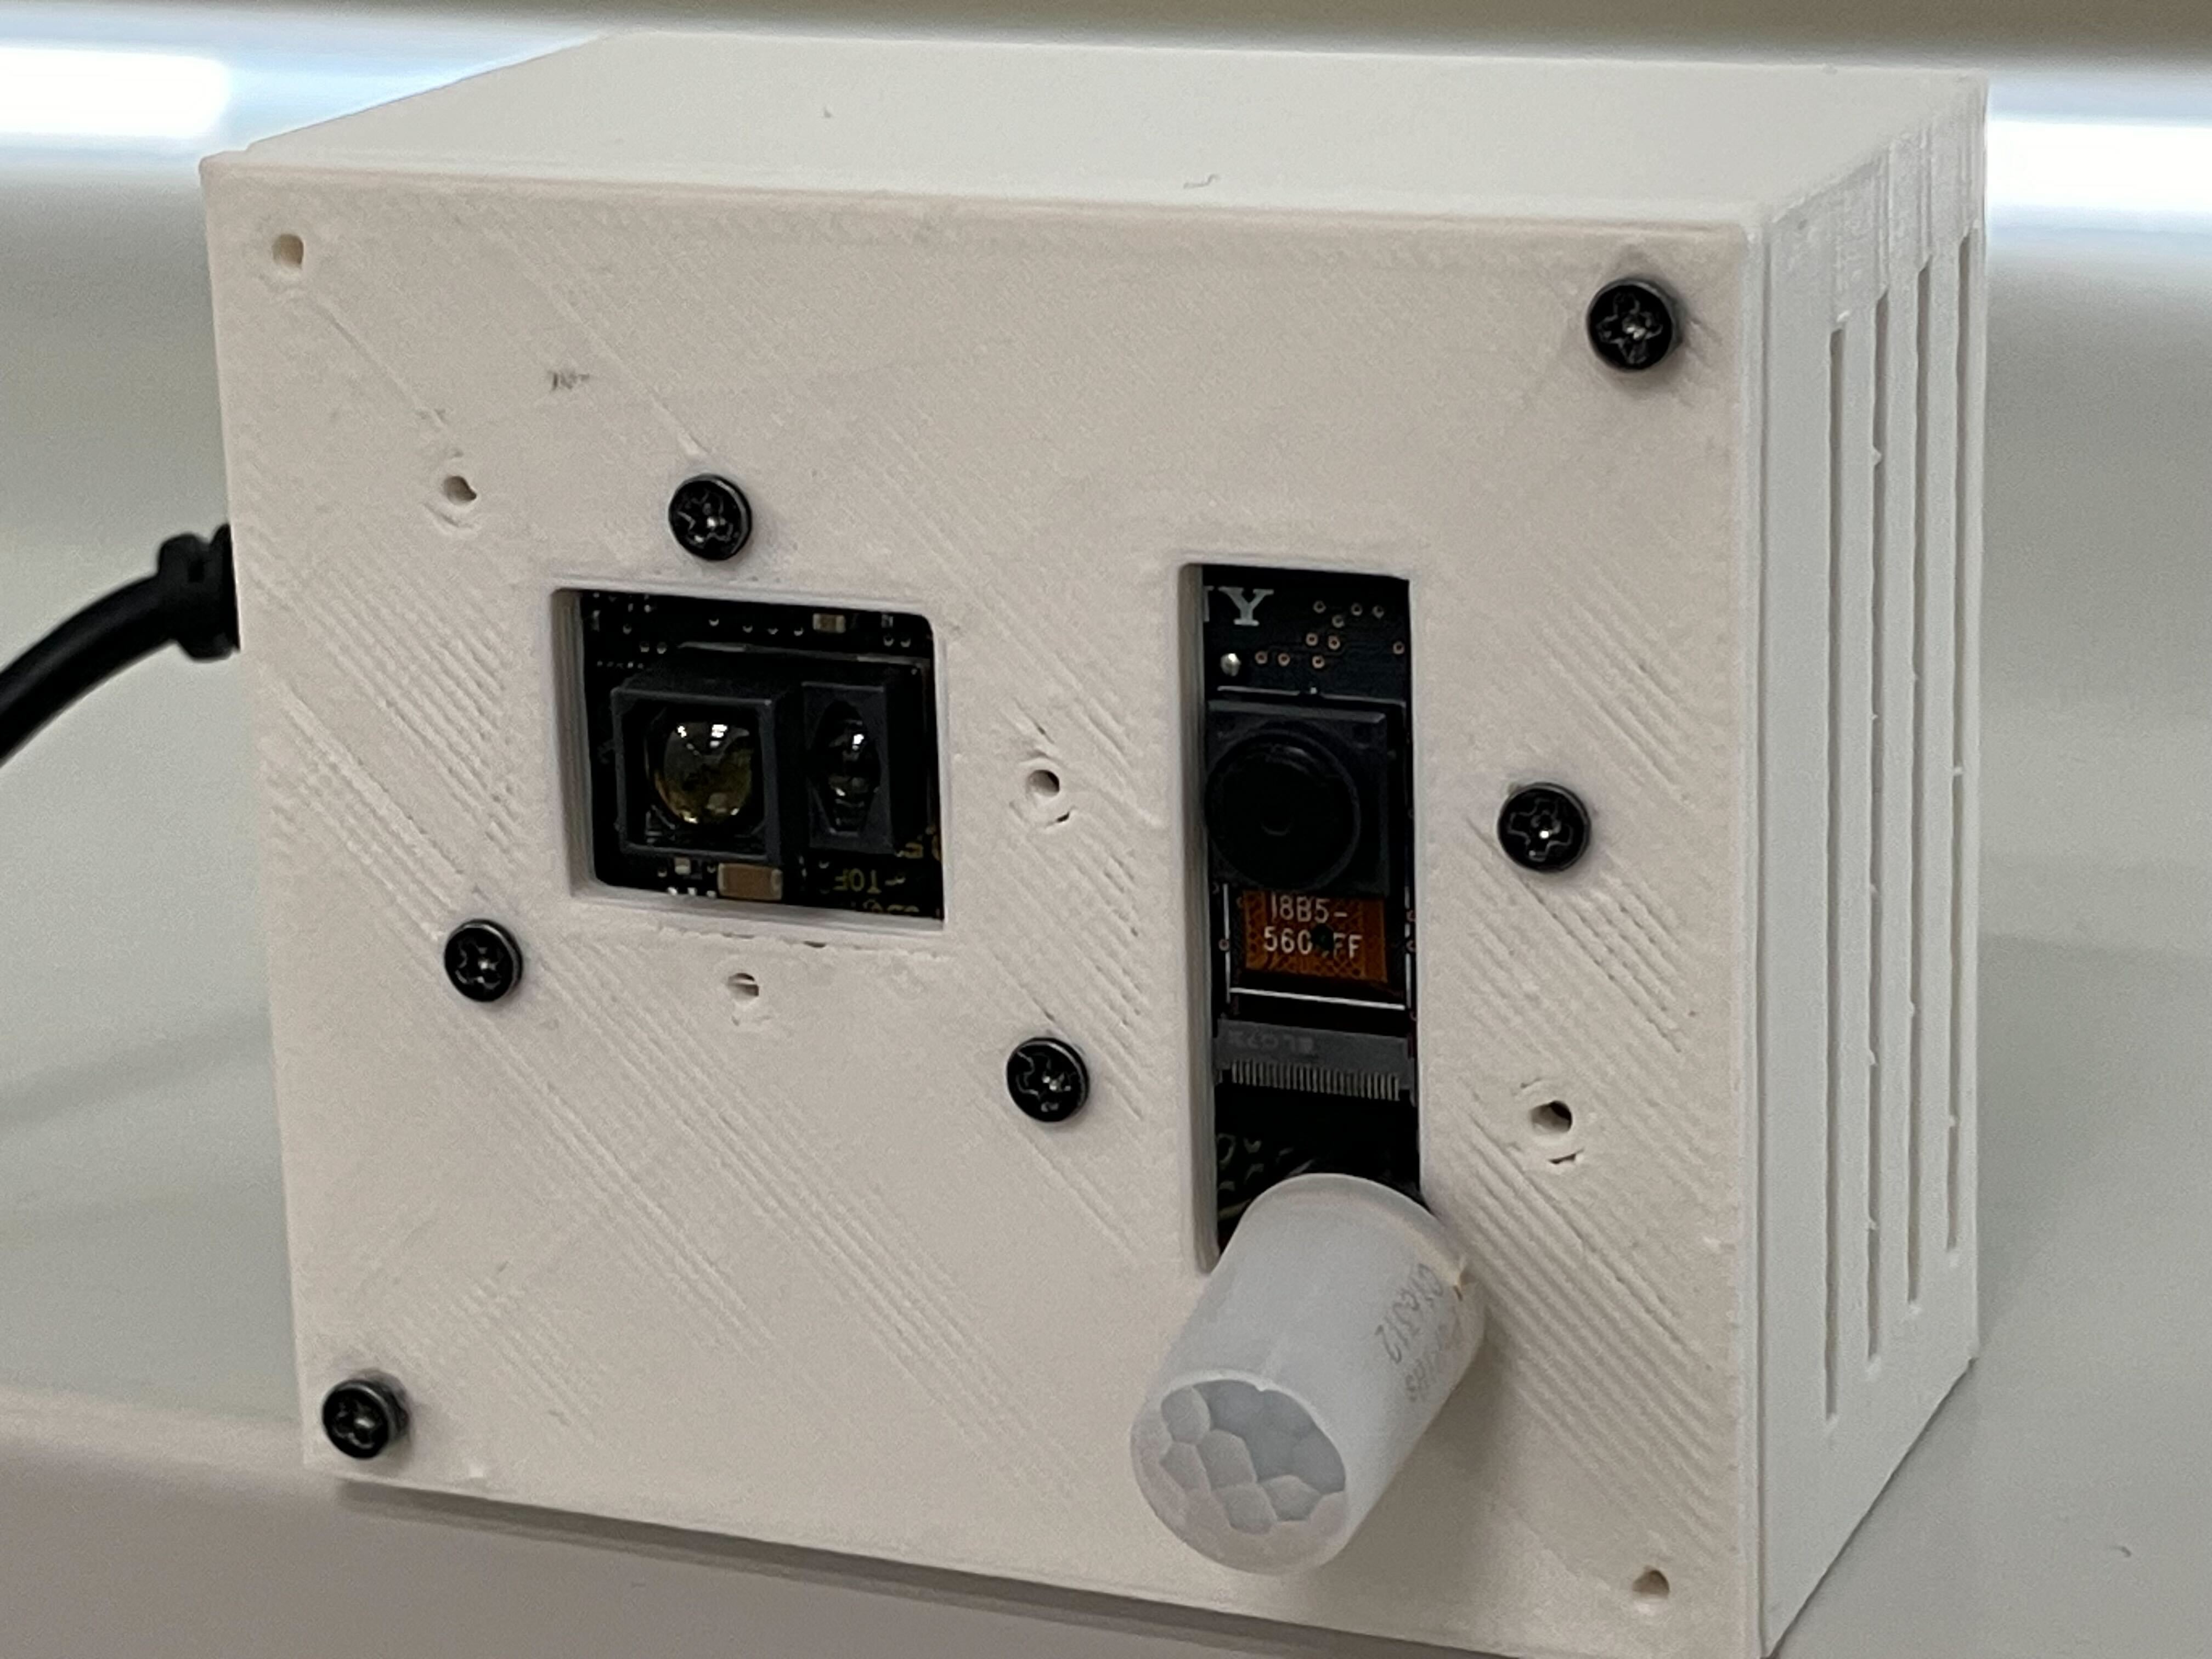 現実空間に配置したカメラに使用した部品は下記になります。 | 部品名 | 個数 | 役割 | | - | - | - | | SPRESENSEメインボード[CXD5602PWBMAIN1] | 1 | 制御用メインボード | | SPRESENSEカメラボード [CXD5602PWBCAM1] | 1 | カメラモジュール | | ToFセンサーボード(SPRESENSE用)(MM-S50MV) | 1 | 深度情報取得 | | SPRESENSE Wi-Fi Add-onボード iS110B | 1 | 画像、深度情報送信用 | | 筐体 | 1 | 3Dプリンタで作成 | | Raspberry Pi 4 | 1 | WEBサーバー用 |
Todo: 動体検知、画像切り抜きについて書く
# 4.Unityソフトウェア側構成 VRアプリはUnity6000.0.23f1 URPで作成しています。 VR機能面はMeta XR Core SDKを利用しています。 ## シーン構成 シーン内にはあらかじめ3Dスキャンを行った空間モデルを配置しています。 かつ現実空間においてあるカメラ位置をVRアプリ内でも把握し、 動体画像の表示位置の指定に使っています。  ## スクリプト詳細 ### VR操作機能 VRでの操作はシンプルにコントローラを使った移動と回転のみ実装しています。 ``` using UnityEngine; public class VRLocomotion : MonoBehaviour { [SerializeField] private Transform cameraRig; [SerializeField] private Transform head; [SerializeField] private float moveSpeed = 2f; [SerializeField] private float rotationAngle = 45f; private bool canRotate = true; private void Update() { // 左スティックで移動 HandleMovement(); // 右スティックで回転 HandleRotation(); } private void HandleMovement() { Vector2 leftStick = OVRInput.Get(OVRInput.RawAxis2D.LThumbstick); Vector3 forward = new Vector3(head.forward.x, 0f, head.forward.z).normalized; Vector3 right = new Vector3(head.right.x, 0f, head.right.z).normalized; Vector3 moveDirection = forward * leftStick.y + right * leftStick.x; cameraRig.position += moveDirection * moveSpeed * Time.deltaTime; } private void HandleRotation() { Vector2 rightStick = OVRInput.Get(OVRInput.RawAxis2D.RThumbstick); bool isRotating = Mathf.Abs(rightStick.x) > 0.5f; if (isRotating && canRotate) { cameraRig.Rotate(0f, rotationAngle * Mathf.Sign(rightStick.x), 0f); canRotate = false; } if (!isRotating) { canRotate = true; } } } ``` ### カメラ画像の受信 カメラ画像はWebサーバーとなっているRaspberry Pi からHTTPS通信でダウンロードしています。 ``` using UnityEngine; using UnityEngine.Networking; using Cysharp.Threading.Tasks; using static Constants; using System; public class ImageDownloader { public async UniTask<(ImageResult, bool)> DownloadImageAsync() { var result = new ImageResult(); try { string url = $"{MonitorSSDUrl}?time={DateTime.UtcNow.Ticks}"; using (UnityWebRequest request = UnityWebRequestTexture.GetTexture(url)) { await request.SendWebRequest(); if (request.result != UnityWebRequest.Result.Success) { Debug.LogError($"画像のダウンロードに失敗しました: {request.error}"); return (result, false); } result.Image = DownloadHandlerTexture.GetContent(request); return (result, true); } } catch (Exception ex) { Debug.LogError($"例外が発生しました: {ex.Message}"); return (result, false); } } } ``` ### 深度情報の受信
動体の深度情報も同様にWebサーバーとなっているRaspberry Pi からHTTPS通信でダウンロードしています。
動体の深度情報も同様にWebサーバーとなっているRaspberry Pi からHTTPS通信でダウンロードし、Jsonパースを行っています。
``` using System; using Cysharp.Threading.Tasks; using UnityEngine; using UnityEngine.Networking; using Newtonsoft.Json; public static class DepthInfoDownloader { // 差異の深度情報(JSON)をダウンロードする public static async UniTask<(DepthResult depthResult, bool isSuccess)> FetchDepthInfoAsync() { DepthResult depthResult = null; try { using (var request = UnityWebRequest.Get(Constants.MonitorTOFUrl)) { await request.SendWebRequest(); if (request.result != UnityWebRequest.Result.Success) { Debug.LogError($"Depth info download failed: {request.error}"); return (depthResult, false); } string jsonText = request.downloadHandler.text; depthResult = JsonConvert.DeserializeObject<DepthResult>(jsonText); bool success = depthResult != null && depthResult.distance != null; return (depthResult, success); } } catch (Exception ex) { Debug.LogError($"Exception during depth info download: {ex.Message}"); return (depthResult, false); } } } ``` 実際に送られてきている深度Json情報は下記になります。 「511.000000」は測定できなかった時の値のため、それ以外の値が入っている場合、 そのブロックに紐づいたカメラ画像の領域に動体が存在する判定になります。 ``` { "distance": [ [ "511.000000", "511.000000", "511.000000", "511.000000" ], [ "511.000000", "511.000000", "511.000000", "511.000000" ], [ "511.000000", "511.000000", "511.000000", "511.000000" ], [ "511.000000", "511.000000", "511.000000", "511.000000" ], [ "3.809655", "3.866323", "3.679776", "511.000000" ], [ "511.000000", "3.692517", "3.667131", "3.683865" ], [ "3.556268", "3.670649", "3.556743", "3.667796" ], [ "2.890043", "3.223393", "3.033804", "3.564159" ] ] } ```
### AI画像解析 AI画像解析は[Amazon Bedrock](https://aws.amazon.com/jp/bedrock/)という様々なAIモデルを利用できるサービスで画像やテキストの入力ができる[Claude 3.5 sonnet](https://www.anthropic.com/news/claude-3-5-sonnet)というAIモデルをAPI経由で利用し、実現しています。 ``` using System; using System.Collections.Generic; using System.IO; using Amazon.BedrockRuntime; using Amazon.BedrockRuntime.Model; using Amazon.Util; using Cysharp.Threading.Tasks; using Newtonsoft.Json; using UnityEngine; public class BedrockChatService : MonoBehaviour { [SerializeField] private BedrockSettings bedrockSettings; [SerializeField] private ClaudePrompt claudePrompt; // 画像データを元にAIで画像の説明コメントを生成する // ※6MB以上だとエラーになるので注意 public async UniTask<string> GetImageCommentAsync(byte[] imageData) { string imageComment = await SendChatMessageAsync( textPrompt: claudePrompt.userPrompt, role: Role.User, systemPrompt: claudePrompt.systemPrompt, imageData: imageData, imageMediaType: "image/jpeg" ); return imageComment; } private async UniTask<string> SendChatMessageAsync( string textPrompt, Role role, string systemPrompt, byte[] imageData = null, string imageMediaType = "image/jpeg", float temperature = 0.5f, int maxTokens = 10000 ) { List<BedrockContent> contents = new List<BedrockContent>(); if (imageData != null && imageData.Length > 0) { string base64Image = Convert.ToBase64String(imageData); contents.Add(new BedrockContent { type = "image", source = new ImageSource { type = "base64", media_type = imageMediaType, data = base64Image } }); } contents.Add(new BedrockContent { type = "text", text = textPrompt }); List<BedrockMessage> messages = new List<BedrockMessage> { new BedrockMessage { role = RoleToString(role), content = contents } }; object payload = BuildRequestPayload(messages, systemPrompt, temperature, maxTokens); string responseText = await InvokeBedrockModelAsync(payload); return responseText; } private string RoleToString(Role role) { return role == Role.User ? "user" : "assistant"; } private object BuildRequestPayload( List<BedrockMessage> messages, string systemPrompt, float temperature, int maxTokens ) { return new { anthropic_version = "bedrock-2023-05-31", anthropic_beta = new[] { "computer-use-2024-10-22" }, max_tokens = maxTokens, temperature, stop_sequences = new string[0], system = systemPrompt, messages }; } private async UniTask<string> InvokeBedrockModelAsync(object payload) { string payloadJson = JsonConvert.SerializeObject(payload); using var client = new AmazonBedrockRuntimeClient(bedrockSettings.Credentials, bedrockSettings.Region); try { Debug.Log("Request JSON: " + payloadJson); var response = await client.InvokeModelAsync(new InvokeModelRequest { ModelId = bedrockSettings.MODEL_ID, Body = AWSSDKUtils.GenerateMemoryStreamFromString(payloadJson), ContentType = "application/json", Accept = "application/json" }); if (response.HttpStatusCode == System.Net.HttpStatusCode.OK) { using var reader = new StreamReader(response.Body); string responseJson = await reader.ReadToEndAsync(); Debug.Log("Response JSON: " + responseJson); BedrockResponse bedrockResponse = JsonConvert.DeserializeObject<BedrockResponse>(responseJson); if (bedrockResponse != null && bedrockResponse.content != null && bedrockResponse.content.Count > 0) { return bedrockResponse.content[0].text; } else { Debug.LogWarning("BedrockResponse or its content is null"); return string.Empty; } } else { Debug.LogError($"InvokeModelAsync failed. HTTP {(int)response.HttpStatusCode}"); return $"InvokeModelAsync failed. HTTP {(int)response.HttpStatusCode}"; } } catch (AmazonBedrockRuntimeException ex) { Debug.LogError("BedrockRuntimeError: " + ex.Message); return $"BedrockRuntimeError: {ex.Message}"; } } } ``` システムプロンプト(AIに前提として渡す前提、設定、指示)とユーザープロンプト(行わせたい作業の指示)は下記になります。 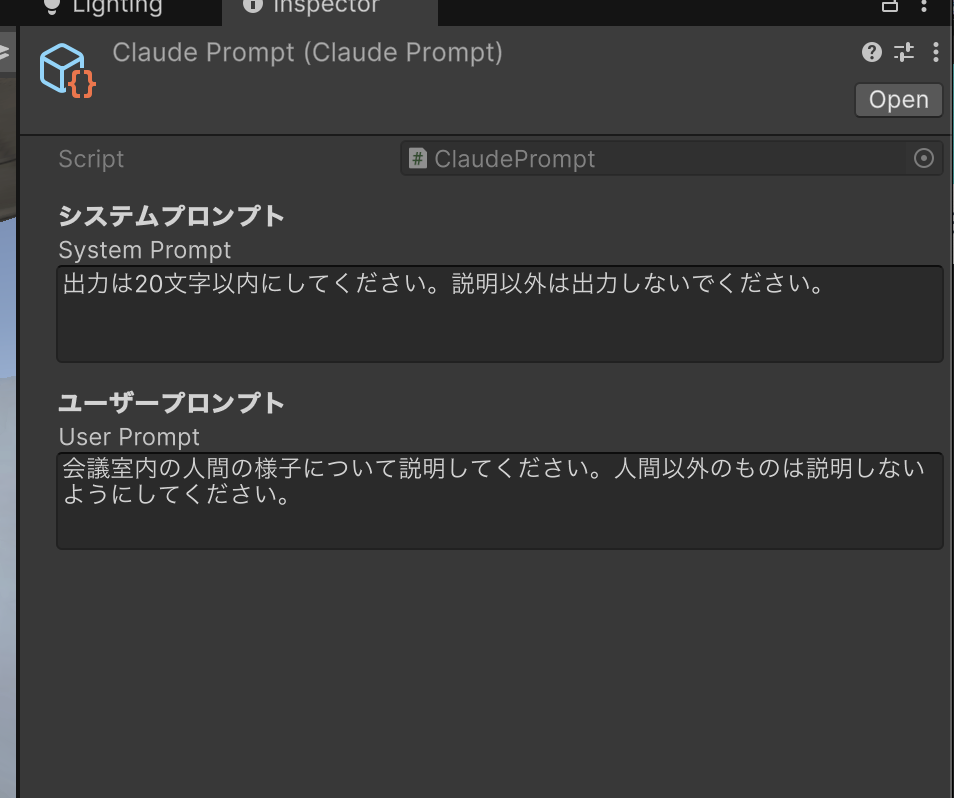
# 5.おわりに