 製作品
製作品  3201
3201M5StickCで作るインターホンの視覚通知『InterNotify』
概要
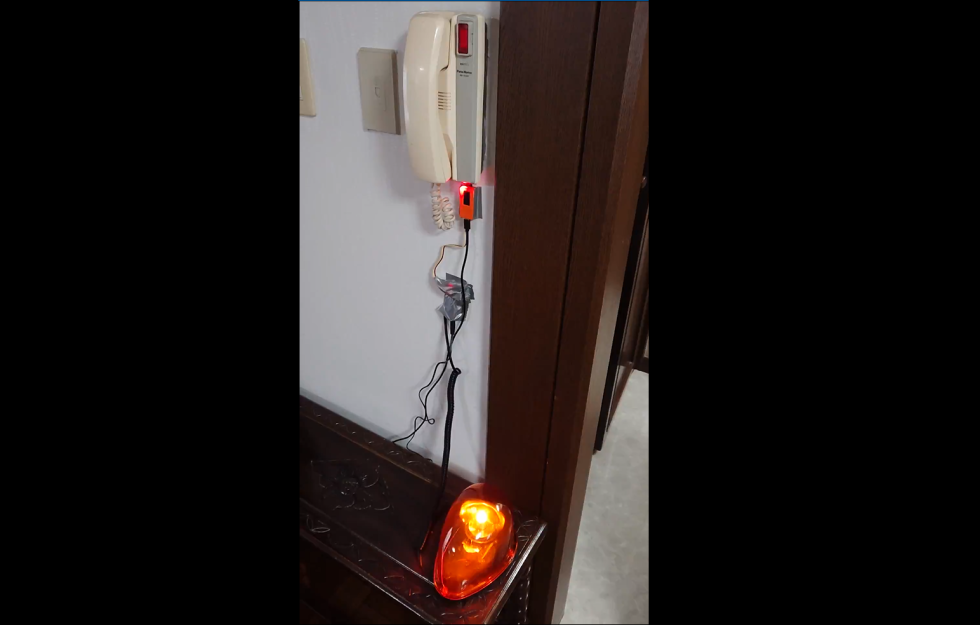
インターホンが鳴ったことが視覚的にわかるようパトランプが光るものを作りました。
設計・製作はすべて私の息子(中学1年生)が行ったものなのですが、文章やまとめることが苦手であるため内容を聞いて母親(私)が代理で書いています。耳の悪くなった息子の祖父(私の父)のために作りました。
インターホンが鳴ったときにパトランプが点灯し、M5StickCのAボタン(表面の大きなボタン)を押すとパトランプの点灯が止まります。また、ボタンが押されない場合は、1分でタイムアウトして止まります。
また、インターホンが鳴った記録はWiFi経由でGoogleスプレッドシートに記録します。ボタンを押して止めたか、タイムアウトしたかの記録も残るので、不在時に来客があったかどうか確かめることもできます。
前回いつインターホンが鳴ったかはM5StickCのBボタン(側面のボタン)を押して画面上に表示させて確認できるようにもしました。
材料
- M5StickC ×1
- パトランプ(回転灯)×1
- Groveリレーモジュール×1
- ACアダプター 12V 1A (2.1mmプラグ)×1
- 5.5mm x 2.1mm DC 12V電源アダプタコネクタネジ端子アダプタDCジャック変換プラグ(メス)
製作
パトランプ
今回シガーソケットタイプのパトランプを購入しました。
せっかくシガーソケットがついているのですがこの部分は取り外します。
インターホンへ接続
インターホンをあけると配線が見えます。仕様は各家庭で様々と思いますので、説明書をご確認ください。
今回対応したインターホンは30年くらい前の製品でありネットで検索しても情報がなかったのでテスターを使って自力で調べました。インターホンが鳴ると写真の3番と4番が通電することがわかったのでそれぞれにワイヤーを取り付けました。
※本改造は電気工事士の資格のいらない「軽微な工事」(電気工事士法施行令 第1条の4)であることを経済産業省に問い合わせて確認済みです。
配線
図のように配線しました。
M5StickCはG36と3Vに接続します。
プログラム
InterNotify.ino
#include <M5StickC.h>
#include <WiFi.h>
#include <HTTPClient.h>
#include <ArduinoJson.h>
#define INTER_TIMEOUT 60000 //milisecound
bool oldtriggered;
bool triggered;
long triggeredtime = 0;
const char* ssid = "XXXXXXXXXXXX"; // 接続先のSSIDを設定
const char* password = "XXXXXXXXXXXXXXX"; // 接続先のパスワードを設定
const char* published_url = "https://script.google.com/macros/s/XXXXXXXXXXXXXXXXXXXXXXXXXXXXXXXXX/exec"; // GoogleスプレッドシートのデプロイされたURLを設定
char json[100]; // postするjson
String responseString; // Http Getで戻った値
DynamicJsonDocument json_response(255);
boolean getRequest(String url) {
//HTTPClient code start
HTTPClient http;
boolean isSuccess = false;
// configure traged server and url
http.begin(url); //HTTP
Serial.print("[HTTP GET] begin...\n");
// start connection and send HTTP header
int httpCode = http.GET();
// httpCode will be negative on error
if (httpCode > 0) {
// HTTP header has been send and Server response header has been handled
Serial.printf("[HTTP GET] Return... code: %d\n", httpCode);
// file found at server
if (httpCode == HTTP_CODE_OK) {
// 200
Serial.println("[HTTP GET] Success!!");
responseString = http.getString();
Serial.println(responseString);
isSuccess = true;
}
} else {
Serial.printf("[HTTP POST] GET... failed, error: %s\n", http.errorToString(httpCode).c_str());
}
http.end();
return isSuccess;
}
boolean postRequest(String url, String json) {
//HTTPClient code start
HTTPClient http;
boolean isSuccess = false;
Serial.println(json);
Serial.print("[HTTP POST] begin...\n");
// configure traged server and url
http.begin(url); //HTTP
// Locationをとるためにこれを書かないといけない
const char* headerNames[] = { "Location"};
http.collectHeaders(headerNames, sizeof(headerNames) / sizeof(headerNames[0]));
Serial.print("[HTTP POST] ...\n");
// start connection and send HTTP header
int httpCode = http.POST(json);
// httpCode will be negative on error
if (httpCode > 0) {
// HTTP header has been send and Server response header has been handled
Serial.printf("[HTTP POST] Return... code: %d\n", httpCode);
// Serial.println("Allow");
// Serial.println(http.header("Allow"));
// file found at server
if (httpCode == HTTP_CODE_OK) {
// 200
Serial.println("[HTTP] Success!!");
String payload = http.getString();
Serial.println(payload);
isSuccess = true;
} else if (httpCode == HTTP_CODE_FOUND) {
// 302 … ページからreturnが戻った場合はリダイレクトとなりこのエラーコードとなる
String payload = http.getString();
Serial.println(payload);
// ヘッダのLocation(リダイレクト先URL)を取り出す
Serial.println("Location");
Serial.println(http.header("Location"));
// リダイレクト先にGetリクエスト
isSuccess = getRequest(http.header("Location"));
}
} else {
Serial.printf("[HTTP POST] GET... failed, error: %s\n", http.errorToString(httpCode).c_str());
}
http.end();
return isSuccess;
}
void setup() {
// put your setup code here, to run once:
M5.begin();
Serial.begin(115200);
M5.Lcd.setRotation(3); // 左を上にする
M5.Lcd.setTextSize(2); // 文字サイズを2にする
WiFi.begin(ssid, password); // Wi-Fi接続 (-Aは繋がらなかった)
while (WiFi.status() != WL_CONNECTED) { // Wi-Fi AP接続待ち
delay(500);
Serial.print(".");
}
Serial.print("WiFi connected\r\nIP address: ");
Serial.println(WiFi.localIP());
pinMode(36, INPUT);
pinMode(10, OUTPUT);
pinMode(33, OUTPUT);
M5.Axp.SetLDO2(false);
M5.Axp.SetLDO3(false);
}
void loop() {
// put your main code here, to run repeatedly:
M5.update();
if (analogRead(36) > 3500) {
digitalWrite(10, LOW);
digitalWrite(33, HIGH);
triggeredtime = millis();
triggered = true;
if (!oldtriggered) {
sprintf(json, "{\"id\": \"%s\",\"action\": \"%s\"}", "rec", "開始");
postRequest(published_url, json);
}
} else {
digitalWrite(10, HIGH);
}
if (M5.BtnA.wasPressed()) {
triggered = false;
}
if (M5.BtnB.wasPressed()) {
M5.Axp.SetLDO2(true);
M5.Axp.SetLDO3(true);
M5.Lcd.setCursor(0, 0, 1);
M5.Lcd.fillScreen(BLUE);
M5.Lcd.setTextColor(WHITE);
M5.Lcd.println("Inquiry...");
//make JSON
char json[100];
sprintf(json, "{\"id\": \"%s\",\"action\": \"\"}", "inquery"); // Inqueryモード
boolean isSuccess = postRequest(published_url , json);
M5.Lcd.setCursor(0, 0, 1);
M5.Lcd.fillScreen(BLUE);
if (isSuccess) {
// 成功時のM5画面表示
M5.Lcd.setTextColor(WHITE);
// 戻ってきたjsonを処理
deserializeJson(json_response, responseString.c_str());
const char* prevDate = json_response["previnfo_date"];
const char* prevTime = json_response["previnfo_time"];
M5.Lcd.println("previous date is");
M5.Lcd.println("");
M5.Lcd.println(prevDate);
M5.Lcd.println(prevTime);
delay(10000);
M5.Axp.SetLDO2(false);
M5.Axp.SetLDO3(false);
}
}
if (triggered) {
digitalWrite(33, HIGH);
} else {
digitalWrite(33, LOW);
if (oldtriggered) {
sprintf(json, "{\"id\": \"%s\",\"action\": \"%s\"}", "rec", "停止 (ボタンが押された)");
postRequest(published_url, json);
}
}
if (triggered && (millis() - triggeredtime) > INTER_TIMEOUT) {
triggered = false;
digitalWrite(33, LOW);
sprintf(json, "{\"id\": \"%s\",\"action\": \"%s\"}", "rec", "停止 (時間切れ)");
postRequest(published_url, json);
}
oldtriggered = triggered;
delay(100);
}Googleスプレッドシートのコード.gs
function doPost(e) {
var sheet = SpreadsheetApp.getActiveSpreadsheet().getSheetByName('シート1');
var params = JSON.parse(e.postData.getDataAsString());
var id = params.id;
var action = params.action;
if (id == "rec"){
// 記録モード(Aボタン押下)時のみデータをシートに追加
sheet.insertRows(2,1);
sheet.getRange(2, 1).setValue(new Date()); // 受信日時を記録
sheet.getRange(2, 2).setValue(action);
}
// 最新行の日時セル内容を取得してフォーマット
var targetDate = sheet.getRange(2,1).getValue();
var dateString = "";
var timeString = "";
if (targetDate != null){
dateString = Utilities.formatDate(targetDate,"JST","yyyy/MM/dd");
timeString = Utilities.formatDate(targetDate,"JST","HH:mm:ss");
}
// 戻り値を設定
var output = ContentService.createTextOutput();
output.setMimeType(ContentService.MimeType.JSON);
output.setContent(JSON.stringify({ previnfo_date : dateString , previnfo_time : timeString})); // 最新行の日時セル内容を取得して戻す
return output;
}実行結果
実行動画
Googleスプレッドシート
Googleスプレッドシートには以下のようなログが保存されます。
大変だったところ
Wi-Fiを使うとなぜかADC1なのにAnalog Readにノイズがのってしまい誤作動してしまいました(約0.2秒ごとに4098がReadされてしまう)が、原因を探り10m秒ごとにReadしていたのを100m秒ごとにReadさせることでノイズが発生しなくなることがわかったので対応しました。
投稿者の人気記事


-
siroitori0413
さんが
2021/01/12
に
編集
をしました。
(メッセージ: 初版)
-
siroitori0413
さんが
2021/01/12
に
編集
をしました。
-
siroitori0413
さんが
2021/01/15
に
編集
をしました。
-
siroitori0413
さんが
2021/12/20
に
編集
をしました。
ログインしてコメントを投稿する