Ketunorobio が 2022年07月27日00時18分31秒 に編集
コメント無し
本文の変更
Twitterを拝見していると、「メカナムホイールを使ったラジコン」が目に留まりまして、私も作ってみました。 今回はその時の制作過程を簡単にまとめようかと思います。 なお、ブラウザで操作出来る仕組みにしたかったので、動作の流れとしては次のようにしました。 スマホ(ブラウザ)→ラズパイ(Apache(html→js→CGI(python)))→GPIO→DCモータードライバ→DCモーター ※ラズベリーパイは、ApacheなどのWEBサーバーやCGIが使える状態にある事を前提に進めます。 それでは初めに、必要な部品をまとめておきます。 ## 使用部材 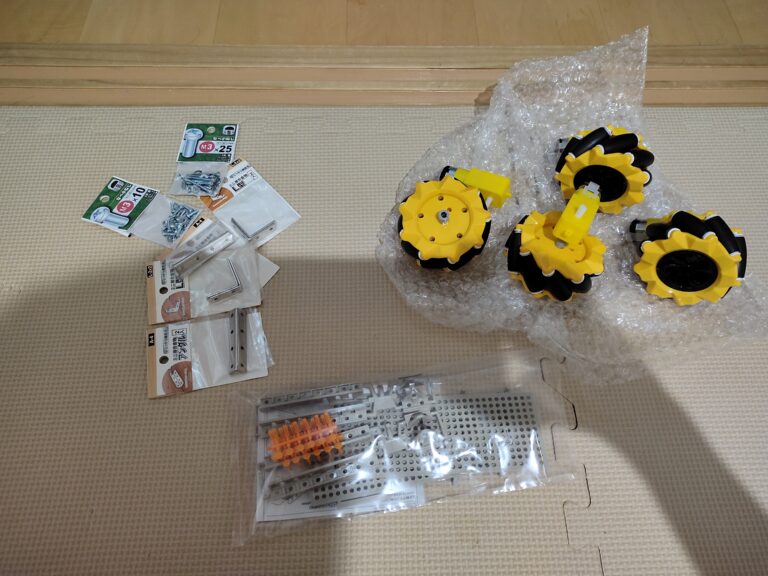 ・ユニバーサルプレート × 1枚 ・メカナムホイール(L,R) × 2セット ・TTモーター × 4つ ・ミニ接合金物アングルA-4 × 4枚 ・なべ小ねじM3 10mm × 8本(ミニ接合金物アングル固定用) ・なべ小ねじM3 25mm × 4本(TTモーター固定用) ・RaspberryPi3 × 1つ ・5V電源と6V電源(乾電池やモバイルバッテリーなど) ・DRV8833 DC モーター ドライバー × 2個 ・ジャンピングワイヤー × 多数 ・ブレッドボード(小) × 1個 続いて組み立てます。 ## 組立 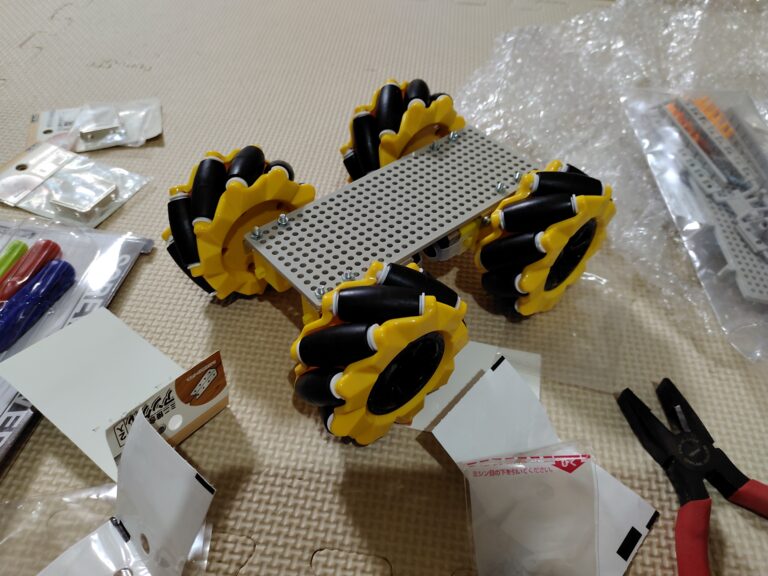 モーター、メカナムホイールを写真のように組み立てます。 注意点としましては、メカナムホイールはL,Rがあり、前輪はそのままですが、後輪はL,Rが逆になります。 あと、この時点でモーターに導線をはんだ付けしておくと楽でした。その後は仮で電池を繋いで、モーターの正転、後転を確認しておきます。(導線は8本、つまりGPIOを8つ使用するので、タイヤ毎の回転方向となる電圧の向きHIGH,Lowを把握しておく。) ## メカナムホイールの進行方向 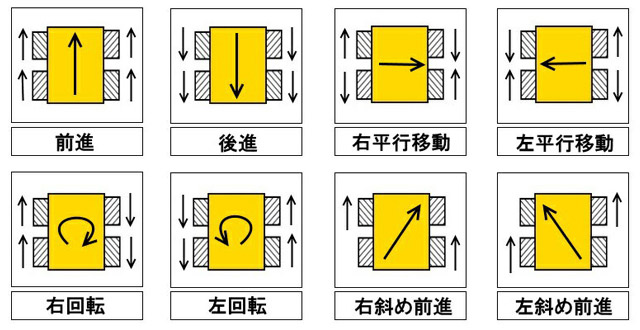 ※画像はrobotshop様より引用 4輪駆動で各タイヤに正転、後転、停止の制御をかければ、組み合わせに応じて図のような動作が再現できます。今回は全ての方向を網羅させたいので、図に左下と右下、停止を加えた「11パターン」の組み合わせを作ります。 各モーターに1~4の番号を割り振り、Aが+(正転)、Bが-(後転)、等を割り振って紙に記しておけば、後の配線やプログラム記述が楽になります。 ## 配線 今回しようするモータードライバは1つで2ch制御出来るので、前輪と後輪に分けて実装することにします。 配線は、 ラズパイ(GPIO)→モータードライバIN→モータードライバOUT→DCモーター となるので、モーターに接続した8本の導線はモータードライバのoutに、INにはラズパイのGPIOから8つ引っ張ってきます。 GPIOと各モーターの紐づけ(制御)については、先ほど控えた紙などを参考にすればいいと思います。 なお、電源についてはラズパイ(5V)とモータードライバ(6V程度)は別で取る事とします。 ## プログラム ### html ``` <!DOCTYPE html> <html lang="ja"> <head> <meta charset="utf-8"> <title>テスト</title> <meta name="viewport" content="width=device-width, initial-scale=1"> <link rel="stylesheet" href="style.css"> </head> <body> <div class="cam"> <img src="http://ローカルIP:8080/?action=stream"/> </div> <main> <ul> <div class="bc"> <div class="b"> <li id="leftforward" class="ledoff">↖</li> </div> <div class="a"> <li id="forward" class="ledoff">↑</li> </div> <div class="c"> <li id="rightforward" class="ledoff">↗</li> </div> </div> <div class="bc"> <div class="b"> <li id="left" class="ledoff">←</li> </div> <div class="a"> <div class="z"> <div class="y"> <li id="l" class="ledoff">↰</li> </div> <div class="x"> <li id="r" class="ledoff">↱</li> </div> </div> </div> <div class="c"> <li id="right" class="ledoff">→</li> </div> </div> <div class="bc"> <div class="b"> <li id="leftbackward" class="ledoff">↙</li> </div> <div class="a"> <li id="backward" class="ledoff">↓</li> </div> <div class="c"> <li id="rightbackward" class="ledoff">↘</li> </div> </div> </ul> </main> <script src="https://ajax.googleapis.com/ajax/libs/jquery/3.1.0/jquery.min.js"></script> <script src="main.js"></script> </body> </html> ``` モーターの操作画面となるhtmlになります。jsで非同期通信を使うので、Ajaxは必須です。 また、カメラ画像も載せたいので、カメラストリーミング(mjpgストリーマー)のリンクを貼っています。 ## css ``` * { margin: 0px; padding: 0px; } body { max-width: 600px; font-size: 25px; width: 100%; -webkit-touch-callout: none; -webkit-user-select: none; } img { width: 100%; } main { height: 40vh; background: skyblue; } ul { display: block; height: 40vh; list-style: none; padding-top: 10px; } .bc { display: flex; } .z { display: flex; } .a ,.bc, .d .y, .x { height: 12vh; } li { width: 90px; height: 90% ; margin-left: 5px; background: yellow; line-height: 80px; } #l, #r { width: 45px; margin-left: 5px; } .b { margin-left: auto; } .c { margin-right: auto; } ul li { text-align: center; } .a li, .b li, .c li, .d li { border: solid 1px; } .ledon { background: #f88888; } .n li { background: skyblue; } a:active { color: #ff2020; } ``` ## javascript ``` $(function(){ let motor = "STOP"; // 関数:モーターを動かすマクロ呼び出し function change_motor(typee) { motor = typee; if(typee == "FOWARD") { // 前進 //w().callMacro('FW'); console.log(typee); $.ajax({ url: 'cgi-bin/recieve.py', type: 'post', data: {name: 'hhhhh' } }).done(function(data){ console.log(data); }).fail(function(){ console.log('failed'); }); } else if(typee == "BACKWARD") { //w().callMacro('BK'); console.log(typee); $.ajax({ url: 'cgi-bin/recieve.py', type: 'post', data: {name: 'iiii' } }).done(function(data){ console.log(data); }).fail(function(){ console.log('failed'); }); } else if(typee == "RIGHT") { //w().callMacro('RT'); console.log(typee); $.ajax({ url: 'cgi-bin/recieve.py', type: 'post', data: {name: 'jjjj' } }).done(function(data){ console.log(data); }).fail(function(){ console.log('failed'); }); } else if(typee == "LEFT") { //w().callMacro('LT'); console.log(typee); $.ajax({ url: 'cgi-bin/recieve.py', type: 'post', data: {name: 'kkkk' } }).done(function(data){ console.log(data); }).fail(function(){ console.log('failed'); }); } else if(typee == "STOP") { //w().callMacro('ST'); console.log(typee); $.ajax({ url: 'cgi-bin/recieve.py', type: 'post', data: {name: 'ssss' } }).done(function(data){ console.log(data); }).fail(function(){ console.log('failed'); }); } else if(typee == "LEFTFORWARD") { //w().callMacro('ST'); console.log(typee); $.ajax({ url: 'cgi-bin/recieve.py', type: 'post', data: {name: 'qqqq' } }).done(function(data){ console.log(data); }).fail(function(){ console.log('failed'); }); } else if(typee == "RIGHTFORWARD") { //w().callMacro('ST'); console.log(typee); $.ajax({ url: 'cgi-bin/recieve.py', type: 'post', data: {name: 'mmmm' } }).done(function(data){ console.log(data); }).fail(function(){ console.log('failed'); }); } else if(typee == "L") { //w().callMacro('ST'); console.log(typee); $.ajax({ url: 'cgi-bin/recieve.py', type: 'post', data: {name: 'gggg' } }).done(function(data){ console.log(data); }).fail(function(){ console.log('failed'); }); } else if(typee == "R") { //w().callMacro('ST'); console.log(typee); $.ajax({ url: 'cgi-bin/recieve.py', type: 'post', data: {name: 'dddd' } }).done(function(data){ console.log(data); }).fail(function(){ console.log('failed'); }); } else if(typee == "LEFTBACKWARD") { //w().callMacro('ST'); console.log(typee); $.ajax({ url: 'cgi-bin/recieve.py', type: 'post', data: {name: 'oooo' } }).done(function(data){ console.log(data); }).fail(function(){ console.log('failed'); }); } else if(typee == "RIGHTBACKWARD") { //w().callMacro('ST'); console.log(typee); $.ajax({ url: 'cgi-bin/recieve.py', type: 'post', data: {name: 'zzzz' } }).done(function(data){ console.log(data); }).fail(function(){ console.log('failed'); }); } } // 「前進」ボタンが押されたときのイベント処理 $('#forward').bind('touchstart', function() { // 押されたとき if(motor == 'STOP') { $(this).addClass('ledon'); change_motor('FOWARD'); } }).bind('touchend', function() { // 離したとき $(this).removeClass('ledon'); change_motor('STOP'); }); // 「後退」ボタンが押されたときのイベント処理 $('#backward').bind('touchstart', function() { if(motor == "STOP") { $(this).addClass('ledon'); change_motor('BACKWARD'); } }).bind('touchend', function() { $(this).removeClass('ledon'); change_motor('STOP'); }); // 「右」ボタンが押されたときのイベント処理 $('#right').bind('touchstart', function() { if(motor == "STOP") { $(this).addClass('ledon'); change_motor('RIGHT'); } }).bind('touchend', function() { $(this).removeClass('ledon'); change_motor('STOP'); }); // 「左」ボタンが押されたときのイベント処理 $('#left').bind('touchstart', function() { if(motor == "STOP") { $(this).addClass('ledon'); change_motor('LEFT'); } }).bind('touchend', function() { $(this).removeClass('ledon'); change_motor('STOP'); }); $('#leftforward').bind('touchstart', function() { // 押されたとき if(motor == 'STOP') { $(this).addClass('ledon'); change_motor('LEFTFORWARD'); } }).bind('touchend', function() { // 離したとき $(this).removeClass('ledon'); change_motor('STOP'); }); $('#rightforward').bind('touchstart', function() { // 押されたとき if(motor == 'STOP') { $(this).addClass('ledon'); change_motor('RIGHTFORWARD'); } }).bind('touchend', function() { // 離したとき $(this).removeClass('ledon'); change_motor('STOP'); }); $('#leftbackward').bind('touchstart', function() { // 押されたとき if(motor == 'STOP') { $(this).addClass('ledon'); change_motor('LEFTBACKWARD'); } }).bind('touchend', function() { // 離したとき $(this).removeClass('ledon'); change_motor('STOP'); }); $('#rightbackward').bind('touchstart', function() { // 押されたとき if(motor == 'STOP') { $(this).addClass('ledon'); change_motor('RIGHTBACKWARD'); } }).bind('touchend', function() { // 離したとき $(this).removeClass('ledon'); change_motor('STOP'); }); $('#l').bind('touchstart', function() { // 押されたとき if(motor == 'STOP') { $(this).addClass('ledon'); change_motor('L'); } }).bind('touchend', function() { // 離したとき $(this).removeClass('ledon'); change_motor('STOP'); }); $('#r').bind('touchstart', function() { // 押されたとき if(motor == 'STOP') { $(this).addClass('ledon'); change_motor('R'); } }).bind('touchend', function() { // 離したとき $(this).removeClass('ledon'); change_motor('STOP'); }); }); ``` touchstart(ボタンを押している時),touchend(ボタンを離したとき)でpythonに値を渡す関数を呼び出しています。 押したボタンに応じて異なる値を、Ajaxを用いてpythonへpostしています。 ## python ``` #!/usr/bin/python3 # -*- coding: utf-8 -*- import cgi import RPi.GPIO as GPIO GPIO.setmode(GPIO.BCM) MOTOR_A1 = 5; MOTOR_A2 = 6; MOTOR_B1 = 13; MOTOR_B2 = 19; MOTOR_C1 = 26; MOTOR_C2 = 12; MOTOR_D1 = 16; MOTOR_D2 = 20; GPIO.setup(MOTOR_A1, GPIO.OUT) GPIO.setup(MOTOR_A2, GPIO.OUT) GPIO.setup(MOTOR_B1, GPIO.OUT) GPIO.setup(MOTOR_B2, GPIO.OUT) GPIO.setup(MOTOR_C1, GPIO.OUT) GPIO.setup(MOTOR_C2, GPIO.OUT) GPIO.setup(MOTOR_D1, GPIO.OUT) GPIO.setup(MOTOR_D2, GPIO.OUT) form = cgi.FieldStorage() recieve = form.getvalue('name') if recieve == 'hhhhh': GPIO.output(MOTOR_A1,GPIO.HIGH) GPIO.output(MOTOR_A2,GPIO.LOW) GPIO.output(MOTOR_B1,GPIO.HIGH) GPIO.output(MOTOR_B2,GPIO.LOW) GPIO.output(MOTOR_C1,GPIO.HIGH) GPIO.output(MOTOR_C2,GPIO.LOW) GPIO.output(MOTOR_D1,GPIO.HIGH) GPIO.output(MOTOR_D2,GPIO.LOW) print('Content-type: text/html\n') print(recieve) elif recieve == 'iiii': GPIO.output(MOTOR_A1,GPIO.LOW) GPIO.output(MOTOR_A2,GPIO.HIGH) GPIO.output(MOTOR_B1,GPIO.LOW) GPIO.output(MOTOR_B2,GPIO.HIGH) GPIO.output(MOTOR_C1,GPIO.LOW) GPIO.output(MOTOR_C2,GPIO.HIGH) GPIO.output(MOTOR_D1,GPIO.LOW) GPIO.output(MOTOR_D2,GPIO.HIGH) print('Content-type: text/html\n') print(recieve) elif recieve == 'jjjj': GPIO.output(MOTOR_A1,GPIO.HIGH) GPIO.output(MOTOR_A2,GPIO.LOW) GPIO.output(MOTOR_B1,GPIO.LOW) GPIO.output(MOTOR_B2,GPIO.HIGH) GPIO.output(MOTOR_C1,GPIO.LOW) GPIO.output(MOTOR_C2,GPIO.HIGH) GPIO.output(MOTOR_D1,GPIO.HIGH) GPIO.output(MOTOR_D2,GPIO.LOW) print('Content-type: text/html\n') print(recieve) elif recieve == 'kkkk': GPIO.output(MOTOR_A1,GPIO.LOW) GPIO.output(MOTOR_A2,GPIO.HIGH) GPIO.output(MOTOR_B1,GPIO.HIGH) GPIO.output(MOTOR_B2,GPIO.LOW) GPIO.output(MOTOR_C1,GPIO.HIGH) GPIO.output(MOTOR_C2,GPIO.LOW) GPIO.output(MOTOR_D1,GPIO.LOW) GPIO.output(MOTOR_D2,GPIO.HIGH) print('Content-type: text/html\n') print(recieve) elif recieve == 'ssss': print('Content-type: text/html\n') print(recieve) GPIO.output(MOTOR_A1,GPIO.LOW) GPIO.output(MOTOR_A2,GPIO.LOW) GPIO.output(MOTOR_B1,GPIO.LOW) GPIO.output(MOTOR_B2,GPIO.LOW) GPIO.output(MOTOR_C1,GPIO.LOW) GPIO.output(MOTOR_C2,GPIO.LOW) GPIO.output(MOTOR_D1,GPIO.LOW) GPIO.output(MOTOR_D2,GPIO.LOW) elif recieve == 'qqqq': print('Content-type: text/html\n') print(recieve) GPIO.output(MOTOR_A1,GPIO.LOW) GPIO.output(MOTOR_A2,GPIO.LOW) GPIO.output(MOTOR_B1,GPIO.HIGH) GPIO.output(MOTOR_B2,GPIO.LOW) GPIO.output(MOTOR_C1,GPIO.HIGH) GPIO.output(MOTOR_C2,GPIO.LOW) GPIO.output(MOTOR_D1,GPIO.LOW) GPIO.output(MOTOR_D2,GPIO.LOW) elif recieve == 'mmmm': print('Content-type: text/html\n') print(recieve) GPIO.output(MOTOR_A1,GPIO.HIGH) GPIO.output(MOTOR_A2,GPIO.LOW) GPIO.output(MOTOR_B1,GPIO.LOW) GPIO.output(MOTOR_B2,GPIO.LOW) GPIO.output(MOTOR_C1,GPIO.LOW) GPIO.output(MOTOR_C2,GPIO.LOW) GPIO.output(MOTOR_D1,GPIO.HIGH) GPIO.output(MOTOR_D2,GPIO.LOW) elif recieve == 'gggg': print('Content-type: text/html\n') print(recieve) GPIO.output(MOTOR_A1,GPIO.LOW) GPIO.output(MOTOR_A2,GPIO.HIGH) GPIO.output(MOTOR_B1,GPIO.HIGH) GPIO.output(MOTOR_B2,GPIO.LOW) GPIO.output(MOTOR_C1,GPIO.LOW) GPIO.output(MOTOR_C2,GPIO.HIGH) GPIO.output(MOTOR_D1,GPIO.HIGH) GPIO.output(MOTOR_D2,GPIO.LOW) elif recieve == 'dddd': print('Content-type: text/html\n') print(recieve) GPIO.output(MOTOR_A1,GPIO.HIGH) GPIO.output(MOTOR_A2,GPIO.LOW) GPIO.output(MOTOR_B1,GPIO.LOW) GPIO.output(MOTOR_B2,GPIO.HIGH) GPIO.output(MOTOR_C1,GPIO.HIGH) GPIO.output(MOTOR_C2,GPIO.LOW) GPIO.output(MOTOR_D1,GPIO.LOW) GPIO.output(MOTOR_D2,GPIO.HIGH) elif recieve == 'oooo': print('Content-type: text/html\n') print(recieve) GPIO.output(MOTOR_A1,GPIO.LOW) GPIO.output(MOTOR_A2,GPIO.HIGH) GPIO.output(MOTOR_B1,GPIO.LOW) GPIO.output(MOTOR_B2,GPIO.LOW) GPIO.output(MOTOR_C1,GPIO.LOW) GPIO.output(MOTOR_C2,GPIO.LOW) GPIO.output(MOTOR_D1,GPIO.LOW) GPIO.output(MOTOR_D2,GPIO.HIGH) elif recieve == 'zzzz': print('Content-type: text/html\n') print(recieve) GPIO.output(MOTOR_A1,GPIO.LOW) GPIO.output(MOTOR_A2,GPIO.LOW) GPIO.output(MOTOR_B1,GPIO.LOW) GPIO.output(MOTOR_B2,GPIO.HIGH) GPIO.output(MOTOR_C1,GPIO.LOW) GPIO.output(MOTOR_C2,GPIO.HIGH) GPIO.output(MOTOR_D1,GPIO.LOW) GPIO.output(MOTOR_D2,GPIO.LOW) ``` html,css,jsは同じ階層に置き、pythonはcgiスクリプトなので、同じ階層にcgi-binディレクトリを作成し、その配下にpythonファイルを作成します。 内容は至ってシンプルで、jsからpostされた値を受け取り、その値によってGPIOの出力HIGH,LOWを変化させています。 それでは、これで完成ですので、動作確認をしてみます。 ## 完成 @[twitter](https://twitter.com/ketunorobio/status/1449196401573851136?ref_src=twsrc%5Etfw%7Ctwcamp%5Etweetembed%7Ctwterm%5E1449196401573851136%7Ctwgr%5E%7Ctwcon%5Es1_&ref_url=https%3A%2F%2Fdenkenmusic.com%2Fraspberrypie381a7e4bd9ce3828be383a1e382abe3838ae383a0e3839be382a4e383bce383abe383a9e382b8e382b3e383b3e382abe383bc%2F)
ついでにM5StickCの加速度センサーを使って制御もしてみました。 @[twitter](https://twitter.com/ketunorobio/status/1488301696237277185)