sako_DIY が 2021年02月12日00時47分34秒 に編集
初版
タイトルの変更
ESP32を用いたお風呂満水通知IoT
タグの変更
Arduino
ESP32
M5Atom
Googlehome
IoT
秋葉原2021
メイン画像の変更
本文の変更
# 概要 筆者の家は新築アパートでありながら、風呂に自動給湯機能はない。 蛇口の制御は厳しいが、満水を知らせるデバイスなら作れそうということで、 お風呂の満水通知を行うIoTデバイスを作成した。 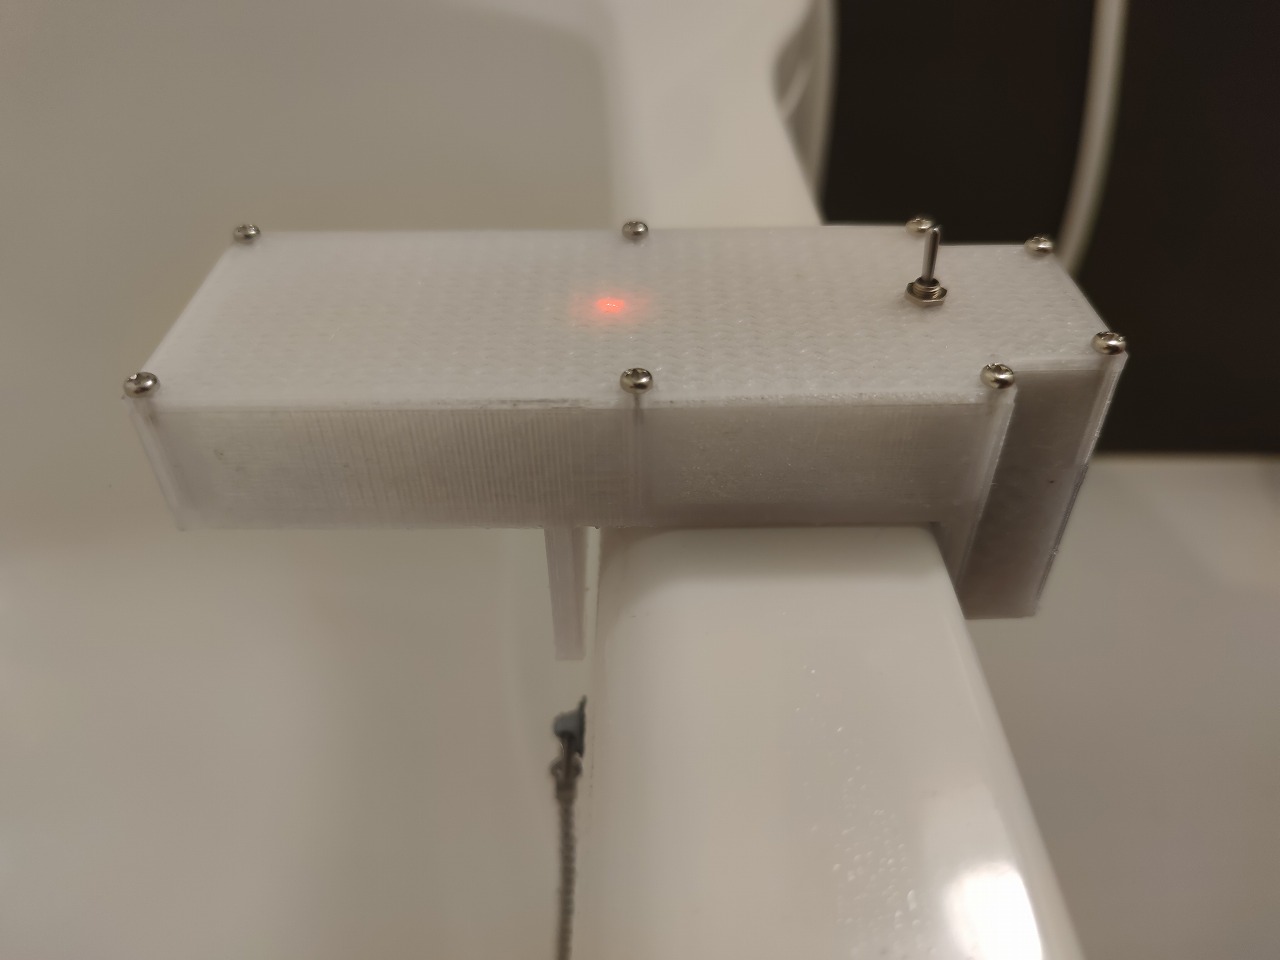 仕組みは単純で、超音波距離センサーで水面までの距離を測定、 事前に設定したしきい値以下になったときにgooglehomeから通知する。 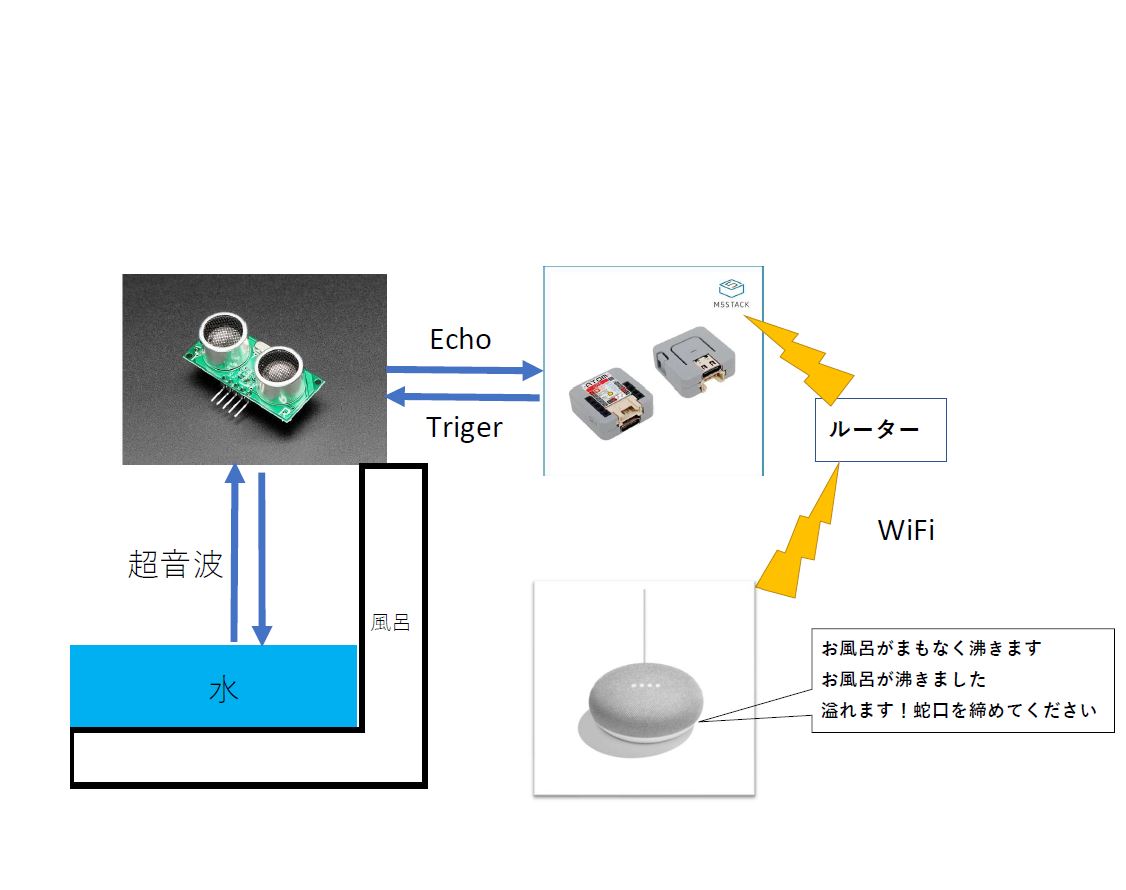 # 材料 - M5Atom Lite [https://www.switch-science.com/catalog/6262/](https://www.switch-science.com/catalog/6262/)(スイッチサイエンス) >M5Stackシリーズの中で最もコンパクトな開発モジュールで、サイズはわずか24 x 24 mmです。。 メインコントローラとして、ESP32-PICO-D4チップを搭載しているので、Wi-FiとBluetooth、4 MBの内蔵SPIフラッシュメモリを利用できます。 >本製品は、赤外線LED、 RGB LED、ボタン、Grove互換コネクタを備えています。 さらに、六つのGPIOを介してセンサやモーターなどに接続できます。 - 超音波距離センサー(HC-SR04互換) [https://eleshop.jp/shop/g/gJ9K122/](https://eleshop.jp/shop/g/gJ9K122/)(共立エレショップ) >標準的な超音波距離センサモジュールです。 超音波の反射を検出することで、前方にある物体までの距離を測定します。電源は3V、5Vどちらでも使用可能です。 測定距離は2~450cmです。 - 電池ボックス(006P用) [https://eleshop.jp/shop/g/g26B451/](https://eleshop.jp/shop/g/g26B451/)(共立エレショップ) - 5Vレギュレータ [https://akizukidenshi.com/catalog/g/gM-11188/](https://akizukidenshi.com/catalog/g/gM-11188/)(秋月電子通商) - Googlehome mini ※旧型 下記リンクは新型のNestMini [https://store.google.com/jp/product/google_nest_mini](https://store.google.com/jp/product/google_nest_mini)(Google) - その他小物 ピンヘッダ ユニバーサル基板 電源スイッチ等 # ハード 回路は至って単純でM5AtomLiteに電池より作成した5Vを供給 超音波距離センサーをIOピンに接続 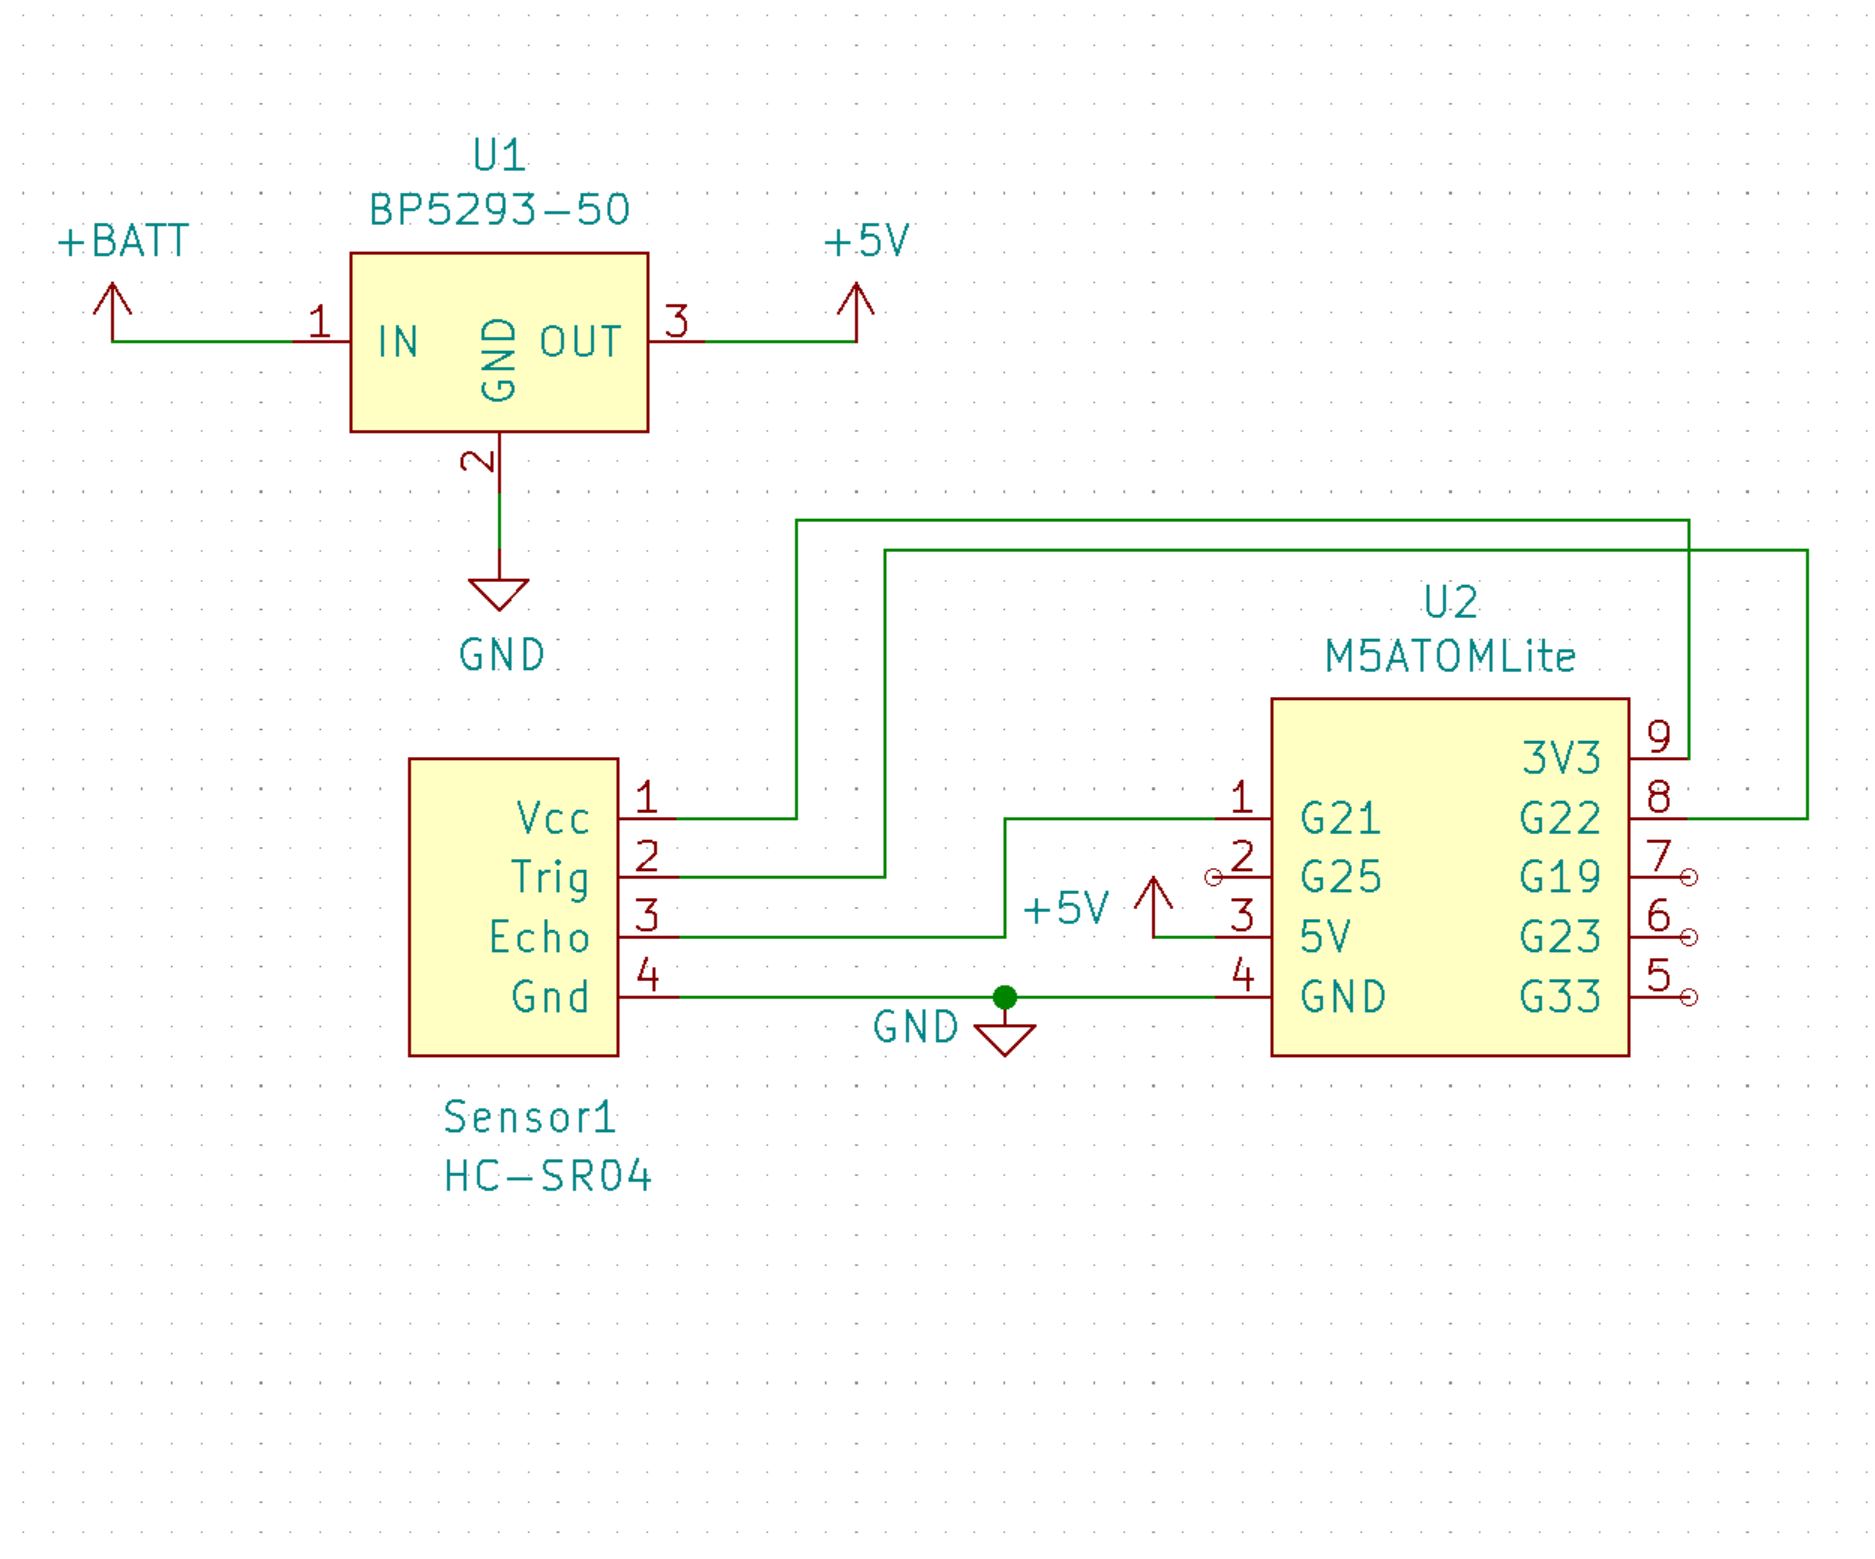 筐体は3DCADで設計し3Dプリンターにて出力した。 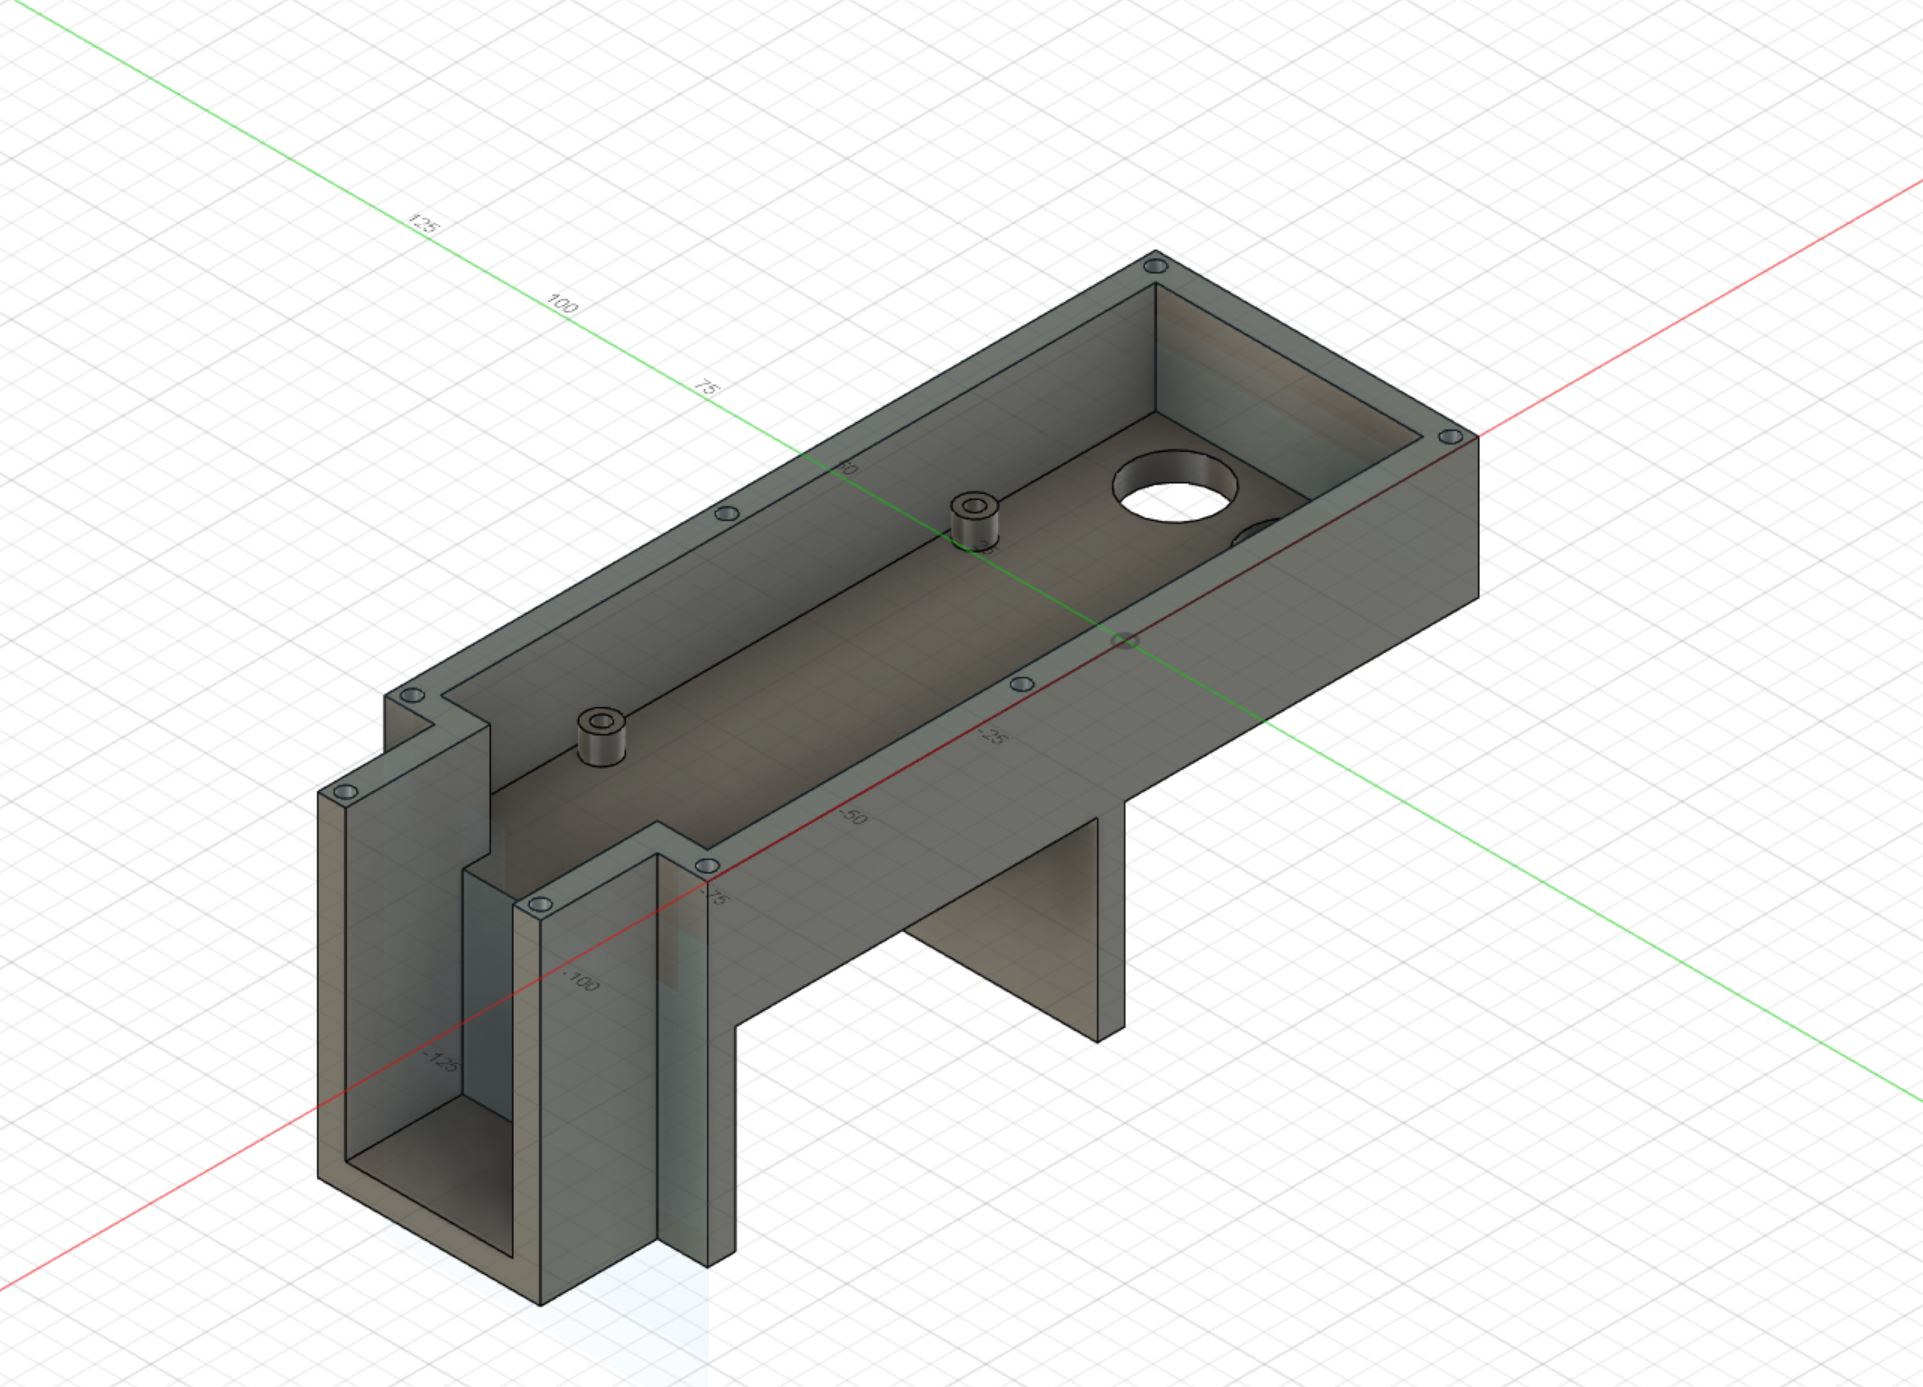 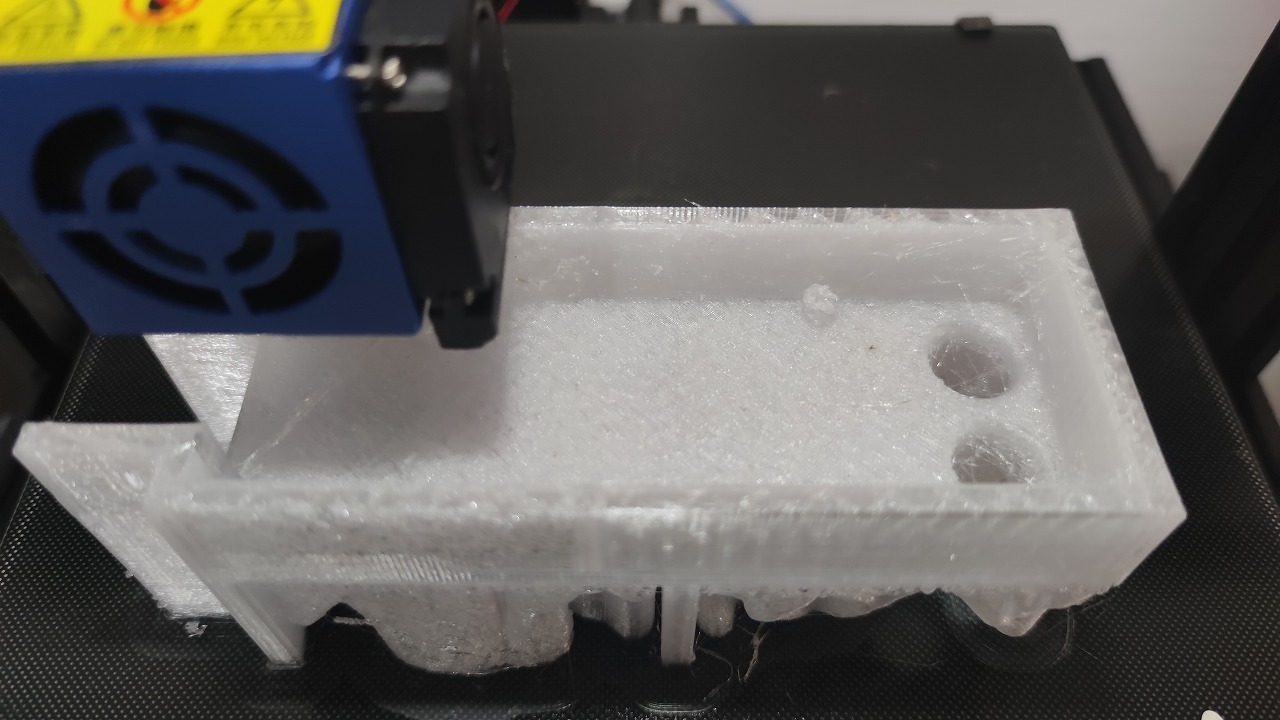 組み立てるとこんな感じになりました。 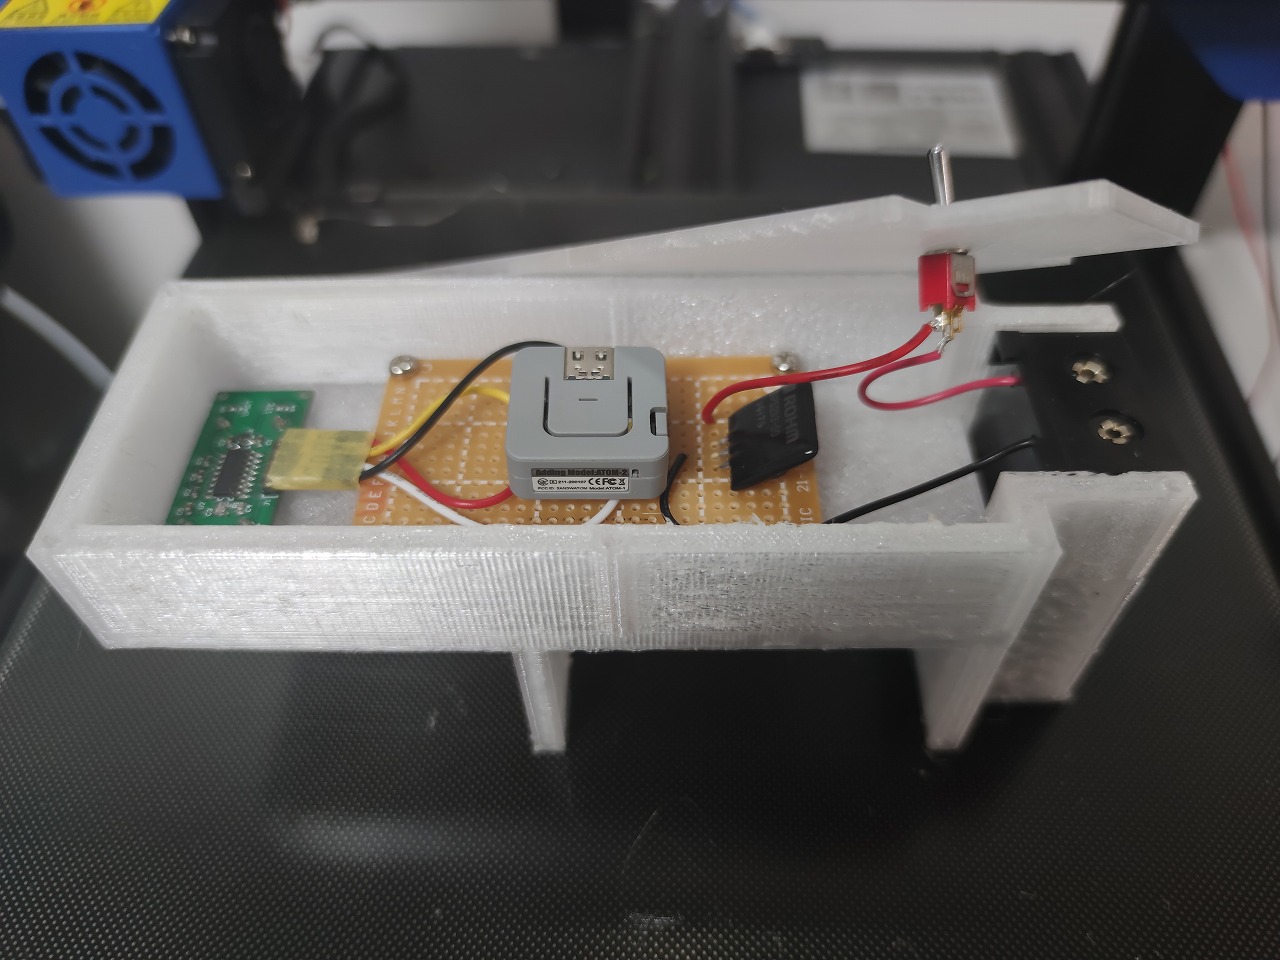 # ソフト 重要な部分のみ解説しコード全体は最後に掲載する。 - まずは距離の測定のコード ```arduino:sendTrigger() #define Trigger_Pin 22 #define Echo_Pin 21 void setup(){ pinMode(Trigger_Pin, OUTPUT); //超音波センサーのトリガーに接続したピンを出力 pinMode(Echo_Pin, INPUT); //超音波センサーのエコーに接続したピンを入力 digitalWrite(Trigger_Pin, LOW); } //距離測定関数 int sendTrigger() { digitalWrite(Trigger_Pin, HIGH); delayMicroseconds(10); digitalWrite(Trigger_Pin, LOW); while (!digitalRead(Echo_Pin)) { } unsigned long t1 = micros(); while (digitalRead(Echo_Pin)) { } unsigned long t2 = micros(); unsigned long t = t2 - t1; return 340 * t / 20000; } ``` HC-SR04のトリガーピンを一定時間Highにすることで、パルスを送信 送信完了してから反射したパルスが帰ってくるまでの時間は、エコーピンがHighになるためその時間を計測 その時間に音速(340[m/s]=340*100/1000000[cm/μs]=340/10000[cm/μs])をかけて2で割れば距離となります。 - 次にgoogle-homeでの通知 ```arduino:google-home-notifier #include <esp8266-google-home-notifier.h> const char displayName[] = "リビングルーム"; //googlehomeの名前 GoogleHomeNotifier ghn; void setup(){ // google-homeのサーチ if (ghn.device(displayName, "ja") != true) { Serial.println(ghn.getLastError()); return; } Serial.println("found Google Home"); } // 通知用関数 void notify_messege(String filename) { Serial.println("playfile file:" + filename); if ((WiFi.status() == WL_CONNECTED)) { String mp3url = "http://" + WiFi.localIP().toString() + "/" + filename; Serial.println("GoogleHomeNotifier.play() start"); if (ghn.play(mp3url.c_str()) != true) //GoogleHomeNotifierに通知ファイルのURLを渡す { Serial.print("GoogleHomeNotifier.play() error:"); Serial.println(ghn.getLastError()); return; } } else { Serial.println("Error in WiFi connection"); } } ``` こちらは先駆者によって作成されたESP32及びESP8266においてgooglehomeを喋らせるためのライブラリを使用させていただいた。 [ESP8266 から Google Home に喋らせるライブラリ](https://qiita.com/horihiro/items/4ab0edf415916a2cd542)(@horihiro様) 詳しくはリンク先を参照していただくとして、このライブラリではgoogle-ttsを使用してテキストからmp3ファイルを作成し、 そのURLを投げることで、googlehomeを喋らせるようになっているようです。 今回のデバイスは、通知パターンは少ないのでgoogle-ttsを使用せずに音声ファイルを事前に用意し、SPIFFS領域に書き込んでおくこととした。 音声ファイルは、HOYA株式会社様の[VoiceText Web API](https://cloud.voicetext.jp/webapi)を使用し3パターンのmp3を作成, 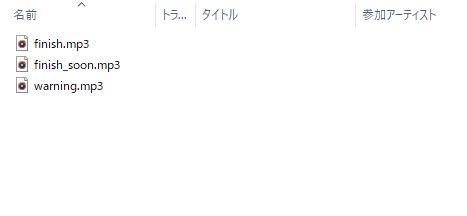 こちらを使用して、SPISFFS領域に書き込んでおいた。 [arduino-esp8266fs-plugin](https://github.com/esp8266/arduino-esp8266fs-plugin) - サーバーコード ```arduino:WebServer #include <WiFi.h> #include <WebServer.h> #include <FS.h> #include <SPIFFS.h> const String fileList[3] = {"finish_soon.mp3", "finish.mp3", "warning.mp3"}; void setup(){ // WebServer起動 通知音声ファイルを配置 for (int i = 0; i < 3; i++) { server.on("/" + fileList[i], handlePlay); } server.begin(); } void loop(){ server.handleClient(); } //音声ファイルにアクセスがあったら再生する void handlePlay() { String path = server.uri(); SPIFFS.begin(); if (SPIFFS.exists(path)) { Serial.println("handlePlay: sending " + path); File file = SPIFFS.open(path, "r"); server.streamFile(file, "audio/mp3"); file.close(); } else { server.send(200, "text/html", "<meta charset=\"utf-8\"><h1>text2speech</h1><br>SPIFFS file not found:" + path); } SPIFFS.end(); } ``` 先程のgoogle-home-notifierライブラリはmp3ファイルではなく再生用URLを渡す必要があるので、WebServerライブラリで鯖立て SPIFFS領域の音声ファイルを配置しておく。 # 完成 動作の様子は以下の動画をご覧ください @[youtube](https://youtu.be/20Tso1sb8R8) # 全体コード ```arduino:コード全体 #include <M5Atom.h> #include <WiFi.h> #include <WebServer.h> #include <FS.h> #include <SPIFFS.h> #include <esp8266-google-home-notifier.h> #define Trigger_Pin 22 #define Echo_Pin 21 int Threshold[3] = {20, 10, 5}; //各通知しきい値(ほぼ満水、満水、限界)単位:cm int Stage = 0; //水面までの距離ステージ const char *ssid = "SSID"; //WifiのSSID const char *password = "Password"; //Wifiのパスワード unsigned long crr = 0; //起動後の経過時間 unsigned long prev = 0; //前回距離測定時間 unsigned long interval = 5000; //測定インターバル 単位:ms const char displayName[] = "リビングルーム"; // GoogleHomeの名前 const String fileList[3] = {"finish_soon.mp3", "finish.mp3", "warning.mp3"}; //通知音声ファイルリスト GoogleHomeNotifier ghn; WebServer server(80); void setup() { //各ピン等初期設定 M5.begin(true, false, true); //(シリアル通信,I2C,LED) pinMode(Trigger_Pin, OUTPUT); //超音波センサーのトリガーに接続したピンを出力 pinMode(Echo_Pin, INPUT); //超音波センサーのエコーに接続したピンを入力 digitalWrite(Trigger_Pin, LOW); delay(10); M5.dis.drawpix(0, 0x00FF00);//LEDを赤へ(初期設定開始) //Wifi接続 Serial.println(""); Serial.print("connecting to Wi-Fi"); WiFi.mode(WIFI_STA); WiFi.begin(ssid, password); int n; while ((n = WiFi.status()) != WL_CONNECTED) { delay(1000); Serial.print("."); if (n == WL_NO_SSID_AVAIL || n == WL_CONNECT_FAILED) { WiFi.reconnect(); } } Serial.println(""); Serial.println("connected."); Serial.println("IP address: " + WiFi.localIP().toString()); // WebServer起動 通知音声ファイルを配置 for (int i = 0; i < 3; i++) { server.on("/" + fileList[i], handlePlay); } server.begin(); // google-homeのサーチ Serial.println("connecting to Google Home..."); if (ghn.device(displayName, "ja") != true) { Serial.println(ghn.getLastError()); return; } Serial.println("found Google Home"); M5.dis.drawpix(0, 0x0000FF);//LEDを青へ(初期設定完了) } void loop() { server.handleClient(); curr = millis(); //起動時間取得 if ((curr - prev) >= interval) { //前回測定時間よりinterval経過しているか if (sendTrigger() <= Threshold[Stage]) {//距離を測定、しきい値と比較 notify_messege(fileList[Stage]); //しきい値以下なら通知 if (Stage < 2) Stage++; //ステージをすすめる } else { interval = 10000; //最終ステージのみインターバルを10秒に設定 } prev = millis(); //測定時間更新 } } //音声ファイルにアクセスがあればその音声ファイルを再生する void handlePlay() { String path = server.uri(); SPIFFS.begin(); if (SPIFFS.exists(path)) { Serial.println("handlePlay: sending " + path); File file = SPIFFS.open(path, "r"); server.streamFile(file, "audio/mp3"); file.close(); } else { server.send(200, "text/html", "<meta charset=\"utf-8\"><h1>text2speech</h1><br>SPIFFS file not found:" + path); } SPIFFS.end(); } // 通知用関数 void notify_messege(String filename) { Serial.println("playfile file:" + filename); if ((WiFi.status() == WL_CONNECTED)) { String mp3url = "http://" + WiFi.localIP().toString() + "/" + filename; Serial.println("GoogleHomeNotifier.play() start"); if (ghn.play(mp3url.c_str()) != true) //GoogleHomeNotifierに通知ファイルのURLを渡す { Serial.print("GoogleHomeNotifier.play() error:"); Serial.println(ghn.getLastError()); return; } } else { Serial.println("Error in WiFi connection"); } } //距離測定関数 int sendTrigger() { digitalWrite(Trigger_Pin, HIGH); delayMicroseconds(10); digitalWrite(Trigger_Pin, LOW); while (!digitalRead(Echo_Pin)) { } unsigned long t1 = micros(); while (digitalRead(Echo_Pin)) { } unsigned long t2 = micros(); unsigned long t = t2 - t1; Serial.print(340 * t / 20000); Serial.println("cm"); return 340 * t / 20000; } ```