Koji が 2021年02月28日14時54分03秒 に編集
初版
タイトルの変更
室内から今の外気を観測。爆弾低気圧の記録もとれる
タグの変更
ESP32
BME280
Ambient
秋葉原2021
メイン画像の変更
記事種類の変更
製作品
本文の変更
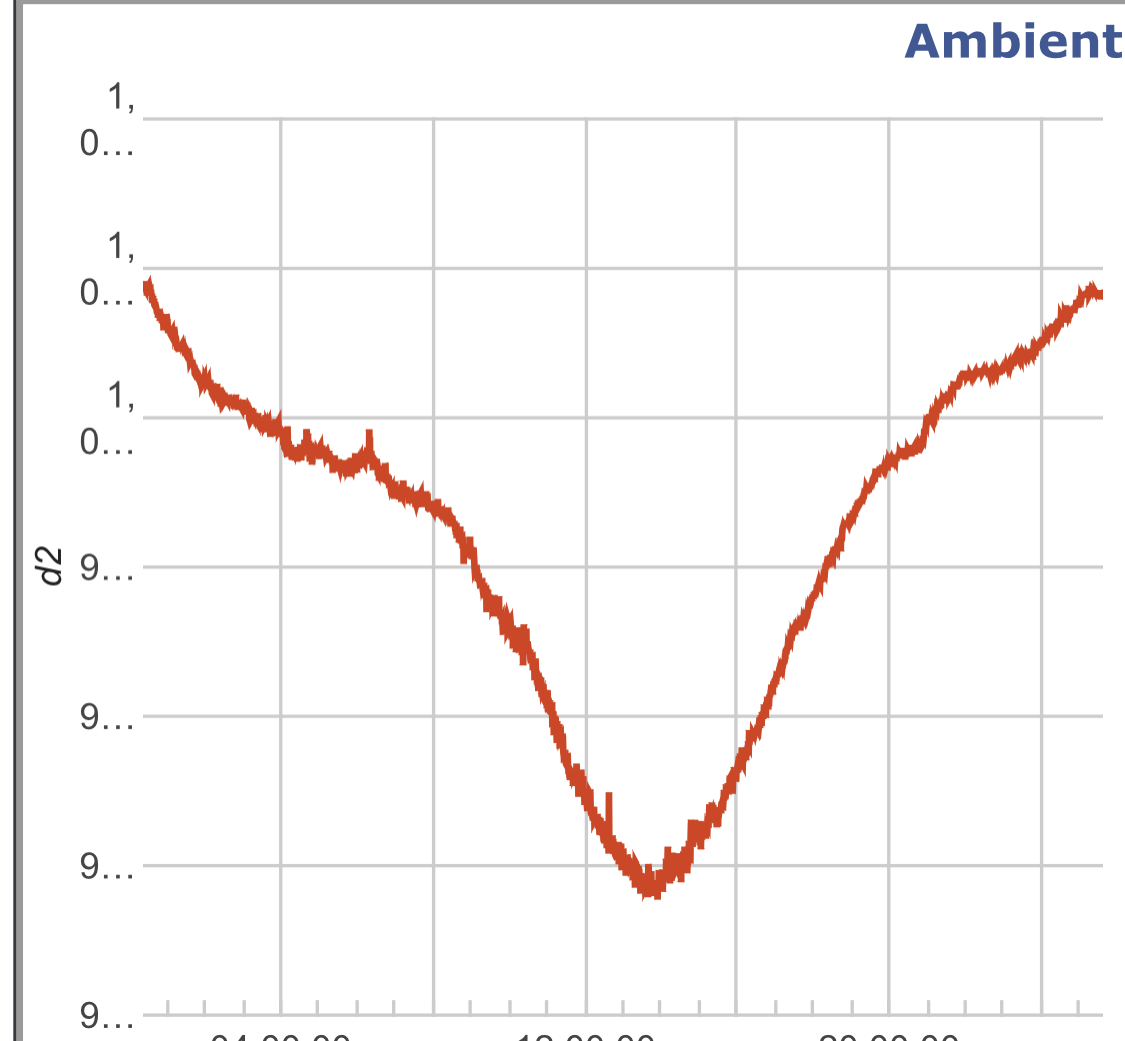
夏休みの宿題で天気の記録をつけるのが面倒。朝外に出て服を変える。そんなお悩みの解消のためにベランダに百葉箱を設置してスマホから確認できるようにしてみました。 使用部材 ESP32 BME280 プラダン(百葉箱) 工作 プラダンを加工して風は通して直射日光がセンサと箱内部の旧期に当たらないように工夫。 ベランダには電源があるためバッテリなどの心配はなし。 室内からのWifiが届いているのでそのままinternetに出てAmbientへデータを送信する。 ```arduino:スケッチ #include <WiFi.h> #include <Wire.h> #include <SPI.h> #include <Adafruit_Sensor.h> #include <Adafruit_BME280.h> #include "Ambient.h" #define BME_SCK 13 #define BME_MISO 12 #define BME_MOSI 11 #define BME_CS 10 #define SEALEVELPRESSURE_HPA (1013.25) const char* ssid = "xxxxx";//Wifi SSID const char* password = "xxxxxx";//Wifi Password unsigned int channelId = xxxx;//Ambient Channel const char* writeKey = "xxxxxx"/Ambient key; #define PERIOD 30 Ambient ambient; WiFiClient client; Adafruit_BME280 bme; // I2C unsigned long delayTime; void setup() { Serial.begin(115200); delay(10); while(!Serial); // time to get serial running Serial.println(F("BME280 test")); // We start by connecting to a WiFi network Serial.println(); Serial.println(); Serial.print("Connecting to "); Serial.println(ssid); WiFi.begin(ssid, password); while (WiFi.status() != WL_CONNECTED) { delay(500); Serial.print("."); } Serial.println(""); Serial.println("WiFi connected"); Serial.println("IP address: "); Serial.println(WiFi.localIP()); ambient.begin(channelId, writeKey, &client); unsigned status; // default settings // (you can also pass in a Wire library object like &Wire2) status = bme.begin(); if (!status) { Serial.println("Could not find a valid BME280 sensor, check wiring, address, sensor ID!"); Serial.print("SensorID was: 0x"); Serial.println(bme.sensorID(),16); Serial.print(" ID of 0xFF probably means a bad address, a BMP 180 or BMP 085\n"); Serial.print(" ID of 0x56-0x58 represents a BMP 280,\n"); Serial.print(" ID of 0x60 represents a BME 280.\n"); Serial.print(" ID of 0x61 represents a BME 680.\n"); while (1); } Serial.println("-- Default Test --"); // delayTime = 1000; Serial.println(); } void loop() { printValues(); delay(PERIOD * 1000); } void printValues() { float temperature; float pressure; float humidity; temperature = bme.readTemperature(); Serial.print("Temperature = "); Serial.print(temperature); Serial.println(" *C"); ambient.set(1, temperature); pressure = bme.readPressure() / 100.0F; Serial.print("Pressure = "); Serial.print(pressure); Serial.println(" hPa"); ambient.set(2, pressure); humidity = bme.readHumidity(); Serial.print("Humidity = "); Serial.print(humidity); Serial.println(" %"); ambient.set(3, humidity); Serial.println(); ambient.send(); } ``` 配線はごくシンプルに、SDAを21にSDLを22に接続するだけ。 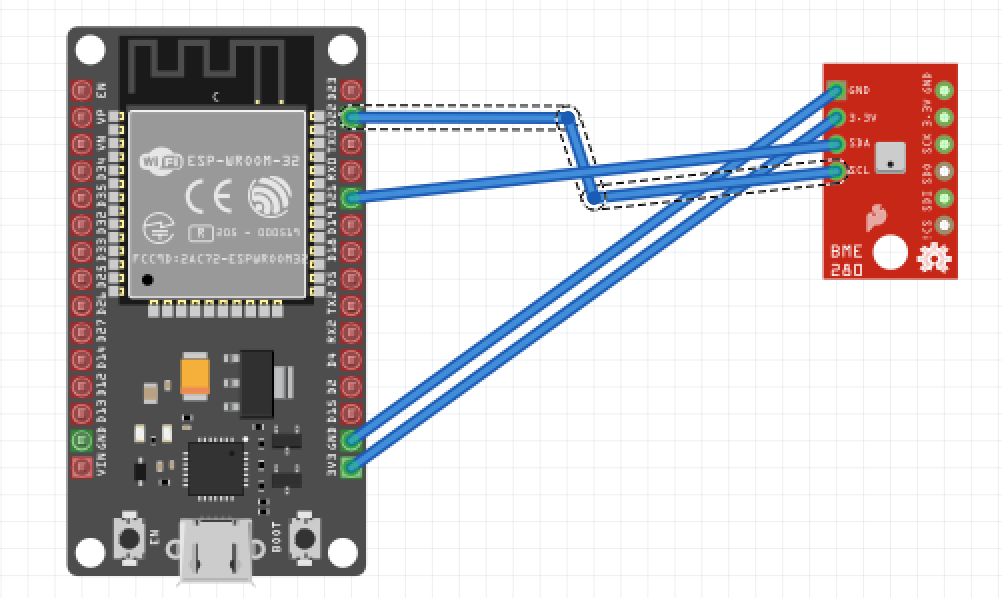 測定結果。難しいことをしなくてもAmbientならグラフを書いてくれるので変化が簡単に見えるようになりました。 下の図は低気圧が通過した時の経時的変化です。