higedaruma が 2025年01月31日18時49分08秒 に編集
初版
タイトルの変更
ワンボタンでマリオを遊ぶ(カメラ型コントローラー)
タグの変更
Nintendo_Switch
コントローラー
記事種類の変更
製作品
ライセンスの変更
(MIT) The MIT License
本文の変更
# はじめに 以前**スーパーマリオブラザーズ**をワンボタンで遊べる[コントローラ](https://elchika.com/article/3e7d745d-acc3-41ff-9e11-7910e5dd6c85/)を作りました。 今回はさらに拡張して、異なる体験ができるコントローラーを作成しました。 ### 操作方法について カメラでマリオを撮影すると、マリオが動き出します。 ※マリオが一定時間に撮影されない場合は、**Bダッシュ** の状態で動き出します。 シャッターボタンを押すと、マリオがジャンプ。 ダイヤルを回すと、(デジタル)ズームするので撮影しやすくなるかも? 全く動けなくなる場合もあることから、すべてのダイアルスイッチとシャッターボタンを同時に押すとゲームをリセットします。 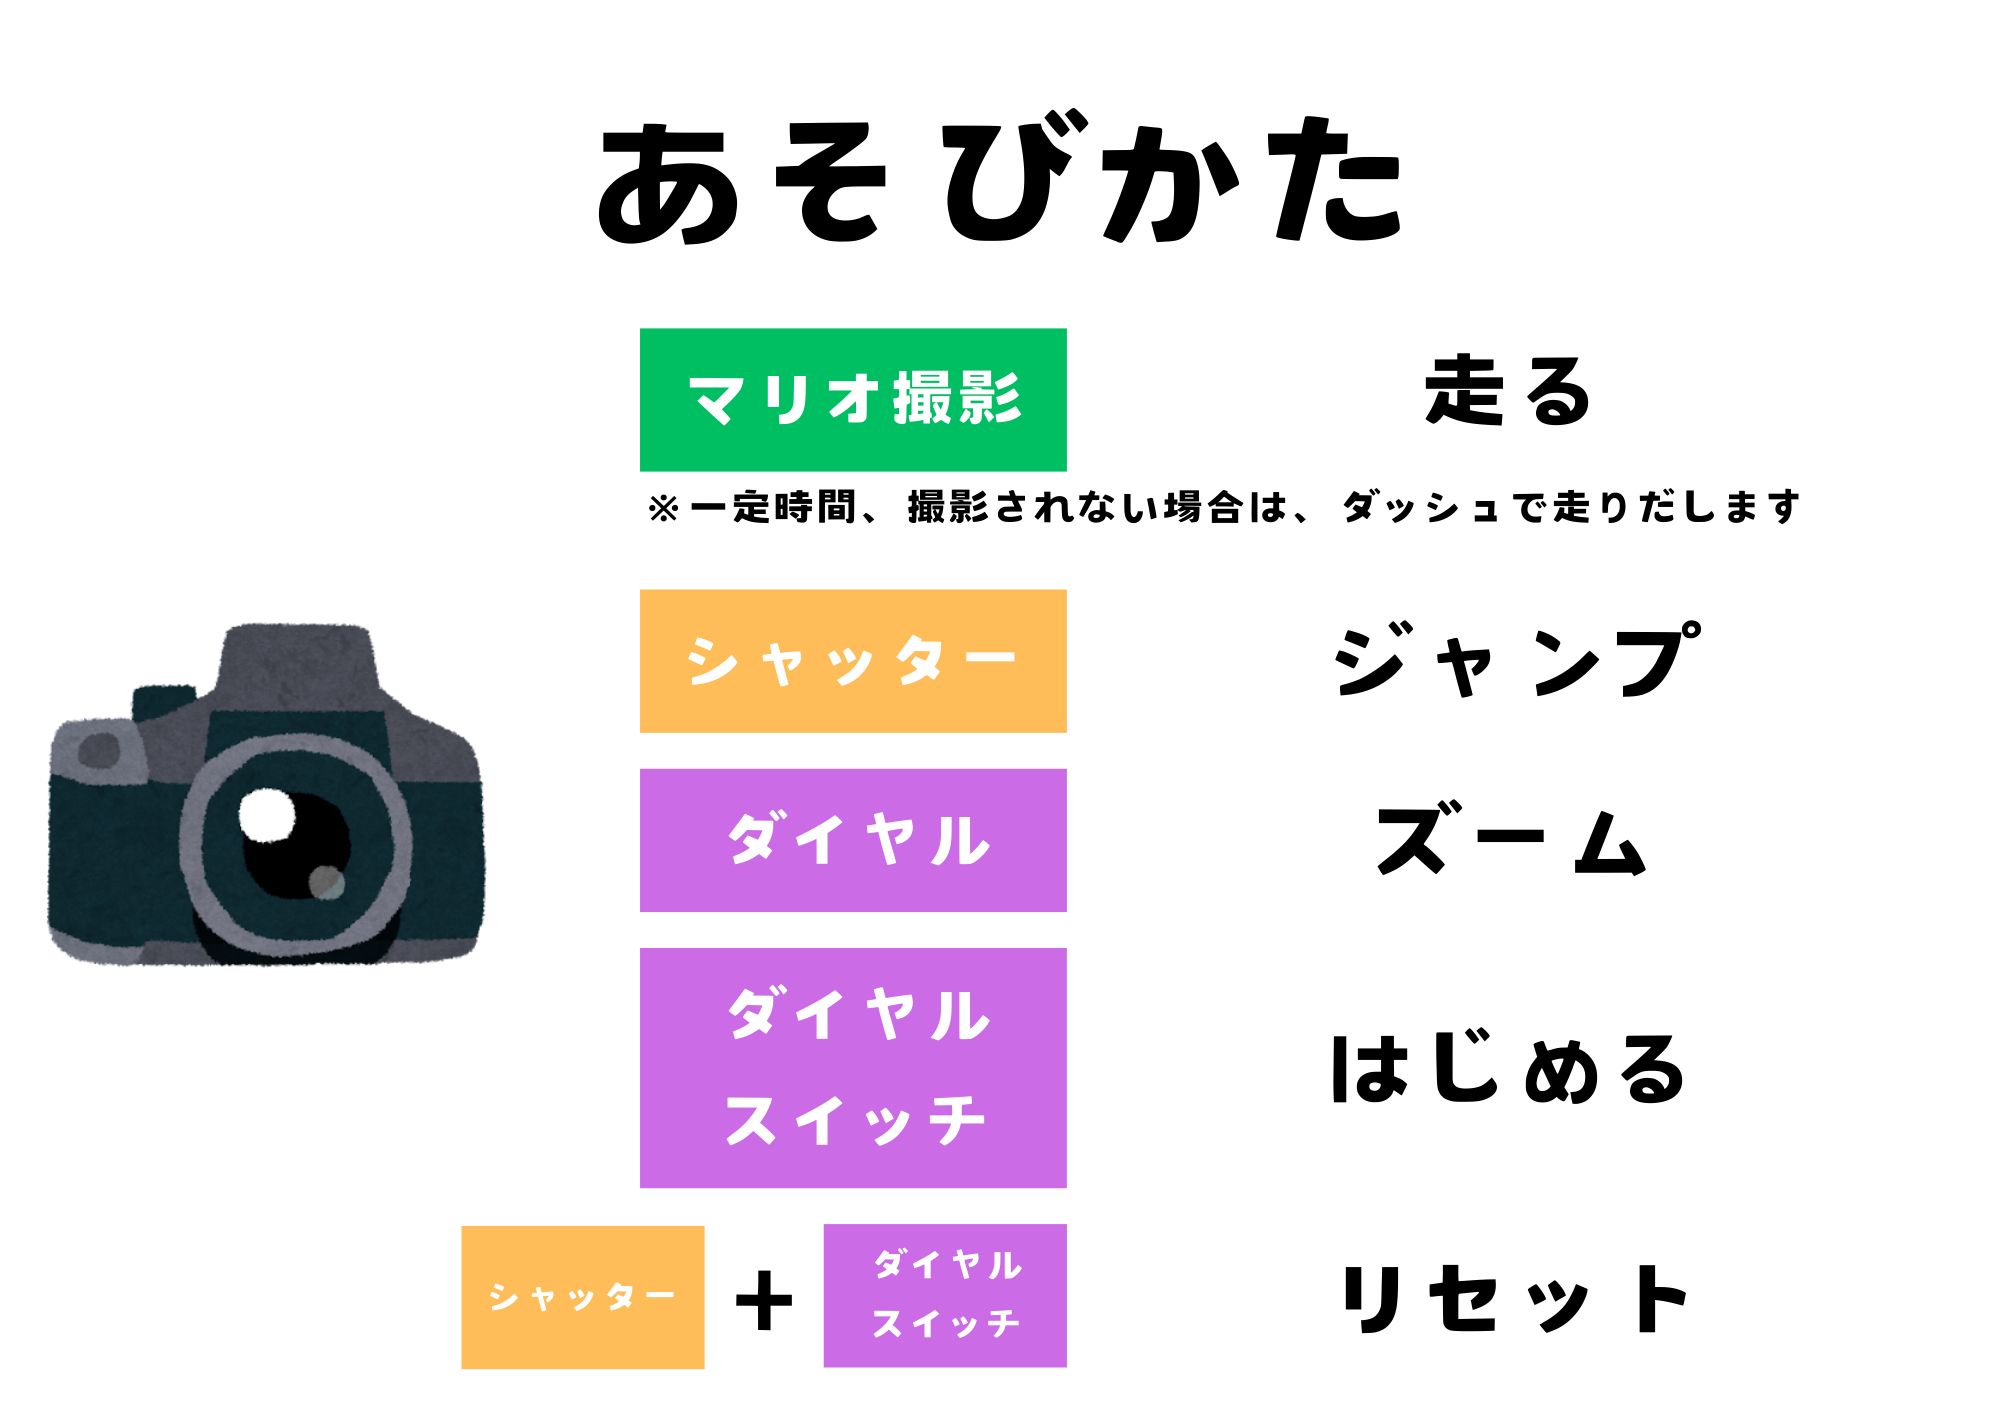 # 構成 装置の構成は下図の通りです 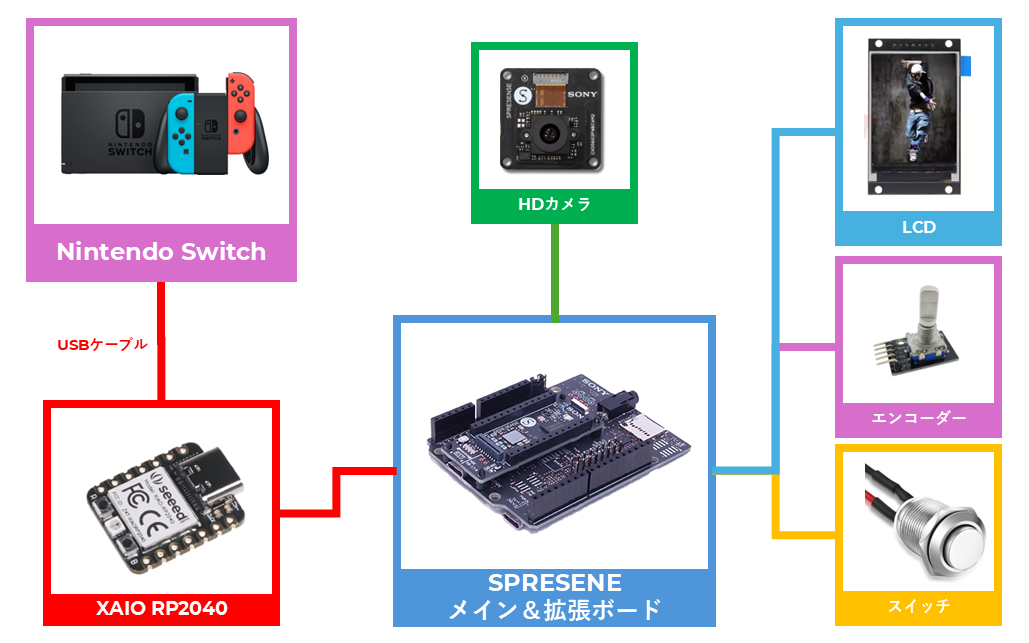 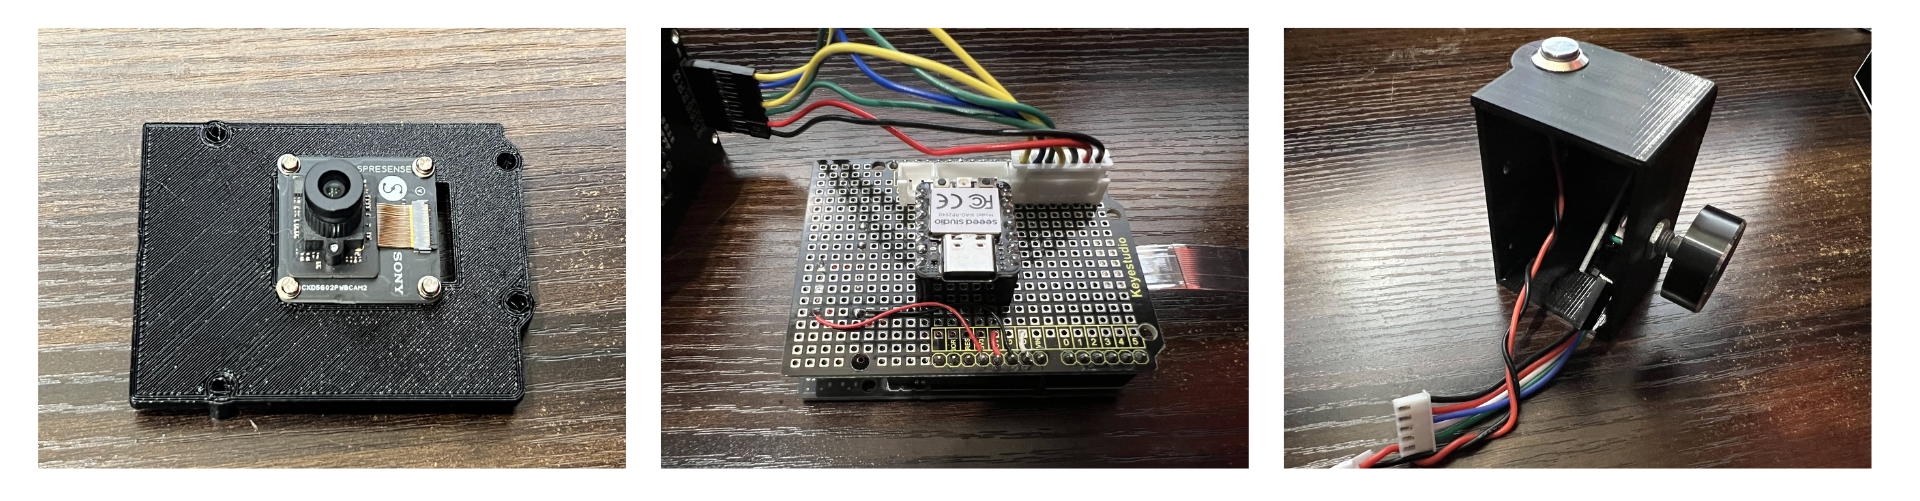 Spresenseの拡張ボードにドッキングできるように設計しました。 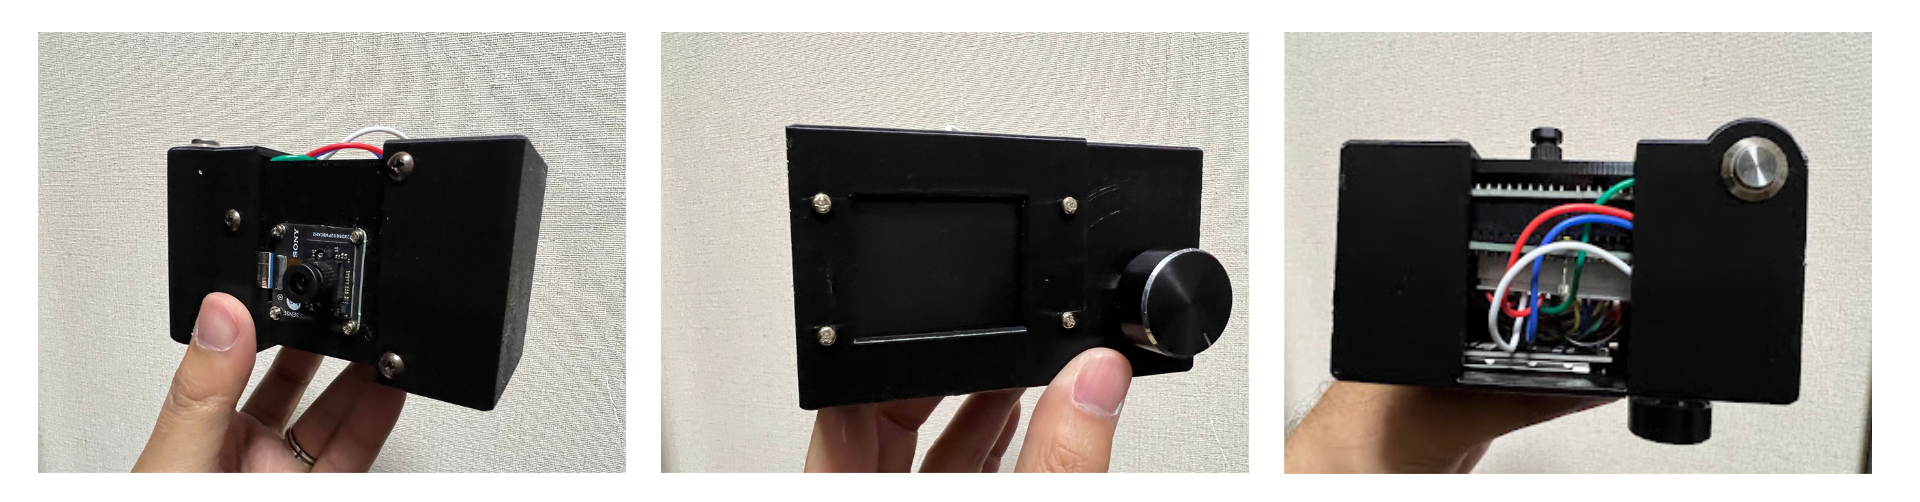 できるかぎりカメラっぽくなるようにしています。 # 部品表 ### カメラコントローラー | 名前 | 数量 | 備考 | |:---|---:|:--| | Spresenseメインボード | 1個 | 支給品| | Spresense拡張ボード | 1個 |支給品| | SpresenseHDカメラ | 1個 | 支給品| | スイッチ |1個 |https://amzn.asia/d/fNR2sty | |スイッチ付きロータリーエンコーダー | 1個 | https://amzn.asia/d/9LtZFow| | GMT020-02 | 1個 |https://ja.aliexpress.com/item/1005004237117445.html| | Seeed XIAO RP2040 | 1個 | https://eleshop.jp/shop/g/gM17311/| | Arduino用ユニバーサル基板 |1枚|https://eleshop.jp/shop/g/gGBS125/ | | TypeCケーブル | 1本 | https://eleshop.jp/shop/g/gK9I112/| | SDカード | 1枚 | https://jp.daisonet.com/products/4984279232446| |XHコネクタ ハウジング|3個| 2ピン / 5ピン /7ピン(それぞれ一個)| |XHコネクタ ベース|3個| 2ピン / 5ピン /7ピン(それぞれ一個)| |QIコネクタハウジング|2個| 5ピン/7ピン(それぞれ一個)| | 筐体 | 3個 | [3Dプリンタ出力](https://github.com/tanaka3/CameraMario/tree/main/STL) | # 接続図 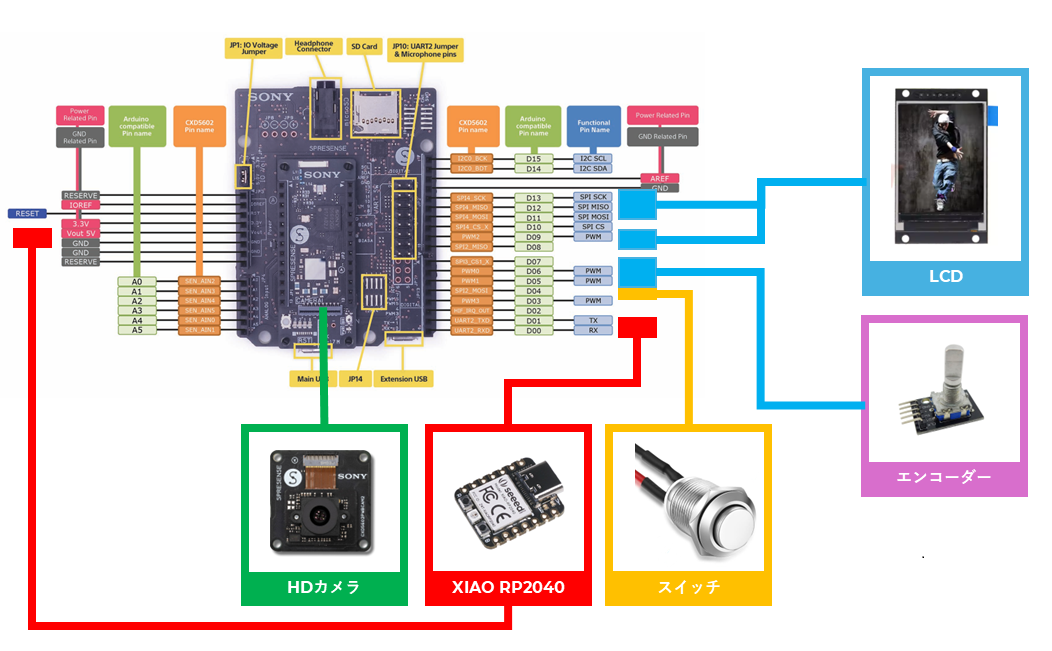 ※SPRESENSEへの電源供給は、XAIOから実施 # 推論データの作成 ### プレイ動画の撮影 HDMIビデオキャプチャを利用し、実際のプレイ動画を撮影します  ### 写真に切り出し 動画は、[FFmpeg](https://www.ffmpeg.org/)を利用してフレーム画像に変換します。 ``` CPP:変換時のコマンド ./ffmpeg -i "<<動画のパス>>" -r 2 "<<出力先フォルダ>>”" ``` ``-r``の引数で、画像に変換するフレーム数を設定することができます。 変換された画像は、``image_%05d.jpg``の名前で保存されます。 ### ターゲット画像の作成 専用のツール(ChatGPT作)を用いて、マリオを中心とした9枚の画像を作成します。 [クリッピングツール](https://github.com/tanaka3/CameraMario/blob/main/tool/tool.py) 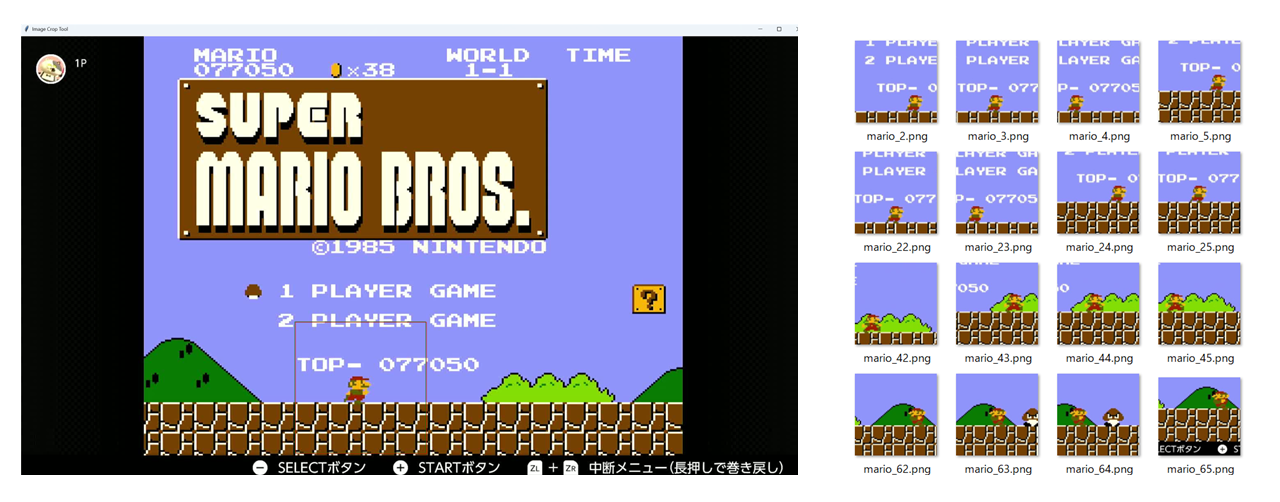 ### NNCを用いた学習 [Fooping](https://elchika.com/user/Fooping)さんの[Spresenseを活用したAI駐車場監視システム](https://elchika.com/article/d9158fa1-8d54-4bfe-b589-b75af7f266e9/#h_NNC%E3%81%A7%E5%AD%A6%E7%BF%92%E3%81%AE%E6%BA%96%E5%82%99)、[airpocket](https://elchika.com/user/airpocket/?page=0)さん[SLIMちゃんみっけ!](https://elchika.com/article/42c4b8e6-2bfc-4278-a844-ebef8f5e63d1/#h_NNC%E3%81%AB%E3%82%88%E3%82%8B%E7%89%A9%E4%BD%93%E6%A4%9C%E5%87%BA)をほぼそのまま参考にさせて頂きました。 この記事が無ければ無理でした。本当にありがとうございます。 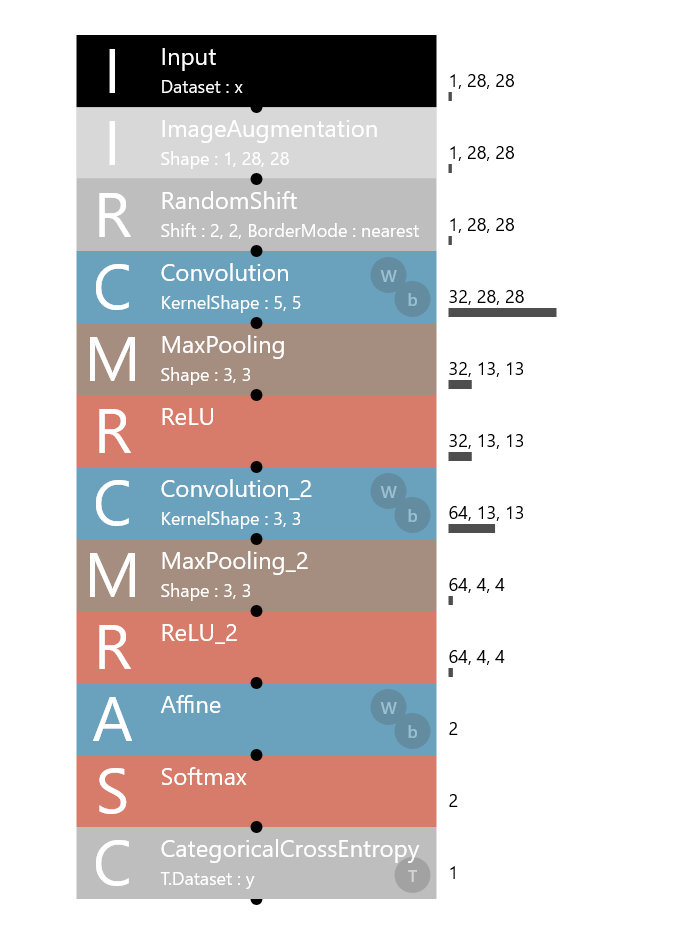 # ソースコード ## 環境 * [Arduino IDE v2.3.3](https://www.arduino.cc/en/software/) ## ボード定義 * [Arduino-Pico v4.1.1](https://github.com/earlephilhower/arduino-pico) ==ビルドを行うには、**USB Stack**は、``Adafruit TinyUSB``を選択してください。 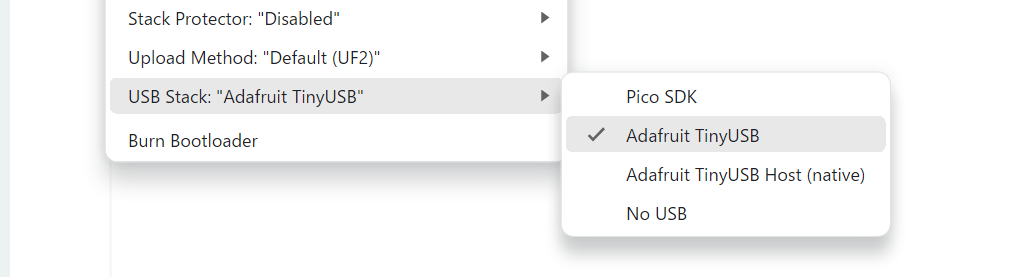== ## 使用ライブラリ * [switch_tinyusb_custom](https://github.com/tanaka3/switch_tinyusb_custom) ※touchgadgetさん作成の[switch_tinyusb](https://github.com/touchgadget/switch_tinyusb)のカスタマイズ版 #### XAIO RP2020 Switchとコントローラーとして動作します。 [Github](https://github.com/tanaka3/CameraMario/tree/main/camera_mario_rp2040) ```cpp:camera_mario_rp2040.ino // https://wiki.seeedstudio.com/XIAO-RP2040-with-Arduino/ #include <Adafruit_NeoPixel.h> #include "switch_tinyusb_custom.h" #include "CommandParser.hpp" #define NUMPIXELS 1 #define NEO_PWR 11 #define NEOPIX 12 Adafruit_NeoPixel pixels(NUMPIXELS, NEOPIX, NEO_GRB + NEO_KHZ800); Adafruit_USBD_HID G_usb_hid; NSGamepad Gamepad(&G_usb_hid); HID_NSGamepadReport_Data_t beforeData; static CommandParser commandParser; bool resetFlg = false; void setup() { pinMode(NEO_PWR,OUTPUT); digitalWrite(NEO_PWR, HIGH); pixels.begin(); pixels.setBrightness(64); pixels.setPixelColor(0, pixels.Color(255, 0, 0)); pixels.show(); Gamepad.begin(); while( !USBDevice.mounted() ) delay(1); pixels.setPixelColor(0, pixels.Color(0, 255, 0)); pixels.show(); } void loop() { Gamepad.reset(); if(commandParser.RESET){ if(resetFlg){ return; } resetFlg = true; resetControll(); } else if(commandParser.START){ //Serial.println("start"); Gamepad.press(NSButton_Plus); } else{ resetFlg = false; if(commandParser.B){ Gamepad.press(NSButton_B); } if(commandParser.A){ Gamepad.press(NSButton_A); } bool up = false; bool down = false; bool right = commandParser.RIGHT; bool left = commandParser.LEFT; Gamepad.dPad(up, down, left, right); } // 前回と入力が同じ場合は、ボタン操作を送信しない if(!Gamepad.compareTo(beforeData)){ Gamepad.SendReport(); beforeData = Gamepad.getReportData(); //Serial.println("PUSH"); } } void setup1(){ //Serial.begin(115200); Serial1.begin(115200); } void loop1(){ if (Serial1.available() > 0) { String receivedData = Serial1.readStringUntil('\n'); if(CommandParser::isValidCommand(receivedData)) { String numberStr = receivedData.substring(2); int command = numberStr.toInt(); commandParser.parse(command); //commandParser.printStatus(); // Serial.print(receivedData); // Serial.print(":"); // Serial.print(command); // Serial.print(":"); // Serial.println(commandParser.START); } else{ commandParser.reset(); } } } /** * @brief ファミコンのリセット操作 * ZL+ZR押してメニューのリセットを選ぶ操作 */ void resetControll(){ Gamepad.reset(); Gamepad.press(NSButton_LeftThrottle); Gamepad.press(NSButton_RightThrottle); Gamepad.SendReport(); delay(100); for(int i=0; i<3; i++){ Gamepad.reset(); Gamepad.dPad(true, false, false, false); Gamepad.SendReport(); delay(150); Gamepad.reset(); Gamepad.SendReport(); delay(150); } Gamepad.reset(); Gamepad.press(NSButton_A); Gamepad.SendReport(); }; ``` #### カメラ機能用 SPRESENSE上で動作し、カメラを用いてマリオを認識させます。 [Github](https://github.com/tanaka3/CameraMario/blob/main/camera_mario/) ```cpp:camera_mario.ino #include <Camera.h> #include <SPI.h> #include <EEPROM.h> #include <DNNRT.h> #include <RotaryEncoder.h> #include <SDHCI.h> #include <sched.h> #include "LGFX.hpp" #include "CommandParameter.hpp" #define PIN_A 7 #define PIN_B 6 #define ROTARYMIN 0 #define ROTARYMAX 50 #define PIN_START 5 #define PIN_JUMP 2 #define DNN_IMG_SIZE 28 #define CAM_CLIP_SIZE 224 #define CAM_IMG_W 320 #define CAM_IMG_H 240 #define LOST_MARIO_TIME 10000 //ms #define ZOOM_HIDE_TIME 3000 RotaryEncoder encoder(PIN_A, PIN_B, RotaryEncoder::LatchMode::TWO03); int encoder_pos = 0; long encoder_time = 0; SDClass theSD; static DNNRT dnnrt; static DNNVariable input(DNN_IMG_SIZE*DNN_IMG_SIZE); static bool is_DNN_check = false; static LGFX lcd; static LGFX_Sprite sprite(&lcd); CommandParser command; bool resetFlg = false; bool isRun = false; bool isDash = false; long find_mario_time = -1; static int dnn_task_process(int argc, char* argv[]) { dnnrt.inputVariable(input, 0); dnnrt.forward(); DNNVariable output = dnnrt.outputVariable(0); int index = output.maxIndex(); if(index == 1){ isDash = false; isRun = true; find_mario_time = millis(); } else{ isRun = false; } is_DNN_check = false; return 0; } void setup() { Serial2.begin(115200); Serial.begin(115200); initDNN(); initLCD(); initSensor(); initCamera(); find_mario_time = millis(); } void loop() { if(millis() - find_mario_time > LOST_MARIO_TIME){ isRun = true; isDash = true; } command.reset(); // スタートが押されている場合は、他のボタンを無視する if(digitalRead(PIN_START) == LOW){ isRun = false; isDash = false; find_mario_time = millis(); // スタート押下状態で、ジャンプボタンが押されている場合は // ゲームをリセットする if(digitalRead(PIN_JUMP) == LOW){ if(resetFlg){ return; } //リセットフラグを有効し、複数回の実行を防ぐ resetFlg = true; command.RESET = true; } else{ command.START = true; } } else{ resetFlg = false; command.A = digitalRead(PIN_JUMP) == LOW; command.B = isDash; command.RIGHT = isRun; } command.sendCommand(Serial2); } /** * カメラ画像の取得 */ void CamCB(CamImage img) { //Serial.println("CamCB"); //画像が有効かどうか if (!img.isAvailable()){ Serial.println("Failed to get video stream image"); } //倍率 float scale = 1.0f - (encoder_pos >= 20) * 0.125f - (encoder_pos >= 30) * 0.125f - (encoder_pos >= 40) * 0.25f; if(!is_DNN_check){ CamImage small; int size = CAM_CLIP_SIZE * scale; int top = (CAM_IMG_H - size)/2; int left = (CAM_IMG_W - size)/2; int right = left + size -1; int bottom = top + size - 1; CamErr err = img.clipAndResizeImageByHW(small , left, top,right, bottom , DNN_IMG_SIZE, DNN_IMG_SIZE); if (small.isAvailable()){ small.convertPixFormat(CAM_IMAGE_PIX_FMT_RGB565); uint16_t* tmp = (uint16_t*)small.getImgBuff(); float *dnnbuf = input.data(); float f_max = 0.0; for (int n = 0; n < DNN_IMG_SIZE*DNN_IMG_SIZE; ++n) { dnnbuf[n] = (float)((tmp[n] & 0x07E0) >> 5); if (dnnbuf[n] > f_max) f_max = dnnbuf[n]; } /* normalization */ for (int n = 0; n < DNN_IMG_SIZE*DNN_IMG_SIZE; ++n) { dnnbuf[n] /= f_max; } is_DNN_check = true; task_create("dnn task process", 130, 1024, dnn_task_process, NULL); } } img.convertPixFormat(CAM_IMAGE_PIX_FMT_RGB565); sprite.pushImageRotateZoom( lcd.width() >> 1 // 描画先の中心座標X , lcd.height() >> 1 // 描画先の中心座標Y , CAM_IMGSIZE_QVGA_H >> 1 // 画像の中心座標X , CAM_IMGSIZE_QVGA_V >> 1 // 画像の中心座標Y , 0 // 回転角度 , scale // X方向の描画倍率 (マイナス指定で反転可能) , scale // Y方向の描画倍率 (マイナス指定で反転可能) , CAM_IMGSIZE_QVGA_H // 画像データの幅 , CAM_IMGSIZE_QVGA_V // 画像データの高さ , (uint16_t *)img.getImgBuff() // 画像データのポインタ ); drawLCD(); } void drawLCD(){ // ISOアイコン sprite.setFont(&fonts::Font0); sprite.fillRect(15, 15, 30 , 30, TFT_BLACK); sprite.drawString("ISO", 30, 22); sprite.fillRect(17, 30, 26 , 13, TFT_WHITE); sprite.setTextColor(TFT_BLACK); sprite.drawString("AUTO", 30, 37); //WBアイコン sprite.fillRect(15, 50, 30 , 30, TFT_BLACK); sprite.setTextColor(TFT_WHITE); sprite.drawString("WB", 30, 57); sprite.fillRect(17, 65, 26 , 13, TFT_WHITE); sprite.setTextColor(TFT_BLACK); sprite.drawString("AUTO", 30, 72); //EXPOアイコン sprite.fillRect(15, 85, 30 , 30, TFT_BLACK); sprite.setTextColor(TFT_WHITE); sprite.drawString("EXPO", 30, 92); sprite.fillRect(17, 100, 26 , 13, TFT_WHITE); sprite.setTextColor(TFT_BLACK); sprite.drawString("AUTO", 30, 107); if(isRun && !isDash){ sprite.fillRect(0,0, 323, 7, TFT_RED); sprite.fillRect(313,0, 17, 240, TFT_RED); sprite.fillRect(0,0, 7, 240, TFT_RED); sprite.fillRect(0,233, 323, 7, TFT_RED); sprite.fillRect(260, 7, 53 , 30, TFT_RED); sprite.drawString("MARIO", 290, 18); } if(isRun && isDash){ sprite.fillRect(0,0, 323, 7, sprite.color565(130, 130, 130)); sprite.fillRect(313,0, 17, 240, sprite.color565(130, 130, 130)); sprite.fillRect(0,0, 7, 240, sprite.color565(130, 130, 130)); sprite.fillRect(0,233, 323, 7, sprite.color565(130, 130, 130)); sprite.fillRect(260, 7, 53 , 30, sprite.color565(130, 130, 130)); sprite.drawString("NONE", 290, 18); } if(millis() - encoder_time < ZOOM_HIDE_TIME){ sprite.setFont(&fonts::Font2); sprite.setTextSize(1); sprite.setTextDatum(textdatum_t::middle_center); sprite.setTextColor(TFT_WHITE); sprite.fillRect(15, 165, 290 , 60, TFT_BLACK); sprite.fillRect(45,200, 230, 2, TFT_WHITE); for(uint8_t i=0; i<=10; i++){ if(i%2==0){ char str[5]; sprintf(str,"%.1f",(1+(i/2)/10.f)); sprite.drawString(str, 45+(i/2)*45+2, 180); sprite.fillRect(45 + (i/2)*45, 190, 5 , 10, TFT_WHITE); } else{ sprite.fillRect(45 + (i/2.0f)*45, 195, 5 , 5, TFT_WHITE); } } sprite.fillRect(35+ (encoder_pos/10.f)*45.f, 210, 20 , 10, TFT_YELLOW); } } /** * LCDの初期化 */ void initLCD(){ Serial.println("init lcd"); if(!lcd.init()){ Serial.println(">lcd begin failed"); } lcd.setSwapBytes(true); lcd.setRotation(1); sprite.setSwapBytes(true); sprite.createSprite(320, 240); } /** * DNNの初期化 */ void initDNN(){ File nnbfile = theSD.open("model.nnb"); int ret = dnnrt.begin(nnbfile, 3); if (ret < 0) { Serial.println("dnnrt.begin failed" + String(ret)); return; } } //------- /** * カメラの初期化 */ void initCamera(){ Serial.println("init camera"); Serial.println(">Camera begin"); theCamera.begin(2, CAM_VIDEO_FPS_30, CAM_IMGSIZE_QVGA_H, CAM_IMGSIZE_QVGA_V, CAM_IMAGE_PIX_FMT_YUV422, 7); theCamera.startStreaming(true, CamCB); //ISOの設定 CamErr err; Serial.println(">Set ISO Sensitivity"); err = theCamera.setAutoISOSensitivity(true); if (err != CAM_ERR_SUCCESS) { printCameraError(err); } // 露出の設定 Serial.println(">Set Auto exposure"); err = theCamera.setAutoExposure(true); if (err != CAM_ERR_SUCCESS) { printCameraError(err); } Serial.println(">Set Auto WhiteBalance"); err = theCamera.setAutoWhiteBalance(true); if (err != CAM_ERR_SUCCESS) { printCameraError(err); } //HDRの設定 Serial.println(">Set HDR"); err = theCamera.setHDR(CAM_HDR_MODE_ON); if (err != CAM_ERR_SUCCESS) { printCameraError(err); } } /** * カメラのエラー情報 */ void printCameraError(enum CamErr err) { Serial.print("Error: "); switch (err) { case CAM_ERR_NO_DEVICE: Serial.println("No Device"); break; case CAM_ERR_ILLEGAL_DEVERR: Serial.println("Illegal device error"); break; case CAM_ERR_ALREADY_INITIALIZED: Serial.println("Already initialized"); break; case CAM_ERR_NOT_INITIALIZED: Serial.println("Not initialized"); break; case CAM_ERR_NOT_STILL_INITIALIZED: Serial.println("Still picture not initialized"); break; case CAM_ERR_CANT_CREATE_THREAD: Serial.println("Failed to create thread"); break; case CAM_ERR_INVALID_PARAM: Serial.println("Invalid parameter"); break; case CAM_ERR_NO_MEMORY: Serial.println("No memory"); break; case CAM_ERR_USR_INUSED: Serial.println("Buffer already in use"); break; case CAM_ERR_NOT_PERMITTED: Serial.println("Operation not permitted"); break; default: break; } } //------- /** * ボタン&センサー系の初期化 */ void initSensor(){ Serial.println("init sensor"); Serial.println(">init button"); pinMode(PIN_START, INPUT_PULLUP); pinMode(PIN_JUMP, INPUT_PULLUP); Serial.println(">init encoder"); attachInterrupt(PIN_A, IRQEncoderProcess, CHANGE); attachInterrupt(PIN_B, IRQEncoderProcess, CHANGE); } /** * エンコーダーの位置取得 */ void IRQEncoderProcess(){ encoder.tick(); int newPos = encoder.getPosition(); if (newPos < ROTARYMIN) { encoder.setPosition(ROTARYMIN); newPos = ROTARYMIN; } else if (newPos > ROTARYMAX) { encoder.setPosition(ROTARYMAX); newPos = ROTARYMAX; } if (encoder_pos != newPos) { encoder_pos = newPos; encoder_time = millis(); } } ``` #### RP2040との通信用 XAIO RP2040とSPRESENSEとのUART通信用クラス [Github](https://github.com/tanaka3/CameraMario/blob/main/camera_mario/CommandParameter.hpp) ```CPP:CommandParameter.hpp #pragma once class CommandParser { public: bool RESET = false; bool UP = false; bool DOWN = false; bool LEFT = false; bool RIGHT = false; bool A = false; bool B = false; bool START = false; bool SELECT = false; CommandParser() { reset(); } void reset(){ RESET = false; UP = false; DOWN = false; LEFT = false; RIGHT = false; A = false; B = false; START = false; SELECT = false; } void parse(int command) { SELECT =(command & (1 << 0)) != 0; //最下位ビット START = (command & (1 << 1)) != 0; A = (command & (1 << 2)) != 0; B = (command & (1 << 3)) != 0; RIGHT = (command & (1 << 4)) != 0; LEFT = (command & (1 << 5)) != 0; DOWN = (command & (1 << 6)) != 0; UP = (command & (1 << 7)) != 0; RESET = (command & (1 << 8)) != 0; //最上位ビット } static bool isValidCommand(String data) { if (data.startsWith("D:")) { String numberStr = data.substring(2); int command = numberStr.toInt(); return command != 0 || numberStr == "0"; } return false; } int generateCommand() { int command = 0; if (RESET) command |= (1 << 8); if (UP) command |= (1 << 7); if (DOWN) command |= (1 << 6); if (LEFT) command |= (1 << 5); if (RIGHT) command |= (1 << 4); if (B) command |= (1 << 3); if (A) command |= (1 << 2); if (START) command |= (1 << 1); if (SELECT) command |= (1 << 0); return command; } void sendCommand(Stream &serial) { int command = generateCommand(); serial.print("D:"); serial.println(command); } void printStatus() { Serial.println("==============================="); Serial.print("RESET: "); Serial.println(RESET); Serial.print("UP: "); Serial.println(UP); Serial.print("DOWN: "); Serial.println(DOWN); Serial.print("LEFT: "); Serial.println(LEFT); Serial.print("RIGHT: "); Serial.println(RIGHT); Serial.print("A: "); Serial.println(A); Serial.print("B: "); Serial.println(B); Serial.print("START: "); Serial.println(START); Serial.print("SELECT: "); Serial.println(SELECT); } }; ``` # 最後に デモ動画とる前にカメラが動作しなくなり。。動いてるシーン撮影できませんでした。。 応募には間に合いそうにないため、公開後にアップできるようにします。。 現状としては、マリオを認識すると走る、認識から外れると止まるような動作ですが、認識は3FPS程度でした。 どうしても止めたいところで止まるのは難しいです。 あと、マリオ自体の認識もなかなかシビアなところがあるので、このあたりの精度も向上させたいです。