hibigaku が 2019年10月09日05時12分12秒 に編集
初版
タイトルの変更
Sigfox Shield for Arduinoを使ってみる
タグの変更
sigfox
Arduino
IoT
LPWA
クラウド
センサー
記事種類の変更
セットアップや使用方法
本文の変更
低消費電力・低コスト・長距離伝送を特長としたLPWA Sigfoxの開発キットSigfox Shield for Arduino (UnaShield)の使い方を説明します。 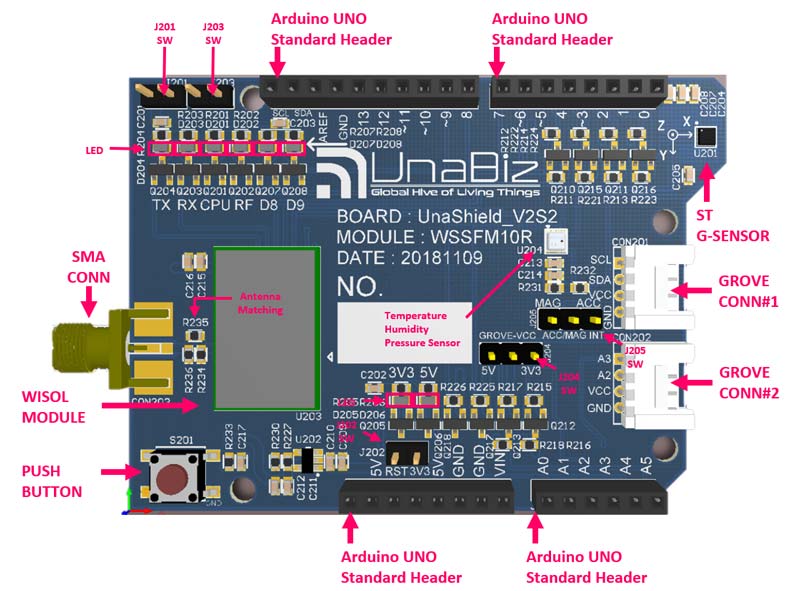 # まず最初に まずは、開発キットの入手と1年間無料回線契約が必要になります。(Arduino Unoも必要です) ## 開発キットの入手 Sigfox Shield for Arduinoは、下記ネットショップから購入できます。 - [マルツエレック](https://www.marutsu.co.jp/pc/i/952284/) - [ソラコム](https://soracom.jp/products/sigfox/) - [共立電子産業](http://eleshop.jp/shop/g/gHAR311/) - [スイッチサイエンス](https://www.switch-science.com/catalog/3354/) ## 1年間無料回線契約 開発キットを入手したら、[Sigfox Buy](https://buy.sigfox.com/)サイトから"Activate my Devkit"ボタンを選択し、画面指示に従って無料回線を取得してください。この時、デバイスのIDとPACが必要になりますので、開発キットに添付されているQRコードを読みとり、入力してください。 取得後、[Sigfox backendクラウド](https://backend.sigfox.com)のアクセス権が払い出されますので、ログインして、ご自身のデバイスが登録されていることを確認してください。 # Sigfoxメッセージを送信する デバイスが登録されていることが確認できれば、早速ArduinoとSigfox Shield for Arduinoを使ってSigfoxメッセージを送信してみましょう。 サンプルスケッチを[こちら](https://github.com/kccs-iot/sigfox-shield-arduino)からダウンロードして、コンパイル後、Arduinoに書き込んでください。 ```arduino:basic-demo #include "SIGFOX.h" //必要に応じ書き換えてください //************************************ static const unsigned int MESSAGE_INTERVAL = 30000; //Sigfoxメッセージ送信間隔(30秒) static const unsigned int MAX_MESSAGE_CNT = 10; //Sigfoxメッセージ最大送信数(10回) //************************************ unsigned int message_cnt = 0; // IMPORTANT: Check these settings with UnaBiz to use the SIGFOX library correctly. static const String device = "NOTUSED"; // Set this to your device name if you're using UnaBiz Emulator. static const bool useEmulator = false; // Set to true if using UnaBiz Emulator. static const bool echo = true; // Set to true if the SIGFOX library should display the executed commands. static const Country country = COUNTRY_JP; // Set this to your country to configure the SIGFOX transmission frequencies. static UnaShieldV2S transceiver(country, useEmulator, device, echo); // Uncomment this for UnaBiz UnaShield V2S Dev Kit static String response; // Will store the downlink response from SIGFOX. // IMPORTANT: Check these settings with UnaBiz to use the SIGFOX library correctly. void setup() { Serial.begin(9600); // Arduinoハードウェアシリアルを起動(Arduino <-> PC) Serial.println("==========================="); Serial.println("Sigfox UnaShield Basic Sample"); Serial.print("Send a message in "); Serial.print(MAX_MESSAGE_CNT); Serial.print(" times for each "); Serial.print(MESSAGE_INTERVAL); Serial.println(" msec."); Serial.println("==========================="); //Sigfoxモジュールを起動 if (!transceiver.begin()) stop(F("Unable to init SIGFOX module, may be missing")); // Will never return. Serial.println("Waiting 3 seconds..."); delay(3000); } void loop() { //温度、バッテリー電圧を取得する float temperature = 0; float voltage = 0; transceiver.getTemperature(temperature); transceiver.getVoltage(voltage); if (sendSigfoxMessage(message_cnt, temperature, voltage)) { message_cnt++; } if (message_cnt >= MAX_MESSAGE_CNT) { stop(String("finish...(Message sent successfully)")); } Serial.print("Waiting "); Serial.print(MESSAGE_INTERVAL/1000); Serial.println(" seconds..."); delay(MESSAGE_INTERVAL); } //送信回数と温度、バッテリー電圧をSigfoxメッセージで送信する bool sendSigfoxMessage(unsigned int cnt, float temperature, float voltage) { Serial.println("\n*****SEND SIGFOX MESSAGE*****"); String sCnt = transceiver.toHex(cnt); String sTemp = convertFloatToHex(temperature); String sVoltage = convertFloatToHex(voltage); Serial.print("Count: "); Serial.print(cnt); Serial.print(" / Temperature: "); Serial.print(temperature); Serial.print(" / Voltage: "); Serial.println(voltage); Serial.print("Payload: "); Serial.println(sCnt + sTemp + sVoltage); bool success = transceiver.sendMessage(sCnt + sTemp + sVoltage); Serial.println("*****************************"); return success; } //Float型変数をIEEE754に準拠した16進文字列へ変換する String convertFloatToHex(float val) { union { uint32_t B32; float Float; } floatb32; floatb32.Float = val; return String(floatb32.B32, HEX); } ``` このスケッチを動かすことにより、送信回数と温度、バッテリー電圧をSigfoxメッセージで送信することができます。 次は、Sigfox backendクラウドで受信したかどうかを確認します。 # Sigfox backendクラウドで受信確認する [Sigfox backendクラウドのDEVICEリスト](https://backend.sigfox.com/device/list)から、ご自身のデバイスIDを選択し、左メニューから**MESSAGES**を選択すると、下図のように受信されたメッセージが確認できます。 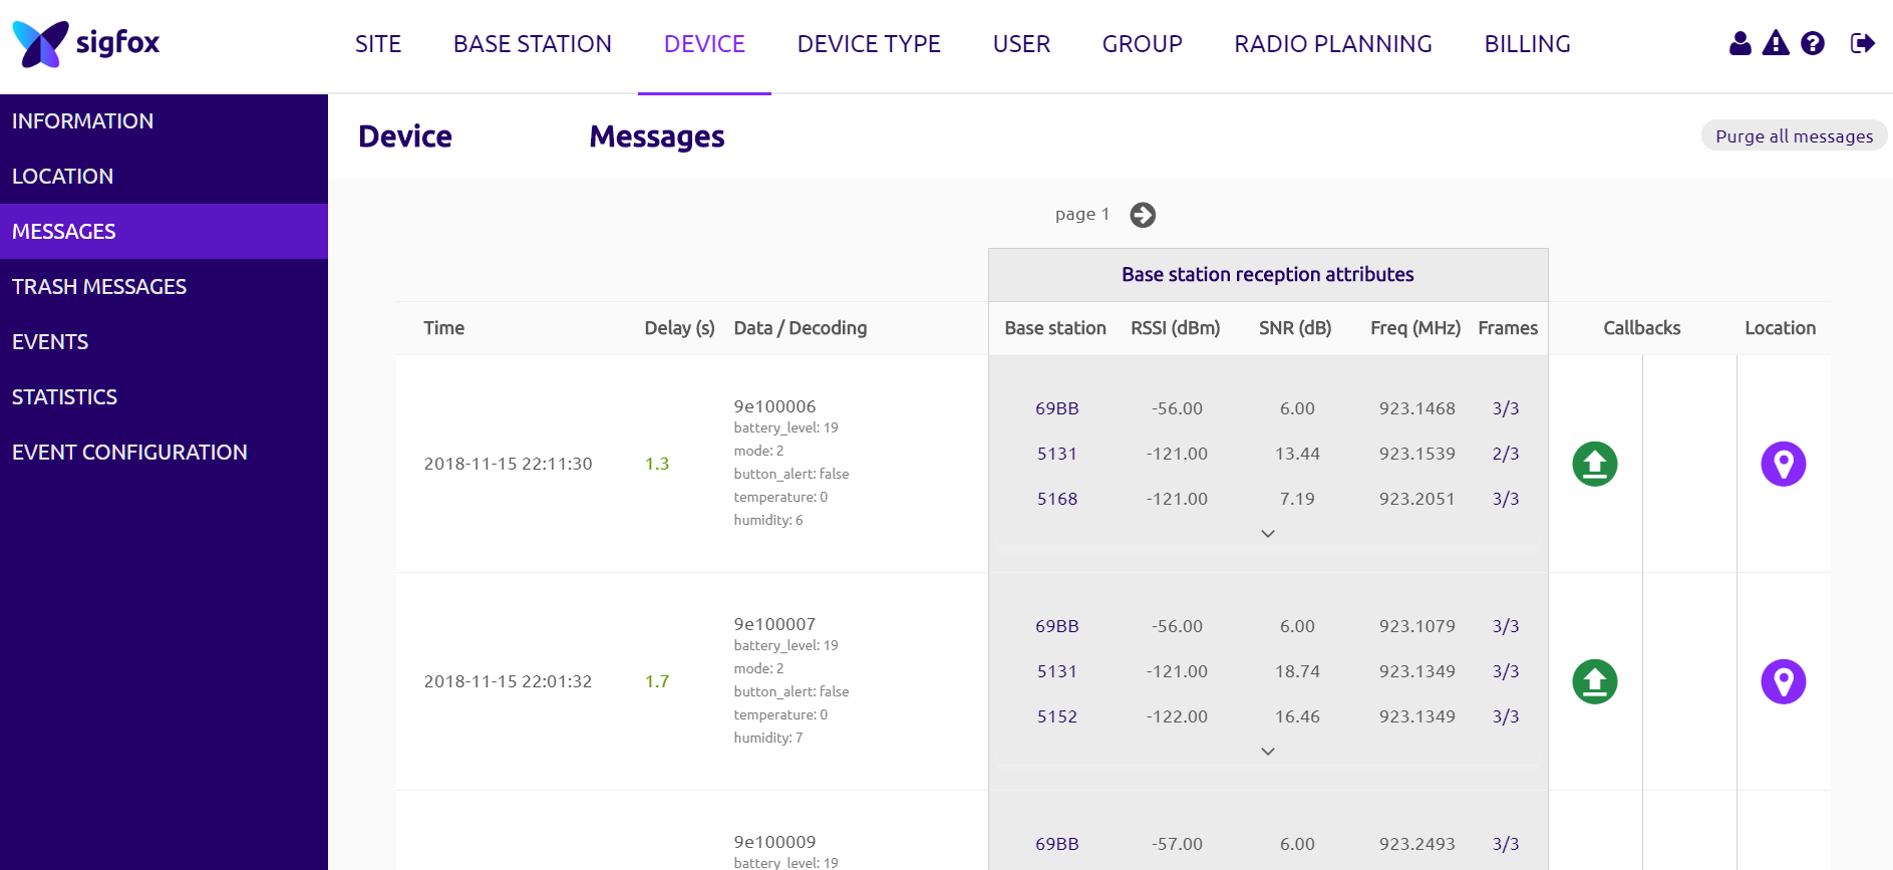 # Callback機能を使い3rd partyアプリケーションにメッセージを転送する SigfoxクラウドのCallback機能を使用することにより、外部アプリケーションにメッセージペイロードを転送することができます。 ## Callbackの設定方法 [Sigfox backendクラウドのDEVICETYPEリスト](https://backend.sigfox.com/devicetype/list)から、ご自身のデバイスタイプ名(Name)を選択し、左メニューから**CALLBACKS**を選択してください。 Sigfoxクラウドは、AWS IoTやMicrosoft Azure IoT hub、IBM Watson IoT Platform等との連携メニューがありますが、それ以外は、**Custom callback**を使います。 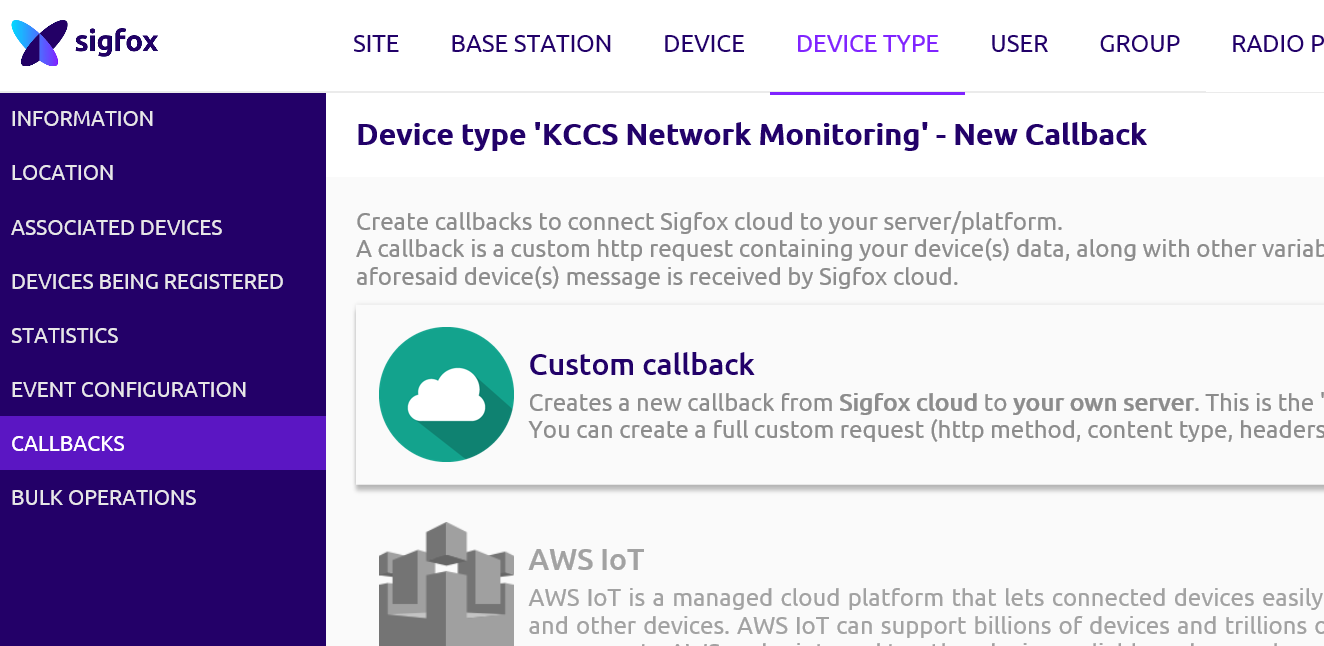 Callback設定画面では、Typeを[DATA]_[UPLINK]とし、下図のようにUrl patternに転送先アプリケーションサーバのURL、その他メッセージ送信方法を定義することにより、メッセージペイロードを転送することができます。 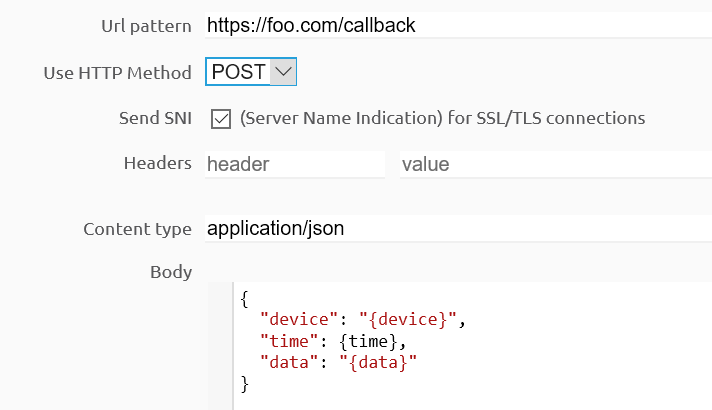 上記の場合、Url pattern先に下記のJSONメッセージを転送します。 ```json:callback { "device": "1234AB", <-デバイスID "time": 1570565096, <-メッセージ受信時刻(UNIXタイムスタンプ) "data": "1234567890ABCDEF" <-ペイロード } ``` あとは、アプリケーションサーバ側で、JSONメッセージをパースするだけで結構です。 もし、お手軽にアプリケーションを作ってみたい場合は、Sigfox社が、初期検証目的で公開している[IoT Agency Platform](https://try.iotagency.sigfox.com)を使ってみてください。