toshibox が 2021年02月27日12時05分59秒 に編集
コメント無し
本文の変更
**1 はじめに** 私は画像処理に興味があり、またかわいいペットのような物を作ってみたいと思い、顔を認識して追従するローバー を製作しました。 **2 使用したもの** ハードウェア ・Raspberry Pi 3 Model B ・Raspberry Pi 用 カメラモジュールケース付き ・モバイルバッテリー ・ビュートローバー H8マイコン搭載(ヴィストン株式会社)(以下ローバー) ・単三乾電池 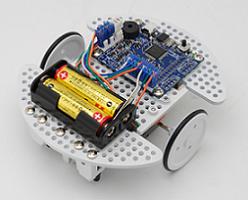 ソフトウェア ・Raspbian ・OpenCV(画像処理ライブラリ ) **3 システム概要** **3-1 回路** 本システムでは、ローバーとRaspberry Piの2つの機構にわかれます。 ローバー とRaspberry Piをシリアル通信させるため、 以下3つを接続します。 ・ローバー : TX - Raspberry Pi : Rx ・ローバー : RX - Raspberry Pi : Tx ・ローバー : GND - Raspberry Pi : GND また、Raspberry Piには専用コネクタにカメラモジュールを接続します。 ※本稿掲載の実際の写真には、Bluetoothモジュールが載っていますが、 本システムでは使用していません。 **3-2 システムイメージ図と実際の写真**  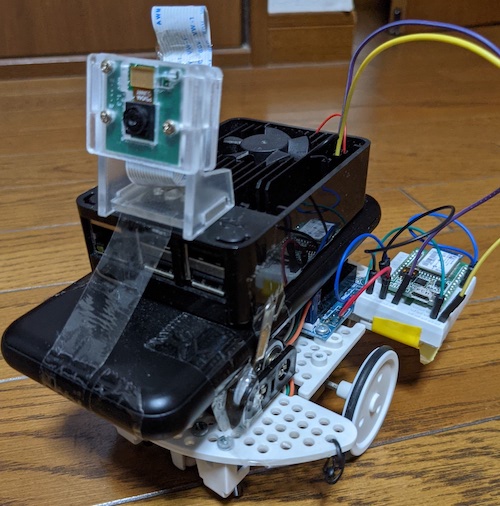 **3-3 動作説明** ①顔写真から顔認識用のモデルを生成。 ②カメラから画像を取得 ③顔分類器(OpenCV公開のもの)で顔を検出 ④顔を検出したら、①のモデルを用いて顔認識 ⑤モデルの顔と判定された場合、その顔の座標を元にモーターの制御値を決定。 ⑥モーター制御値等のデータをローバーにシリアル送信。 ⑦ローバーは受信したデータを元にモーター制御し、受信データをRaspberry Piへ返す。 ⑧最後に、認識結果を載せた画像を表示する。 ※プライバシー保護のため顔を塗りつぶしています。 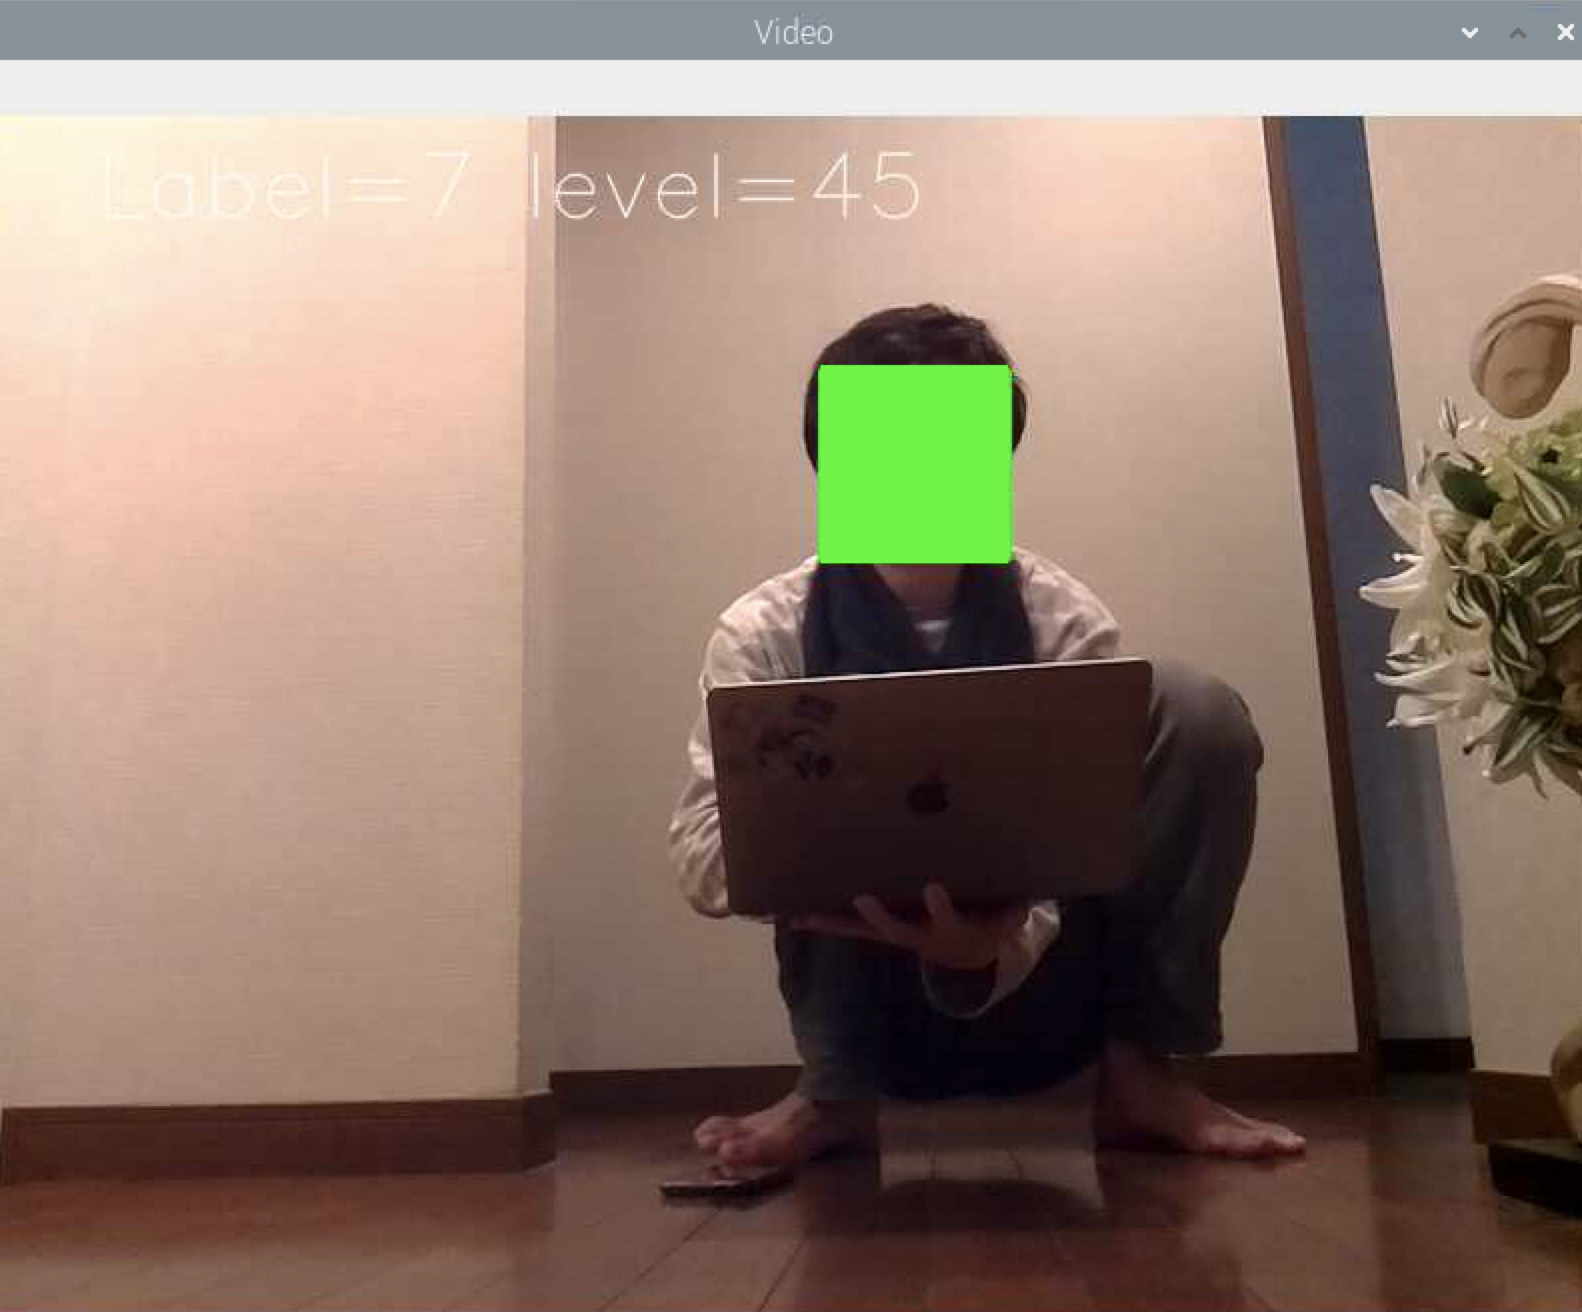 **4 システム詳細** 3-3 動作説明に沿って、プログラムを説明していきます。 全体のソースをみたい方は、こちらを参照してください。 https://github.com/toshibox/Face-Trace-Rover ⓪ライブラリ類のインポート(Raspberry Pi) ```python from __future__ import print_function import serial import cv2 from picamera import PiCamera from picamera.array import PiRGBArray import numpy as np import time import os import argparse from logging import getLogger, StreamHandler, DEBUG, basicConfig, NullHandler, INFO ``` ①顔写真から顔認識用のモデルを生成。(Raspberry Pi) ```python def loadFace(logger): labels = [] faceImages = list() fileCount = 0 baseImg = [] path = ('7') #当ファイルと同ディレクトリに、認識させたい顔写真を100枚程度格納し、モデルのラベル名(任意)をフォルダ名として作成。(ここでは'7'というラベル名) for i, folder in enumerate(path): for fileName in os.listdir(folder): logger.debug(fileName) face = cv2.imread(folder + '/' + fileName)#顔写真のファイル名は0~99 if fileCount == 0: baseImg = face face = resizeAuthImg(face, baseImg) face = cv2.cvtColor(face, cv2.COLOR_BGR2GRAY) faceImages.append(face) labels.append(int(folder)) fileCount += 1 return faceImages, labels ``` ②カメラから画像を取得(Raspberry Pi) forループ処理の初めにカメラから画像を取得。 ③顔分類器(OpenCV公開のもの)で顔を検出(Raspberry Pi) ```python #FaceTrace for image in camera.capture_continuous(rawCapture, format="bgr", use_video_port=True): detected_facelocation =[0,0] detected_face = [0,0] starttime = time.time() #ある時点の写真を切り取り、前処理をする frame = image.array #logger.debug("frame:" + str(type(frame))) gray = ChangeToGray(frame) #顔分類器で顔検出する faces = face_cascade.detectMultiScale(gray, scaleFactor=1.1, minNeighbors=3, minSize=(70,70)) ``` ④顔を検出したら、①のモデルを用いて顔認識(Raspberry Pi) ```python for (x, y, w, h) in faces: #検出した顔の座標データが入る cv2.rectangle(frame,(x,y),(x+w, y+h),(0,255,0),2) #検出範囲を矩形でかこう detected_facelocation = np.array([int((x+w)/2), int((y+h)/2)], dtype=int) #検出した顔の中心の座標をとる logger.debug("yoko:"+ str(w) + " tate:" + str(h)) if w > Face_Dis.CLOSE: #検出サイズ大きい→近い→後退モード mode=Mode.Back elif w<=Face_Dis.CLOSE and Face_Dis.APPROPRIATE<w:#検出サイズ適度→停止モード mode=Mode.Stop elif w<=Face_Dis.DISTANT: #検出サイズ小さい→遠い→速度UP mode=Mode.Up detected_face = frame[y:y+h, x:x+w] #検出した顔の部分だけ取得(認識用) logger.debug(type(frame)) #ここで顔周辺を切り取ってリサイズしないと、サイズの関係で顔認識できない←解決? #x,y,w,hを使って、顔周辺 を切り出す処理が必要(現状これしかわからん) #取得した顔情報を認識したい顔モデルと比較 if len(detected_face) is not 2: #顔を検出していない場合、detected_face = 2 #logger.debug("detected_face check : " + str(len(detected_face))) labelNum, score = GetScore(recognizer, detected_face, compaired_faces) ``` ⑤モデルの顔と判定された場合、その顔の座標を元にモーターの制御値を決定。(Raspberry Pi) ・画面を縦3x横4に分割し、検出された座標によって12通りの制御値を設定します。 (MotorControl) ・検出した顔のサイズを顔までの距離と見立てて、速度をあげたり、下げたりします。 (FaceTrace) ex, 検出した顔のサイズが小さい → 顔が遠くにある → 速度アップ ・検出した距離によって顔認識のスコアが変わるため、 検出距離とスコアの適切な組み合わせで、顔認識判定をします。 (CheckDataScore) ```python def MotorControl(p,_x,_y): if ((_x>=0) and (_x<=100)) and ((_y>=0) and (_y<=100)): Setint(p,-17,14) elif ((_x>100) and (_x<=200)) and ((_y>=0) and (_y<=100)): Setint(p,-16,14) elif ((_x>200) and (_x<=300)) and ((_y>=0) and (_y<=100)): Setint(p,-14,16) elif ((_x>300) and (_x<=400)) and ((_y>=0) and (_y<=100)): Setint(p,-14,17) elif ((_x>=0) and (_x<=100)) and ((_y>100) and (_y<=200)): Setint(p,-19,16) elif ((_x>100) and (_x<=200)) and ((_y>100) and (_y<=200)): Setint(p,-18,16) elif ((_x>200) and (_x<=300)) and ((_y>100) and (_y<=200)): Setint(p,-16,18) elif ((_x>300) and (_x<=400)) and ((_y>100) and (_y<=200)): Setint(p,-16,19) elif ((_x>=0) and (_x<=100)) and ((_y>200) and (_y<=300)): Setint(p,-21,18) elif ((_x>100) and (_x<=200)) and ((_y>200) and (_y<=300)): Setint(p,-20,18) elif ((_x>200) and (_x<=300)) and ((_y>200) and (_y<=300)): Setint(p,-18,20) elif ((_x>300) and (_x<=400)) and ((_y>200) and (_y<=300)): Setint(p,-18,21) ``` ↓④のソースの続きから ```python #FaceTrace if len(detected_face) is not 2: #顔を検出していない場合、detected_face = 2 labelNum, score = GetScore(recognizer, detected_face, compaired_faces) #検出サイズ(w)と認識スコア(cofidence)の組み合わせにより、認識したい顔か判断し分岐 if (CheckDataScore(w,score)): message = 'Label={0} level={1}'.format(labelNum, int(score)) if mode_last==Mode.Stop: #ちょうどいい距離で検出したから、3ループ目で減速しつつ止まる(機体への負荷軽減のため) SlowDown(wheel) #検出した顔の座標からモーターの制御値を決定 else: _x = detected_facelocation[0] _y = detected_facelocation[1] MotorControl(wheel,_x,_y) #検出範囲を元に動作を決定 if mode==Mode.Back: #検出した顔が近すぎる→後退する SwitchingintValue(wheel) #左右のモーターの値を入れ替える elif mode==Mode.Stop: #ちょうどいい距離で検出したから、減速しつつ止まる(機体への負荷軽減のため) SlowDown(wheel) elif mode==Mode.Up: #検出した顔が遠いから、1/5速度アップ SpeedUp(wheel) #mode=Mode.Normalの場合、検出した顔は適度な距離なので速度はそのまま logger.debug('mode=' + str(mode)) mode_last = mode mode = Mode.Normal #最後にノーマルモードに戻す else: SlowDown(wheel) message = 'During verification'#顔は検出したけど、自分の顔と認識しない場合 logger.debug("Not recognized") else: #顔が検出されなければ、減速する(機体への負荷軽減のため) score = 0 message = 'None' SlowDown(wheel) ``` ```python def CheckDataScore(w,score): if (PatternClose(w,score)) or (PatterMiddle(w,score)) or (PatternDistant(w,score)): return True else: return False def PatternClose(w,score): if ((w > 280 or (w <= 120 and w >= 80)) and score <= 60): return True else: return False def PatterMiddle(w,score): if (((w <= 280 and w > 200) or (w <= 200 and w > 120)) and score <= 50): return True else: return False def PatternDistant(w,score): if (w < 80 and score <= 80): return True else: return False ``` ⑥モーター制御値等のデータをローバーにシリアル送信。(Raspberry Pi) ```python bytes_sent = SendMotorCommand(wheel,serialPort) ``` ⑦ローバーは受信したデータを元にモーター制御し、受信データをRaspberry Piへ返す。 (ローバー) ```C void RxDataCheckTask(VP_INT exinf) { FLGPTN Rxdatacheck; VP_INT recv; VP_INT send_data; ER errorCode ; //1つ前と同じ信号ならばモードチェンジしない while(1) { //受信データをキューから取り出す errorCode = prcv_dtq( DTQID_RADICON, &recv); if(E_OK != errorCode) { break; } if(counter == RECEIVED_BUFFERSIZE) { /*clear*/ counter = 0; } //受信したデータをバッファに格納 rcv_buff[counter*RECEIVED_DATASIZE] = recv & 0xff; //データ構造は右モーター、左モーター、チェックサム、0xffの4Byte //0xffをしたら受信データからモーター値を取り出す if(recv == 0xff) { right_motor = rcv_buff[(counter-3) * RECEIVED_DATASIZE]; left_motor = rcv_buff[(counter-2) * RECEIVED_DATASIZE]; cs = rcv_buff[(counter-1) * RECEIVED_DATASIZE]; if(!(cs + right_motor + left_motor)) { //モーター制御 Mtr_Run(right_motor,left_motor,0,0); }
else { counter = 0; g_counter = counter; }
}
}
counter +=1; g_counter = counter;
}
}
``` ⑧最後に、認識結果を載せた画像を表示する。(Raspberry Pi) (setInfo) ```python #FaceTrace setInfo(frame, message)#frameにmessageをつける frame = cv2.resize(frame, (800,600)) cv2.imshow('Video',frame) #画面に検出した顔を矩形で囲った画像を表示 ``` ```python def setInfo(img, msg):#画面左上に表示される cv2.putText(img=img, text="{0}".format(msg), org=(50, 50), fontFace=cv2.FONT_HERSHEY_SIMPLEX, fontScale=1.5, color=(255, 255, 255), lineType=cv2.LINE_AA) ``` **5 実際の動き** 動画があります、これを見てください! https://youtu.be/9kKUzTUUt_c **6 課題とおまけ** 課題 ・顔検出用の分類器の精度に限界があり、顔を少しでも傾けると、検出しなくなります。 ・顔のモデルは複数読み込ませることができますが、モデルが増えると、 それぞれのモデルを顔認識処理にかけるため、時間がかかり、 リアルタイム性を失ってしまします。 上記2点を解決すべく、他のライブラリ をTensorflowを使用しましたが、 これも処理に時間がかかりリアルタイム性を失いました。 顔検出精度を上げることが課題になっています。 おまけーもしも試したい人のためにー 本稿では、H8マイコンを搭載したビュートローバー でモーターを制御しています。 H8マイコンは、-127〜128までの値を設定しての左右それぞれモーター制御してます。 そのため、Raspberry Pi からH8マイコンへは、左右のモーター値に加え、ノイズ対策のためのチェックサムとデータ送信の目印0xFFの計4Byteを送信している。 ビュートローバーの代わりに市販でよく出回っているArduinoなどのモーターキットを使用する場合、上記モーター値を使用するキットに適した値に変更して、シリアル接続したら代用できます。 ソース↓ https://github.com/toshibox/Face-Trace-Rover