Fooping が 2023年07月16日00時51分36秒 に編集
初版
タイトルの変更
M5ATOM S3にM5Stack_Avatarで顔をつけてIMUの値を元に表情を変化させる
タグの変更
M5Atom
SG90
メイン画像の変更
記事種類の変更
セットアップや使用方法
ライセンスの変更
(MIT) The MIT License
本文の変更
## 概要 [前回記事](https://elchika.com/article/ce281c71-eff0-4fe2-b7a8-f144615a5776/)では顔を手書きで済ませましたので、今回はM5ATOM S3のディスプレイに顔を描いてみます。顔を描くためにM5Stack Avatarを使用します。 https://github.com/meganetaaan/m5stack-avatar ## この記事で作る物 @[twitter](https://twitter.com/foopingtech/status/1680238803372634115?s=61&t=W4a-uH_Zdjz1h0h7jN_4kQ) ## 事前準備 ハードウェア、ボードマネージャの準備は下記の記事と同様です。 https://elchika.com/article/aa7fdaca-4ea7-4c02-a042-4bfd3635d8be/ ## ライブラリのインストール Arduino IDEのライブラリマネージャーを開き、"m5stack avatar"をインストールします。 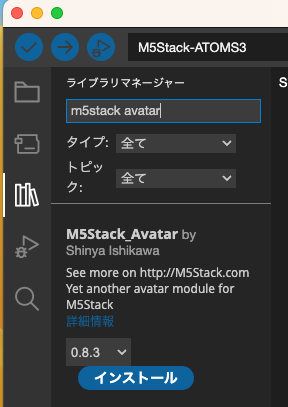 ## 顔を表示してみる ファイル>スケッチ例>M5Stack_Avatar>basics を開き、M5ATOM S3のディスプレイサイズに収まるように``` avatar.setScale(0.4); ```を追加してスケールを変更します。 書き込むと顔が表示されます。 @[twitter](https://twitter.com/foopingtech/status/1680120472657334273?s=61&t=W4a-uH_Zdjz1h0h7jN_4kQ) ``` Arduino #include <M5Unified.h> #include <Avatar.h> using namespace m5avatar; Avatar avatar; void setup() { M5.begin(); avatar.setScale(0.4); //←M5ATOM S3の画面サイズに表示されるようにスケール設定を追加 avatar.init(); } void loop() { // avatar's face updates in another thread // so no need to loop-by-loop rendering } ``` ## 口を開く 次に口を開いてみましょう。 ```avatar.setMouthOpenRatio(float x);```で口を開いたり閉じたりできます。 100msごとに```x```を-1〜1で可変させると次のような動きになります。 口のトレーニングをしているみたいですね。 @[twitter](https://twitter.com/foopingtech/status/1680149691118538755?s=61&t=W4a-uH_Zdjz1h0h7jN_4kQ) ```arduino:口パクする #include <M5Unified.h> #include <Avatar.h> using namespace m5avatar; Avatar avatar; void setup() { M5.begin(); avatar.setScale(0.4); //←M5ATOM S3の画面サイズに表示されるようにスケール設定を追加 avatar.init(); } float x=0; void loop() { M5.update(); x+=0.1; if(x>1)x=-1.0; avatar.setMouthOpenRatio(x); delay(100); // avatar's face updates in another thread // so no need to loop-by-loop rendering } ``` ## 目を動かす ```avatar.setGaze(float v,float h);```で目を上下左右へ動かせます。キョロキョロしていると可愛いですね。 @[twitter](https://twitter.com/foopingtech/status/1680196660285300737?s=61&t=W4a-uH_Zdjz1h0h7jN_4kQ) ```Arduino :目と口を動かす #include <M5Unified.h> #include <Avatar.h> using namespace m5avatar; Avatar avatar; void setup() { M5.begin(); avatar.setScale(0.4); //←M5ATOM S3の画面サイズに表示されるようにスケール設定を追加 avatar.init(); } int counter = 0; bool direct = false; float x=0; float gv=0; float gh=0; void loop() { M5.update(); if(direct){ x+=0.1; gv+=1; gh+=1; counter++; if(counter>10)direct=!direct; }else{ x-=0.1; gv-=1; gh-=1; counter--; if(counter<-10)direct=!direct; } avatar.setMouthOpenRatio(x); avatar.setGaze(0,gh); delay(10); // avatar's face updates in another thread // so no need to loop-by-loop rendering } ``` ## 目をパチパチする ```avatar.setEyeOpenRatio(float x);```で目を閉じたり開いたりできます。 @[twitter](https://twitter.com/foopingtech/status/1680200048414703622?s=61&t=W4a-uH_Zdjz1h0h7jN_4kQ) ```arduino:目をパチパチ #include <M5Unified.h> #include <Avatar.h> using namespace m5avatar; Avatar avatar; void setup() { M5.begin(); avatar.setScale(0.4); //←M5ATOM S3の画面サイズに表示されるようにスケール設定を追加 avatar.init(); } int counter = 0; bool direct = false; float x=0; float gv=0; float gh=0; void loop() { M5.update(); if(direct){ x+=0.1; gv+=1; gh+=1; counter++; if(counter>10)direct=!direct; }else{ x-=0.1; gv-=1; gh-=1; counter--; if(counter<-10)direct=!direct; } //avatar.setMouthOpenRatio(x); //avatar.setGaze(0,gh); avatar.setEyeOpenRatio(x); delay(10); // avatar's face updates in another thread // so no need to loop-by-loop rendering } ``` ## 表情を変える 次に表情を変えてみます。サンプルコードを見る限り6種類の表情があるようです。 ```avatar.setExpression(expressions[idx]);```で表情をセットします。 ```avatar.setExpression(m5avatar::Expression::Happy);```のように直接表情を指定することもできます。 @[twitter](https://twitter.com/foopingtech/status/1680222408635211778?s=61&t=W4a-uH_Zdjz1h0h7jN_4kQ) ```arduino:1秒ごとに表情を変える #include <M5Unified.h> #include <Avatar.h> using namespace m5avatar; Avatar avatar; void setup() { M5.begin(); avatar.setScale(0.4); //←M5ATOM S3の画面サイズに表示されるようにスケール設定を追加 avatar.init(); } int counter = 0; bool direct = false; float x=0; float gv=0; float gh=0; const Expression expressions[] = { Expression::Angry, Expression::Sleepy, Expression::Happy, Expression::Sad, Expression::Doubt, Expression::Neutral }; const int expressionsSize = sizeof(expressions) / sizeof(Expression); int idx = 0; void loop() { M5.update(); if(direct){ x+=0.1; gv+=1; gh+=1; counter++; if(counter>10)direct=!direct; }else{ x-=0.1; gv-=1; gh-=1; counter--; if(counter<-10)direct=!direct; } avatar.setMouthOpenRatio(x); avatar.setExpression(expressions[idx]); idx = (idx + 1) % expressionsSize; //以下のように表情をセットすることもできる //avatar.setExpression(m5avatar::Expression::Happy); delay(1000); // avatar's face updates in another thread // so no need to loop-by-loop rendering } ``` ## 前回のプログラムを修正する 一通りM5Stack_Avatarの動きがわかったところで、前回作成したプログラムを修正します。 x軸加速度の変化量が閾値を超えた時に500ms間、目を開き、口を閉じ、表情を変えるようにしてみました。 @[twitter](https://twitter.com/foopingtech/status/1680238803372634115?s=61&t=W4a-uH_Zdjz1h0h7jN_4kQ) ```arduino:狙われ続けるスタックチャン #include <M5Unified.h> #include <ESP32Servo.h> #include <Avatar.h> using namespace m5avatar; Avatar avatar; Servo servo1; // create four servo objects int servo1Pin = 2; // Published values for SG90 servos; adjust if needed int minUs = 500; int maxUs = 2400; float pos = 0; // position in degrees float before_pos = 0; float diff_pos = 0; uint32_t countTime = 0; void setup() { auto cfg = M5.config(); // M5Stack初期設定用の構造体を代入 M5.begin(cfg); // M5デバイスの初期化 servo1.setPeriodHertz(50); // Standard 50hz servo servo1.attach(servo1Pin, minUs, maxUs); //IMU_CHECK const char* name; switch (M5.Imu.getType()) { case m5::imu_none: name = "not found"; break; case m5::imu_sh200q: name = "sh200q"; break; case m5::imu_mpu6050: name = "mpu6050"; break; case m5::imu_mpu6886: name = "mpu6886"; break; case m5::imu_mpu9250: name = "mpu9250"; break; case m5::imu_bmi270: name = "bmi270"; break; default: name = "unknown"; break; }; M5_LOGI("imu:%s", name); //avatar avatar.setScale(0.4); avatar.init(); } float mapf(float x, float in_min, float in_max, float out_min, float out_max) { return (x - in_min) * (out_max - out_min) / (in_max - in_min) + out_min; } //Average #define STOCK 15 int stock_p[STOCK]; int stock_p_num=0; float CalcAverage(float num){ stock_p_num++; if(stock_p_num >=STOCK){ stock_p_num=0; } stock_p[stock_p_num]=num; float result=0; for(int i = 0;i < STOCK;i++){ result +=stock_p[i]; } result = result/(STOCK); return result; } void loop() { M5.update(); // To update the IMU value, use M5.Imu.update. // If a new value is obtained, the return value is non-zero. auto imu_update = M5.Imu.update(); if (imu_update) { // Obtain data on the current value of the IMU. auto data = M5.Imu.getImuData(); //drawGraph(rect_graph_area, data); //Serial.println(data.accel.x); // The data obtained by getImuData can be used as follows. pos = data.accel.x; // accel x-axis value. data.accel.y; // accel y-axis value. data.accel.z; // accel z-axis value. data.accel.value; // accel 3values array [0]=x / [1]=y / [2]=z. data.gyro.x; // gyro x-axis value. data.gyro.y; // gyro y-axis value. data.gyro.z; // gyro z-axis value. data.gyro.value; // gyro 3values array [0]=x / [1]=y / [2]=z. data.mag.x; // mag x-axis value. data.mag.y; // mag y-axis value. data.mag.z; // mag z-axis value. data.mag.value; // mag 3values array [0]=x / [1]=y / [2]=z. data.value; // all sensor 9values array [0~2]=accel / [3~5]=gyro / [6~8]=mag pos = pos * 100; pos = map(pos,-100,100,0,180); //-100〜100のデータを0〜180°に変換 pos = CalcAverage(pos); //平均値を求める diff_pos = pos - before_pos; //前回値との差を求める before_pos = pos; Serial.print("AveragePos="); Serial.print(pos); Serial.print(",diff_Pos="); Serial.println(diff_pos); // M5_LOGV("ax:%f ay:%f az:%f", data.accel.x, data.accel.y, data.accel.z); // M5_LOGV("gx:%f gy:%f gz:%f", data.gyro.x , data.gyro.y , data.gyro.z ); // M5_LOGV("mx:%f my:%f mz:%f", data.mag.x , data.mag.y , data.mag.z ); }else{ servo1.write(pos); //サーボモータの角度指定 //変化量が大きい時 if(diff_pos > 4){ countTime = millis(); avatar.setMouthOpenRatio(1.5);//口を開ける avatar.setEyeOpenRatio(0);//目を閉じる avatar.setExpression(m5avatar::Expression::Doubt); } //500ms経過したら if(millis() - countTime > 500){ avatar.setMouthOpenRatio(0);//口を閉じる avatar.setEyeOpenRatio(1);//目を開ける avatar.setExpression(m5avatar::Expression::Neutral);//無表情 } delay(1); } } ``` 動きと表情が連動して面白い表現が出来たのではないでしょうか。