Makato-kan が 2022年04月09日20時47分48秒 に編集
コメント無し
本文の変更
elchika様よりM5StickC Plusをいただきましたので、屋外で長い時間使えるように 太陽電池パネルと充電器を接続し、充電できるか試してみました。 ### 部品表: M5StickC Plus DHT11: 温度・湿度センサー 10kΩ抵抗 1個 80mm x 45mm 太陽電池パネル 2枚
Solar Charger HW-736 海外通販にて購入
Solar Charger HW-736 海外通販にて購入(1枚150円位)
※抵抗はDHT11のプルアップ用です。 ### 回路図: 充電基板のバッテリー出力をM5Stickの5VINに接続します。 DHT11のデータ線は10kΩでプルアップしてG26に接続します。 太陽電池パネルは電流容量を増やす為並列接続して充電基板のソーラに接続します。 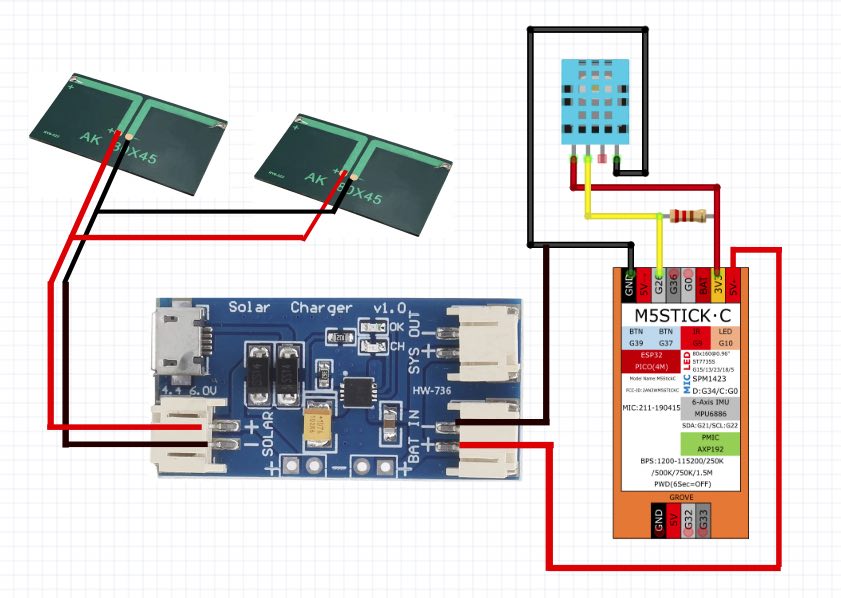 ### ArduinoIDE設定: まだArduinoIDEにMtStickC-Plusの環境を設定していない場合は以下の項目を設定します。 環境設定: ```` arduino:追加のボードマネージャーのURL https://dl.espressif.com/dl/package_esp32_index.json ```` ボードマネージャーの追加で "ESP32"を検索して表示される下図を追加します。 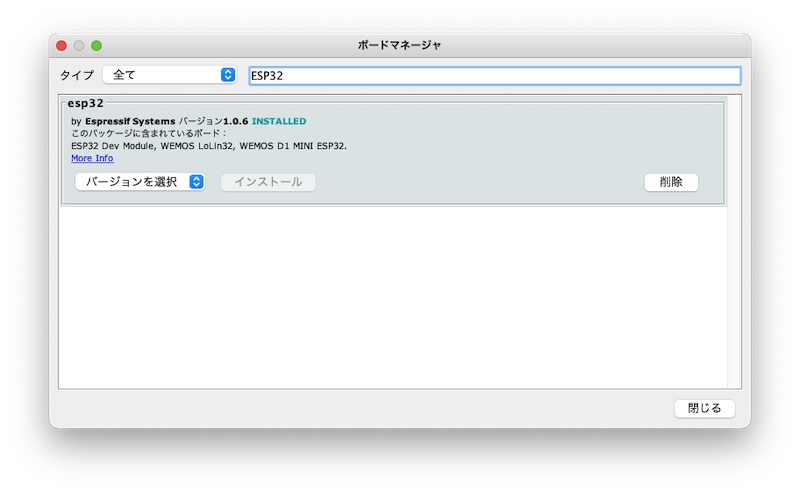 ライブラリの管理で M5StickCPlusを検索して表示される下図を追加します。 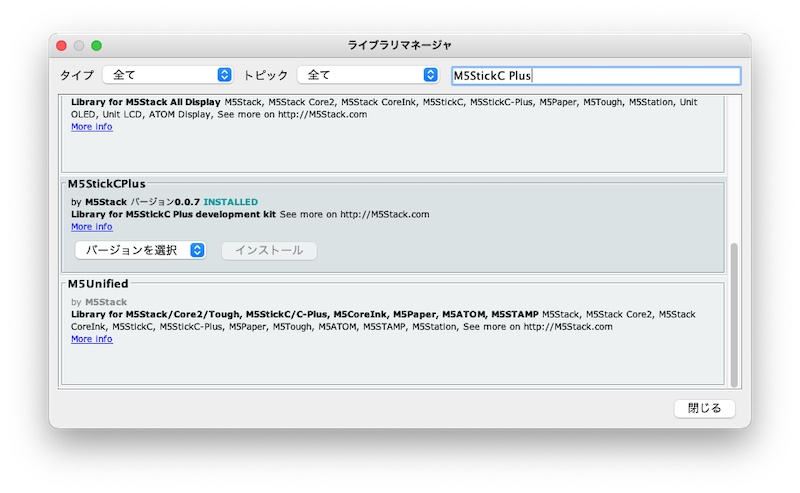 DHT11のライブラリを追加します。 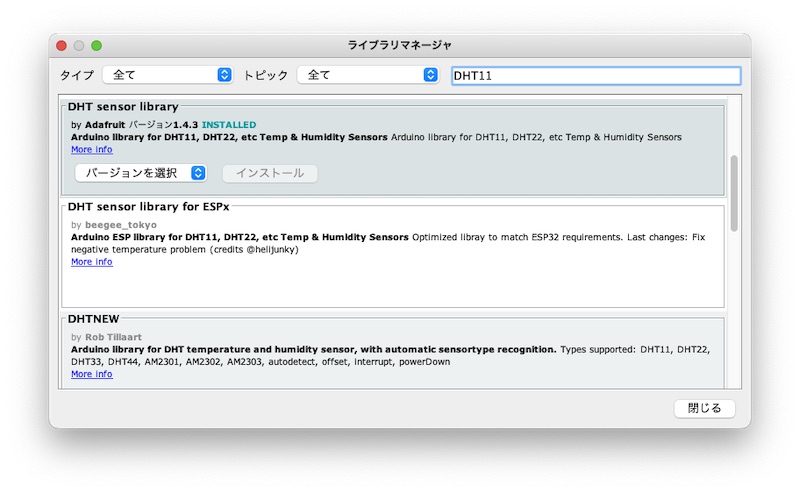 ### プログラム: プログラムはArduinoIDEにある"プログラム例"→M5StickC-Plus→BASICS→AXP192にDHT11温度センサーのプログラムを加えました。
充電するだけなら、DHT11もプログラムも不要です。
```arduino:太陽電池パネルと充電基板接続したよ /* ******************************************************************************* * Copyright (c) 2021 by M5Stack * Equipped with M5StickC-Plus sample source code * 配套 M5StickC-Plus 示例源代码 * Visit the website for more information:https://docs.m5stack.com/en/core/m5stickc_plus * 获取更多资料请访问:https://docs.m5stack.com/zh_CN/core/m5stickc_plus * * describe: APX192. * date:2021/9/14 ******************************************************************************* */ #include <M5StickCPlus.h> #include "AXP192.h" TFT_eSprite tftSprite = TFT_eSprite(&M5.Lcd); //DHT11 #include "DHT.h" #define DHTPIN 26 //G26ピンに接続します。 #define DHTTYPE DHT11 DHT dht(DHTPIN, DHTTYPE); /* After M5StickC Plus is started or reset the program in the setUp () function will be run, and this part will only be run once. 在 M5StickC Plus 启动或者复位后,即会开始执行setup()函数中的程序,该部分只会执行一次。 */ void setup() { M5.begin(); //Init M5StickC Plus. 初始化 M5StickC Plus M5.lcd.setRotation(1); //Rotate the screen. 将屏幕旋转 tftSprite.createSprite(240, 135); //Create a 240x135 canvas. 创建一块160x80的画布 tftSprite.setRotation(3); M5.Axp.EnableCoulombcounter(); //Enable Coulomb counter. 启用库仑计数器 //DHT11 dht.begin(); } /* After the program in setup() runs, it runs the program in loop() The loop() function is an infinite loop in which the program runs repeatedly 在setup()函数中的程序执行完后,会接着执行loop()函数中的程序 loop()函数是一个死循环,其中的程序会不断的重复运行 */ void loop() { tftSprite.fillSprite(BLACK); //Fill the canvas with black. 将画布填充为黑色 tftSprite.setCursor(0, 0, 1); //Set the cursor position and use the 1-point font. 设置光标位置并采用1号字体 tftSprite.printf("AXP Temp: %.1fC \r\n", M5.Axp.GetTempInAXP192()); //Get the temperature of AXP192. 获取AXP192的温度 tftSprite.printf("Bat:\r\n V: %.3fV I: %.3fmA\r\n", M5.Axp.GetBatVoltage(), M5.Axp.GetBatCurrent()); //Output voltage and current of Bat. 输出Bat的电压和电流 tftSprite.printf("USB:\r\n V: %.3fV I: %.3fmA\r\n", M5.Axp.GetVBusVoltage(), M5.Axp.GetVBusCurrent()); //Output current and voltage of USB. 输出USB的电流和电压 tftSprite.printf("5V-In\r\n: V: %.3fV I: %.3fmA\r\n", M5.Axp.GetVinVoltage(), M5.Axp.GetVinCurrent()); tftSprite.printf("Bat power %.3fmwv\r\n", M5.Axp.GetBatPower()); //DHT11 tftSprite.printf("Temp: %.2fC Humi: %.1f%%",dht.readTemperature(),dht.readHumidity()); tftSprite.pushSprite(40, 20); // 0x01V long press(1s), 0x02 press if(M5.Axp.GetBtnPress() == 0x02){ esp_restart(); } if(M5.BtnA.wasPressed()){ // close tft voltage output M5.Axp.SetLDO2(false); }else if(M5.BtnB.wasPressed()){ // close tft voltage output M5.Axp.SetLDO2(true); } M5.update(); //Detect whether the keystroke state has changed. 检测按键状态是否发生变化 delay(100); } ``` ### 実物: 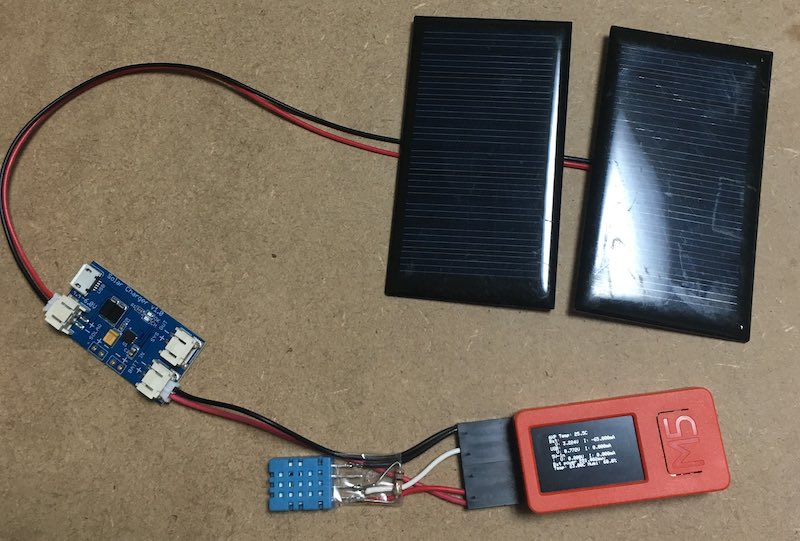 ###動作 : 電池がなくなった状態で太陽光を当ててみました。 晴天でお昼頃の太陽位置ですと、パネル1枚で60mA位 並列接続すると120mA位5V-INに流れました。 ### ご注意: この充電方法が正しいか検証できていません、もしもわかる方おりましたら 指摘いただけると助かります。 直接本体に太陽光が当たると、本体が熱くなりますのでご注意ください。