toppan_yamanaka が 2025年01月30日12時43分03秒 に編集
コメント無し
本文の変更
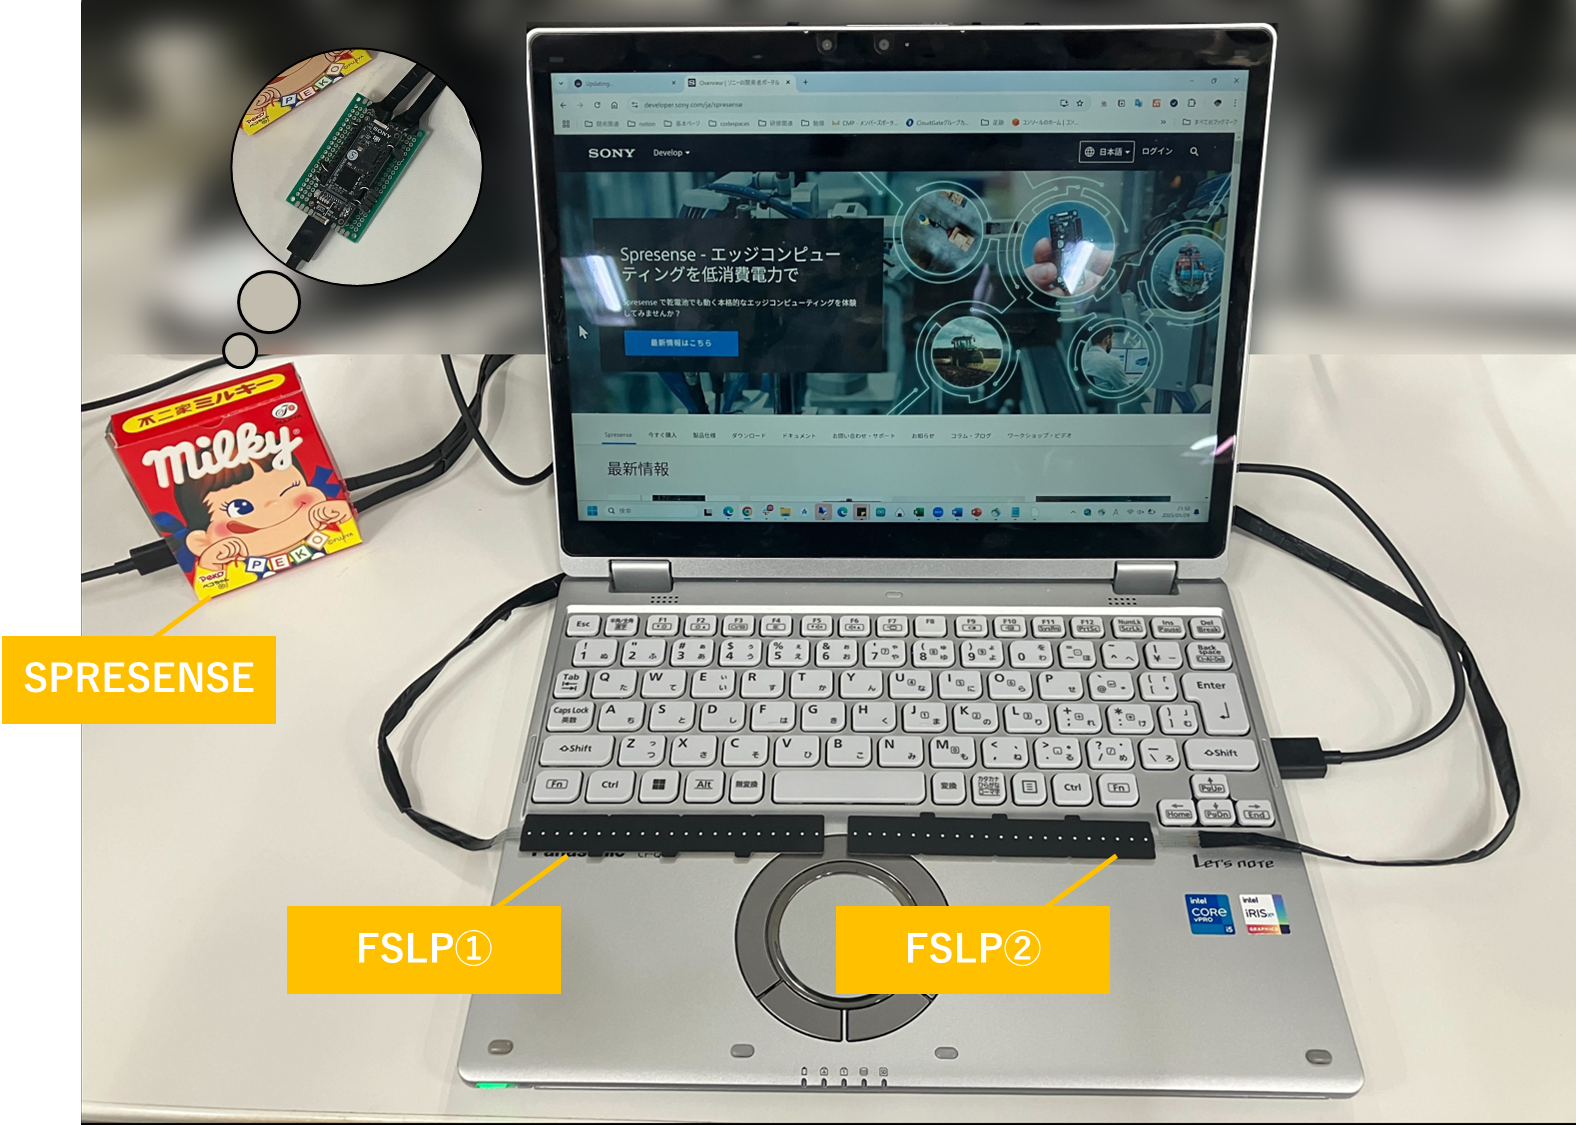
## 概要 本記事では、Spresenseと感圧センサを組み合わせ、感圧によってPCを操作するデバイスの製作方法をご紹介します。Spresenseで取得した感圧センサの値をシリアル通信でPCに送信し、PC側ではPythonのライブラリpyautoguiを用いて、マウス操作やキーボード入力などを制御します。GUIで作成した設定アプリにより、どの感圧レベルでどの操作を行うかを自由に設定できます。マウス操作、キーボード入力だけでなく、複数のキーの組み合わせやマウスクリックの種類(左クリック、右クリックなど)も設定可能です。これにより、従来のキーボードやマウスとは異なる、カスタマイズされた新しいインターフェースを実現できます。 ## 背景・動機 ●従来のPC操作インターフェースであるキーボードやマウス 〇一般的 ×長時間の使用で手や腕に負担 ×特定の作業においては、より直感的でシンプルな操作が求められる ●左手デバイスの活用 ◎ショートカットのカスタマイズ 〇入力種類の多さ ×キーボードから手を離さなくてはならず、腕の動きの負担が追加 ×スペースをとる ★感圧センサデバイス ◎ショートカットのカスタマイズ 〇入力種類の多さ **◎どこでも貼り付けてデバイス化** **◎省スペース** 感圧センサを用いることで省スペースで様々なショートカットを設定でき、少ない負担でPC操作が劇的に書いて気になります。プレゼンテーションのスライド送り、音楽プレイヤーの操作、ゲームのコントローラーなど、様々な用途に応用可能です。操作内容をGUIで自由に設定できることで、ユーザーそれぞれのニーズに合わせた高度なカスタマイズが可能になります。 ## 部品表 | 部品名 | 個数 | 役割 | | - | - | - | | SPRESENSEメインボード[CXD5602PWBMAIN1] | 1 | 感圧読み取り用 | | 直線型接触位置+感圧センサ(FSLP)| 2 | 感圧センサ | ## 構成図
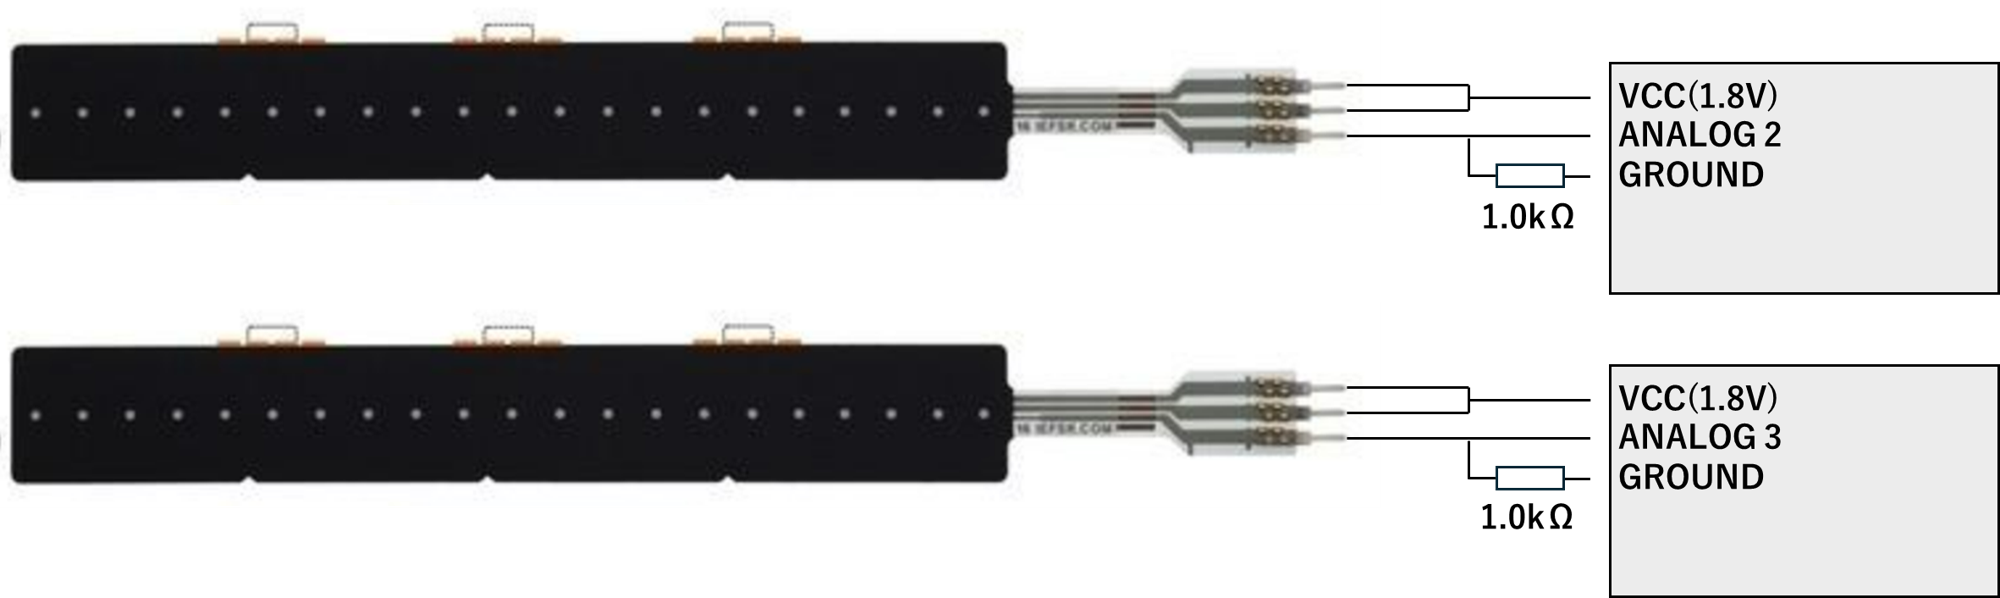
## ソースコード ### Spresense側 本コードはFSLP販売元から公開されているデモコードを一部修正したものになります。 デモコード:https://github.com/pololu/fslp-led-strip-arduino-demo ```html:FslpLedStripDemo.ino // To measure position, the sense line must be connected to a // pin capable of reading analog voltages. For pressure, // the sense line and drive line 2 must be connected to pins // capable of reading analog voltages. See the FSLP guide for // more information. // LTE Board // const int fslpSenseLine = A5; // const int fslpDriveLine1 = PIN_D29; // const int fslpDriveLine2 = PIN_D30; // const int fslpBotR0 = PIN_D02; // Main board const int fslpSenseLine_1 = A2; const int fslpBotR0_1 = PIN_D22; const int fslpSenseLine_2 = A3; const int fslpBotR0_2 = PIN_D14; void setup() { Serial.begin(115200); delay(250); } void loop() { int position1 = fslpGetPosition(1); int position2 = fslpGetPosition(2); Serial.print(position1); Serial.print(","); Serial.print(position2); Serial.println(); delay(100); } int fslpGetPosition(int ch) { int fslpSenseLine = A2; int fslpBotR0 = PIN_D22; if (ch != 1) { fslpSenseLine = A3; fslpBotR0 = PIN_D14; } // Step 1 pinMode(fslpBotR0, OUTPUT); digitalWrite(fslpBotR0, LOW); // Step 2 - Set up appropriate drive line voltages. pinMode(fslpBotR0, INPUT); // Step 3 - Wait for the voltage to stabilize. delayMicroseconds(10); // Step 4 - Take the measurement. return analogRead(fslpSenseLine); } ``` ### PC側 (Python) フォルダツリー /src ├── config │ └── config.json ├── setting-app │ └── setting_app.py └── device-app ├── device_app.py └── mapping.py 設定ファイル ```html:config.json { "sensor_1": { "key": "scroll", "input_dict": { "hotkeys": [ "scroll", "\u2191" ] } }, "sensor_2": { "key": "scroll", "input_dict": { "hotkeys": [ "scroll", "\u2193" ] } } } ``` 設定アプリ ```html:setting_app import dash from dash import dcc, html from dash.dependencies import Output, Input import plotly.graph_objs as go import serial import threading import time import dash_mantine_components as dmc from dash import Dash, _dash_renderer, html import time import plotly.graph_objects as go import numpy as np import json #################### # 定数の設定 #################### config_json_path = "../config/config.json" sensor_name_1 = "sensor_1" sensor_name_2 = "sensor_2" # JSONファイルを読み込む with open(config_json_path, 'r', encoding='utf-8') as f: config = json.load(f) print("リストが更新されました。") _dash_renderer._set_react_version("18.2.0") app = Dash(external_stylesheets=dmc.styles.ALL) data_value = "" max_num_plot = 50 list_fslp_led_strip_01 = [0]*max_num_plot list_fslp_led_strip_02 = [0]*max_num_plot elements = [ {"KEY_ID": sensor_name_1, "KEY": config[sensor_name_1]["input_dict"]["hotkeys"],"ID":sensor_name_1}, {"KEY_ID": sensor_name_2, "KEY": config[sensor_name_2]["input_dict"]["hotkeys"],"ID":sensor_name_2}, ] rows = [ dmc.TableTr( [ dmc.TableTd(element["KEY_ID"]), dmc.TagsInput( id=element["ID"]+"-tagsinput", data=[ { "group": "hotkeys", "items": [ {"value": "ctrl", "label": "ctrl"}, {"value": "tab", "label": "tab"}, {"value": "shift", "label": "shift"}, {"value": "alt", "label": "alt"}, {"value": "win", "label": "win"}, {"value": "scroll", "label": "scroll"}, {"value": "↑", "label": "↑"}, {"value": "↓", "label": "↓"}, ], }, { "group": "input alphabet", "items": [ "a","b","c","d","e", ], }, ], value = element["KEY"], w=200, ), ] ) for element in elements ] for element in elements: @app.callback( Output(element["ID"]+"-tags_input_value", "children"), Input(element["ID"]+"-tagsinput", "value"),Input(element["ID"]+"-tagsinput", "id") ) def select_value(value,id): sensor_name = id.split("-")[0] print(value) if "scroll" in value: config[sensor_name]["key"]="scroll" else: config[sensor_name]["key"]="hotkeys" config[sensor_name]["input_dict"]["hotkeys"]=value # 変更をJSONファイルに書き込む with open(config_json_path, 'w', encoding='utf-8') as f: json.dump(config, f, indent=4) return dash.no_update head = dmc.TableThead( dmc.TableTr( [ dmc.TableTh("Element Position"), dmc.TableTh("Element Name"), ] ) ) body = dmc.TableTbody(rows) caption = dmc.TableCaption("Some elements from periodic table") def start_serial(): global ser try: ser = serial.Serial( port='COM9', # シリアルポート名 baudrate=115200, # ボーレート timeout=2 # 読み取りタイムアウト(秒) ) except serial.SerialException as e: print(f'Error opening serial port: {e}') ser = None def read_serial(): global ser global data_value global list_fslp_led_strip_01 global list_fslp_led_strip_02 server_count = max_num_plot-1 start_serial() sta = time.time() if ser is None: return while True: if ser.in_waiting > 0: data_value = ser.readline().decode('utf-8').rstrip() list_fslp_led_strip_01.append(int(data_value.split(",")[0])) list_fslp_led_strip_02.append(int(data_value.split(",")[1])) list_fslp_led_strip_01.pop(0) list_fslp_led_strip_02.pop(0) server_count -=1 if server_count <= 0: server_count = max_num_plot-1 else: data_value = 0 time.sleep(0.005) app.layout = dmc.MantineProvider([ dmc.Tabs( [ dmc.TabsList( [ dmc.TabsTab("Settings", value="settings"), ] ), dmc.TabsPanel( [ dmc.Alert( "Hi from Dash Mantine Components. You can create some great looking dashboards using me!", title="Welcome!", color="violet", ), dmc.Group([ dmc.Card( children=[ dmc.Table([head, body, caption]), ], withBorder=True, shadow="sm", radius="md", w=350, h=400, style={"marginLeft": "10px","marginTop": "10px"}, ), dcc.Graph( id = "graph-fslp_led_strip" ), ]), dcc.Interval( id='data-update', interval=50, # ミリ秒単位で更新間隔を設定 n_intervals=0 ) ], value="settings", ), html.Div(id = sensor_name_1+"-tags_input_value"), html.Div(id = sensor_name_2+"-tags_input_value") ], color="blue", orientation="horizontal", value="settings" ), ]) @app.callback( Output('graph-fslp_led_strip', 'figure'), [Input('data-update', 'n_intervals')] ) def update_graph(n): global list_fslp_led_strip_01 global list_fslp_led_strip_02 global max_num_plot fig = go.Figure() fig.add_trace(go.Scatter(name="sensor1", x=np.arange(max_num_plot), y=list_fslp_led_strip_01, mode='lines', line=dict(color='rgba(255, 165, 0, 0.5)') # Light orange with 50% opacity )) fig.add_trace(go.Scatter(name="sensor2", x=np.arange(max_num_plot), y=list_fslp_led_strip_02, mode='lines', line=dict(color='rgba(128, 0, 128, 0.5)') # Light purple with 50% opacity )) fig.update_layout( font_size=20, hoverlabel_font_size=20, plot_bgcolor='rgba(0,0,0,0)', # Make background transparent xaxis=dict( showgrid=True, gridcolor='lightgrey', # Light grey gridlines showticklabels=False # Hide y-axis tick labels ), yaxis=dict( range=[0, 1024], showgrid=True, gridcolor='lightgrey', # Light grey gridlines showticklabels=False # Hide y-axis tick labels ), margin=dict(l=40, r=40, t=40, b=40), # Adjust margins legend=dict( font=dict(size=15), orientation='h', # Horizontal legend x=0.5, # Center horizontally xanchor='center' ) ) # Making the graph static by disabling interactive icons fig.update_layout( dragmode=False, # Disable drag hovermode=False, # Disable hover ) return fig if __name__ == '__main__': thread = threading.Thread(target=read_serial) thread.daemon = True thread.start() app.run_server(debug=False) ``` キー実行アプリ ```html:mapping.py import pyautogui class MappingKey(): def exe_function(self,key, kwargs): hotkeys = kwargs.get("hotkeys", None) scroll_amount= kwargs.get("scroll_amount", None) if key =="scroll": pyautogui.scroll(scroll_amount) elif key == "hotkeys" : print(hotkeys) pyautogui.hotkey(hotkeys) ``` ```html:device_app import serial import threading import time from mapping import MappingKey import copy import json #################### # 定数の設定 #################### config_json_path = "../config/config.json" sensor_name_1 = "sensor_1" sensor_name_2 = "sensor_2" # JSONファイルを読み込む with open(config_json_path, 'r', encoding='utf-8') as f: config = json.load(f) val1 = 0 val2 = 0 mapping = MappingKey() def start_serial(): global ser try: ser = serial.Serial( port='COM9', # シリアルポート名 baudrate=115200, # ボーレート timeout=2 # 読み取りタイムアウト(秒) ) except serial.SerialException as e: print(f'Error opening serial port: {e}') ser = None def read_serial(): global ser global data_value global val1 global val2 start_serial() if ser is None: return while True: if ser.in_waiting > 0: data_value = ser.readline().decode('utf-8').rstrip() val1 = int(data_value.split(",")[0]) val2 = int(data_value.split(",")[1]) print(data_value) else: data_value = 0 time.sleep(0.005) def keyboard(sensor_name): global val1 global val2 kind_key = config[sensor_name]["key"] input_dict = config[sensor_name]["input_dict"] while(1): if sensor_name == sensor_name_1: val = val1 elif sensor_name == sensor_name_2: val = val2 if val>20: if kind_key=="scroll": amount_to_scroll = int(2**(val/50))+20 if "↑" in input_dict["hotkeys"]: sign = 1 elif "↓" in input_dict["hotkeys"]: sign = -1 input_dict["scroll_amount"]=amount_to_scroll*sign mapping.exe_function(kind_key,input_dict) if kind_key=="hotkeys": mapping.exe_function(kind_key,input_dict) time.sleep(0.2) time.sleep(0.005) if __name__ == '__main__': thread = threading.Thread(target=read_serial) thread.daemon = True thread.start() thread = threading.Thread(target=keyboard,args=(sensor_name_1,)) thread.daemon = True thread.start() thread = threading.Thread(target=keyboard,args=(sensor_name_2,)) thread.daemon = True thread.start() while 1: time.sleep(1) ``` ## 設定アプリ(GUI)について 設定アプリでは、以下の機能を実装します。 * 感圧レベルと操作の対応を視覚的に設定。 * マウス操作(左クリック、右クリック、中クリック、移動など)の設定。 * キーボード入力(単一キー、複数キーの組み合わせ)の設定。 * 設定内容の保存と読み込み。 GUIライブラリ(plotly dash)を用いて、これらの機能を実装します。具体的なGUIの設計は、今後の展望で示します。 ## 技術要素 * **Spresense メインボード:** 感圧センサからの値を取得し、シリアル通信でPCに送信します。 * **感圧センサ:** 圧力に応じて抵抗値が変化するセンサです。今回は、スイッチサイエンスで販売されている「フィルム型力覚センサ」を例に説明します。 * **PC:** Spresenseから送信されたデータを受信し、設定に基づいてpyautoguiを用いてPCを制御します。 * **シリアル通信:** SpresenseとPC間のデータ通信に使用します。USB接続を使用します。 * **Python (pyautoguiライブラリ):** PC側で動作するプログラムを記述するために使用します。pyautoguiは、マウス操作、キーボード入力、画面操作などを自動化するためのライブラリです。 * **設定アプリ (GUI):** 感圧レベルとPC操作の対応を視覚的に設定するためのアプリケーション。PythonのTkinterやPyQtなどのGUIライブラリを使用して作成します。 * **設定ファイル (JSONなど):** 設定アプリで設定した内容を保存するためのファイル。 ## 工夫点・苦労点 * 感圧センサの値を安定して読み取るための工夫(ノイズ除去など)。 * pyautoguiを用いたスムーズなPC操作の実現。 * 様々なアプリケーションに対応するための操作マッピングの設計。 * ユーザーが簡単に設定を変更できるような直感的なGUIの設計。 ## 今後の展望 * 複数の感圧センサを用いた、より複雑な操作の実現。 * ジェスチャー認識など、他のセンサとの組み合わせ。 * 特定のアプリケーションに特化したコントローラーの開発。 * 設定アプリのGUIの具体的なデザインと実装。例えば、スライダーで感圧レベルを調整したり、ドロップダウンリストで操作を選択したりするインターフェースを検討。 ## 写真・動画