myaon が 2022年01月08日16時21分23秒 に編集
obniz版構成部品追加
本文の変更
**概要** M5stickCとBlynkで作るM5リモートカー - 遠隔地から操縦できます - 前面にスマホを置いてビデオ通話できます 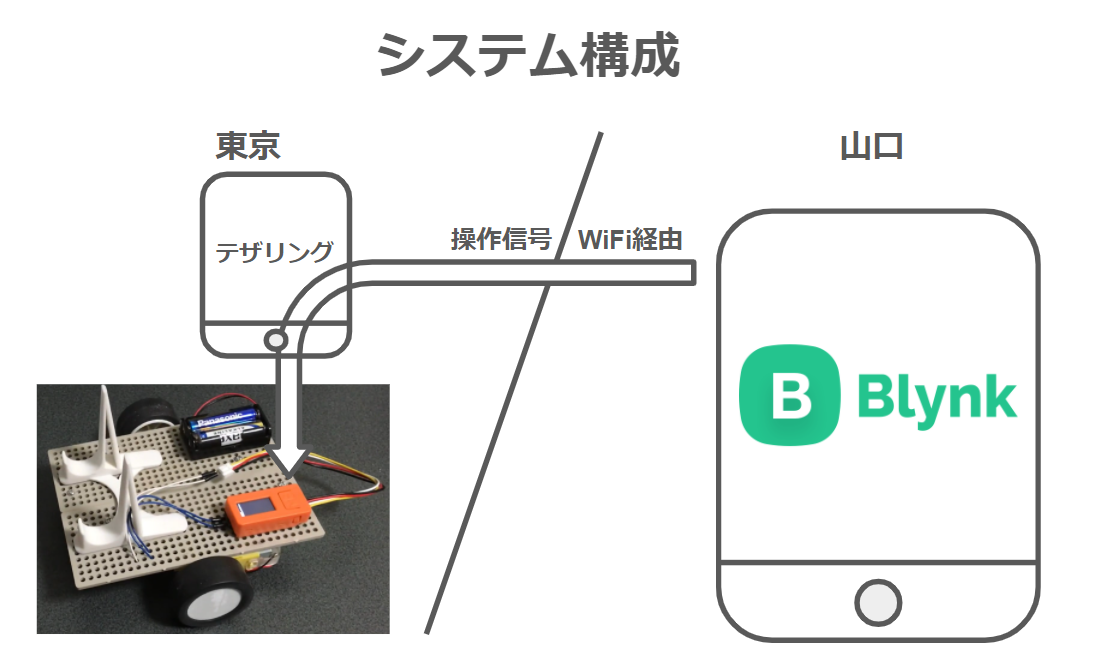 **動画** @[youtube](https://youtu.be/66gbO4gptyA) | 構成部品 | 参考価格 | 参考リンク | |:---:|:---:|:---:| | M5StickC |2,816 円|https://www.switch-science.com/catalog/5517/| | Groveケーブル |407 円|https://www.switch-science.com/catalog/6245/| | タイヤ×2 | 110 円×2|https://www.switch-science.com/catalog/7493/| | モーター×2 | 165 円×2|https://www.switch-science.com/catalog/7492/| | キャスター×2 |-|-|
| モータードライバ |-|-|
| ユニバーサルプレート |-|-| | 電池ボックス |-|-| | 単3電池×2 |-|-| | ジャンパー線 |-|-| | M3ねじナット |-|-| | 両面テープ |-|-|
| Obniz版構成部品 | 参考価格 | 参考リンク | |:---:|:---:|:---:| | obniz Board |6,090 円|https://obniz.com/ja/products/obnizboard1y/| | タイヤ×2 | 110 円×2|https://www.switch-science.com/catalog/7493/| | モーター×2 | 165 円×2|https://www.switch-science.com/catalog/7492/| | キャスター×2 |-|-| | ユニバーサルプレート |-|-| | M3ねじナット |-|-| | 両面テープ |-|-|
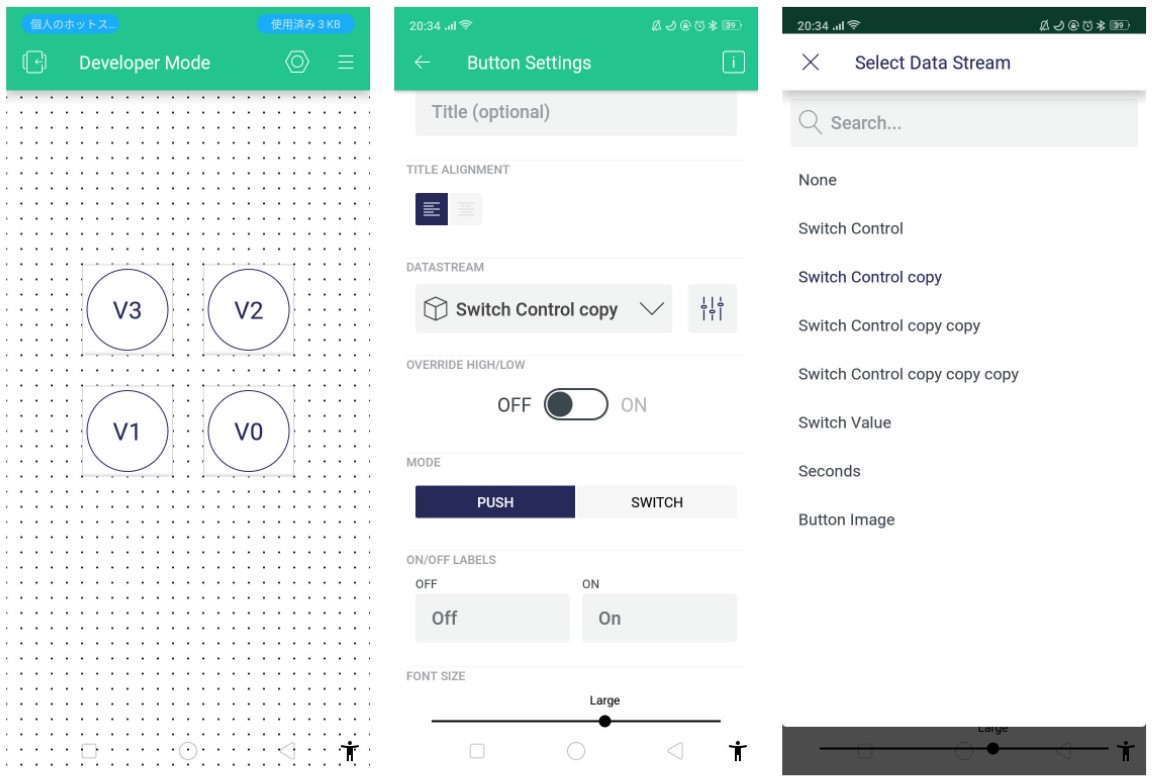
**製作手順** 1. M5StickCのArduino開発環境整備 2. Blynkセットアップ 3. 下記プログラム書き込み 4. ハードウェア組立 5. 動作確認・完成 **プログラム** ```arduino:M5RemoteMotor /************************************************************* Download latest Blynk library here: https://github.com/blynkkk/blynk-library/releases/latest Blynk is a platform with iOS and Android apps to control Arduino, Raspberry Pi and the likes over the Internet. You can easily build graphic interfaces for all your projects by simply dragging and dropping widgets. Downloads, docs, tutorials: http://www.blynk.cc Sketch generator: http://examples.blynk.cc Blynk community: http://community.blynk.cc Follow us: http://www.fb.com/blynkapp http://twitter.com/blynk_app Blynk library is licensed under MIT license This example code is in public domain. ************************************************************* This example runs directly on ESP32 chip. Note: This requires ESP32 support package: https://github.com/espressif/arduino-esp32 Please be sure to select the right ESP32 module in the Tools -> Board menu! Change WiFi ssid, pass, and Blynk auth token to run :) Feel free to apply it to any other example. It's simple! *************************************************************/ /* Comment this out to disable prints and save space */ #define BLYNK_PRINT Serial /* Fill-in your Template ID (only if using Blynk.Cloud) */ #define BLYNK_TEMPLATE_ID "YourTemplateID" #include <WiFi.h> #include <WiFiClient.h> #include <BlynkSimpleEsp32.h> #include <M5StickC.h> //追加部分 // You should get Auth Token in the Blynk App. // Go to the Project Settings (nut icon). char auth[] = "YourAuthToken"; // Your WiFi credentials. // Set password to "" for open networks. char ssid[] = "YourNetworkName"; char pass[] = "YourPassword"; void setup() { M5.begin(); //追加部分 M5.Lcd.println("Blynk"); //追加部分 M5.Lcd.print("M5RemoteMotor"); //追加部分 pinMode(GPIO_NUM_26, OUTPUT); //追加部分 pinMode(GPIO_NUM_0 , OUTPUT); //追加部分 pinMode(GPIO_NUM_32, OUTPUT); //追加部分 pinMode(GPIO_NUM_33, OUTPUT); //追加部分 digitalWrite(GPIO_NUM_26, HIGH); //追加部分 digitalWrite(GPIO_NUM_0 , HIGH); //追加部分 digitalWrite(GPIO_NUM_32, HIGH); //追加部分 digitalWrite(GPIO_NUM_33, HIGH); //追加部分 // Debug console Serial.begin(9600); Blynk.begin(auth, ssid, pass); } void loop() { Blynk.run(); } //追加部分 BLYNK_WRITE(V0) { int16_t LED = param[0].asInt(); if(LED == 0){ l_brake(); } if(LED == 1){ l_front(); } } BLYNK_WRITE(V1) { int16_t LED = param[0].asInt(); if(LED == 0){ r_brake(); } if(LED == 1){ r_front(); } } BLYNK_WRITE(V2) { int16_t LED = param[0].asInt(); if(LED == 0){ l_brake(); } if(LED == 1){ l_back(); } } BLYNK_WRITE(V3) { int16_t LED = param[0].asInt(); if(LED == 0){ r_brake(); } if(LED == 1){ r_back(); } } void l_front(){ digitalWrite(GPIO_NUM_26, HIGH); digitalWrite(GPIO_NUM_0 , LOW); } void r_front(){ digitalWrite(GPIO_NUM_32, HIGH); digitalWrite(GPIO_NUM_33, LOW); } void l_back(){ digitalWrite(GPIO_NUM_26, LOW); digitalWrite(GPIO_NUM_0 , HIGH); } void r_back(){ digitalWrite(GPIO_NUM_32, LOW); digitalWrite(GPIO_NUM_33, HIGH); } void l_brake(){ digitalWrite(GPIO_NUM_26, HIGH); digitalWrite(GPIO_NUM_0 , HIGH); } void r_brake(){ digitalWrite(GPIO_NUM_32, HIGH); digitalWrite(GPIO_NUM_33, HIGH); } ``` **参考文献** - [M5StickCのIOについて調べてみた](https://lang-ship.com/blog/work/m5stickc-io/) GPIO36はdigitalWrite() が使えないみたい - [How to change Virtual Pin Index in Blynk IoT App](https://community.blynk.cc/t/how-to-change-virtual-pin-index-in-blynk-iot-app/56097/9) 新しい方のBlynkのスマホアプリではバーチャルPin番号を変えられず、そこだけはWeb上のダッシュボードから追加する必要がある **参考画像**