Yuki5130 が 2025年01月31日21時39分34秒 に編集
初版
タイトルの変更
高齢者見守りシステムの開発
タグの変更
SPRESENSE
メイン画像の変更
記事種類の変更
製作品
本文の変更
# 概要 高齢の家族が安全に暮らせるように、現在地を確認し迷子になった場合に通知を送る「高齢者見守りシステム」を開発しました。本記事では、システムの構成から環境構築、実装手順までを分かりやすく解説します。 # 使用部品 - Sony Spresense メインボード 1. https://www.sony-semicon.com/ja/products/spresense/index.html - Spresense LTE拡張ボード https://developer.sony.com/ja/spresense/products/spresense-lte-ext-board - SIMカード IIJ mio - https://www.iijmio.jp/mit/ - M5Stack Gray https://www.switch-science.com/products/3648?srsltid=AfmBOoqclx-GDY-WKf_jilKMbF2a4VEOh6qjRTjiWwGA53I91T7QwOgQ # 使用ソフト・サービス - Arduino IDE - Ambient - LINE Notify # システム構成 以下のフローでデータがやり取りされます: 1. Spresense GNSSで緯度・経度を取得し、LTE通信でデータをAmbientに送信。 2. Ambient ブラウザ上で位置情報を可視化。 3. M5Stack MQTT通信でSpresenseからの情報を受け取り、状況に応じて音や表示で警告。 4. LINE Notify 自宅からの距離が特定範囲を超えた場合、LINEに緯度・経度と「迷子」状態を通知。 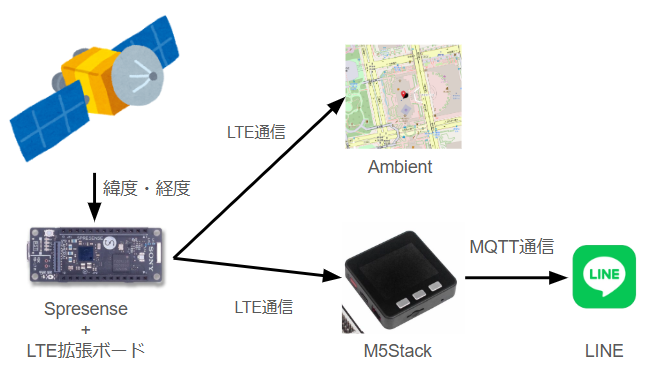 # 環境構築 この章では環境構築方法について解説します。 ただし今回の記事ではSpresenseメインボードのセットアップ方法は省略します。 ## SIMカードの設定(アクティベーションの有効化) LTEボードを使うにあたって今回はIoT向けのSIMカードを購入しました。 https://www.iijmio.jp/mit/ セットアップ方法は取り扱い説明書にも書かれていますが、今後購入される方に向けて参考になればと思います。私はiPhoneを所有していえるのでiOSの場合の設定手順について紹介します。 1. SIMカードをiPhoneに挿入します。 2. 「設定」から「モバイル通信」を選択します。 3. 「通信のオプション」から「データローミング」をOFFにし、「モバイルデータ通信ネットワーク」を選択します。 4. 「モバイルデータ通信」と「LTE設定」のそれぞれにAPN設定情報を入力します - APN:iijmio.jp - ユーザー名:mio@iij - パスワード:iij 5. APN設定が完了したら、スマホを再起動します。SIMカードがアクティベーション(利用登録)されて通信が可能になります。 4. 通信ができているかをブラウザで画像などを検索して表示されていることを確認してください。 *SIMカードの取扱説明書を参考にしてください。 ## LTEボードの設定 次にSIMカードをLTEボードに挿入して通信が可能か確認します。 https://sensing-solution-hackathon-materials.sonyged.com/SPRESENSE_LTE_2024.pdf に従って、Spresense用サンプルコードを動かしてみます。 1. Arduino IDEを起動し、メニューバーの「ファイル」→「スケッチ例」→「LTE]→「LteScanNetwroks」を選択します。 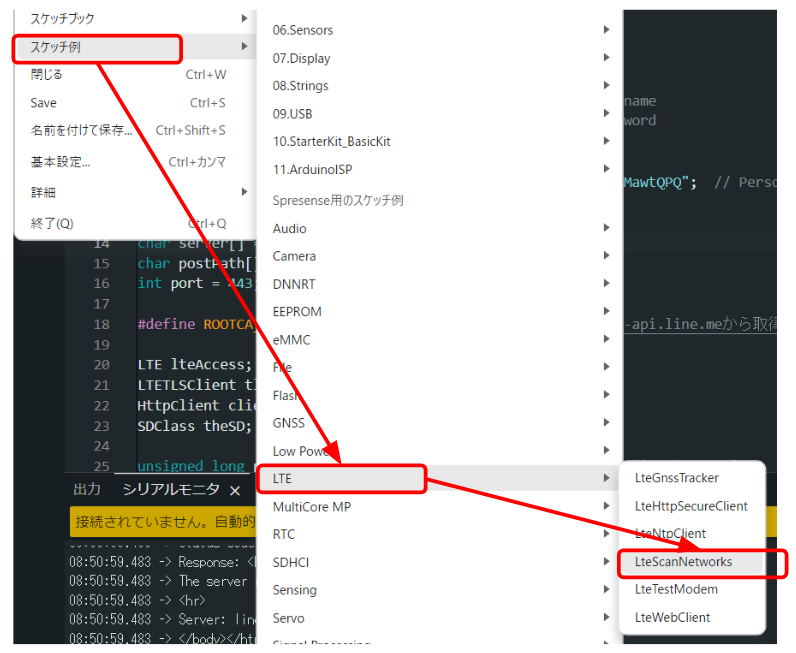 2. 今回使用するSIMカードの認証方法や基本情報(APN名、パスワード)を設定し、書き込みを成功すればIMカードのIPアドレスや通信強度を確認すことができます。 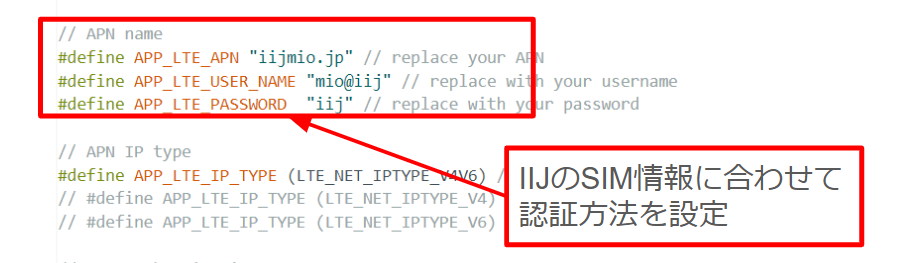 ### LTEScanNetworkのサンプルコード ```c++ /* * LteScanNetworks.ino - Example for obtaining network information * Copyright 2019, 2021, 2022 Sony Semiconductor Solutions Corporation * * This library is free software; you can redistribute it and/or * modify it under the terms of the GNU Lesser General Public * License as published by the Free Software Foundation; either * version 2.1 of the License, or (at your option) any later version. * * This library is distributed in the hope that it will be useful, * but WITHOUT ANY WARRANTY; without even the implied warranty of * MERCHANTABILITY or FITNESS FOR A PARTICULAR PURPOSE. See the GNU * Lesser General Public License for more details. * * You should have received a copy of the GNU Lesser General Public * License along with this library; if not, write to the Free Software * Foundation, Inc., 51 Franklin St, Fifth Floor, Boston, MA 02110-1301 USA * * This sketch turns on the modem and gets the following information: * - IP address assigned by LTE network * - Connected LTE network carrier * - Signal strength of the LTE network * */ // libraries #include <LTE.h> // APN name #define APP_LTE_APN "iijmio.jp" // replace your APN #define APP_LTE_USER_NAME "mio@iij" // replace with your username #define APP_LTE_PASSWORD "iij" // replace with your password // APN IP type #define APP_LTE_IP_TYPE (LTE_NET_IPTYPE_V4V6) // IP : IPv4v6 // #define APP_LTE_IP_TYPE (LTE_NET_IPTYPE_V4) // IP : IPv4 // #define APP_LTE_IP_TYPE (LTE_NET_IPTYPE_V6) // IP : IPv6 // APN authentication type #define APP_LTE_AUTH_TYPE (LTE_NET_AUTHTYPE_CHAP) // Authentication : CHAP // #define APP_LTE_AUTH_TYPE (LTE_NET_AUTHTYPE_PAP) // Authentication : PAP // #define APP_LTE_AUTH_TYPE (LTE_NET_AUTHTYPE_NONE) // Authentication : NONE /* RAT to use * Refer to the cellular carriers information * to find out which RAT your SIM supports. * The RAT set on the modem can be checked with LTEModemVerification::getRAT(). */ #define APP_LTE_RAT (LTE_NET_RAT_CATM) // RAT : LTE-M (LTE Cat-M1) // #define APP_LTE_RAT (LTE_NET_RAT_NBIOT) // RAT : NB-IoT // initialize the library instance LTE lteAccess; LTEScanner scannerNetworks; String readFromSerial() { /* Read String from serial monitor */ String str; int read_byte = 0; while (true) { if (Serial.available() > 0) { read_byte = Serial.read(); if (read_byte == '\n' || read_byte == '\r') { Serial.println(""); break; } Serial.print((char)read_byte); str += (char)read_byte; } } return str; } void readApnInformation(char apn[], LTENetworkAuthType *authtype, char user_name[], char password[]) { /* Set APN parameter to arguments from readFromSerial() */ String read_buf; while (strlen(apn) == 0) { Serial.print("Enter Access Point Name:"); readFromSerial().toCharArray(apn, LTE_NET_APN_MAXLEN); } while (true) { Serial.print("Enter APN authentication type(CHAP, PAP, NONE):"); read_buf = readFromSerial(); if (read_buf.equals("NONE") == true) { *authtype = LTE_NET_AUTHTYPE_NONE; } else if (read_buf.equals("PAP") == true) { *authtype = LTE_NET_AUTHTYPE_PAP; } else if (read_buf.equals("CHAP") == true) { *authtype = LTE_NET_AUTHTYPE_CHAP; } else { /* No match authtype */ Serial.println("No match authtype. type at CHAP, PAP, NONE."); continue; } break; } if (*authtype != LTE_NET_AUTHTYPE_NONE) { while (strlen(user_name)== 0) { Serial.print("Enter username:"); readFromSerial().toCharArray(user_name, LTE_NET_USER_MAXLEN); } while (strlen(password) == 0) { Serial.print("Enter password:"); readFromSerial().toCharArray(password, LTE_NET_PASSWORD_MAXLEN); } } return; } void setup() { char apn[LTE_NET_APN_MAXLEN] = APP_LTE_APN; LTENetworkAuthType authtype = APP_LTE_AUTH_TYPE; char user_name[LTE_NET_USER_MAXLEN] = APP_LTE_USER_NAME; char password[LTE_NET_PASSWORD_MAXLEN] = APP_LTE_PASSWORD; // initialize serial communications and wait for port to open: Serial.begin(115200); while (!Serial) { ; // wait for serial port to connect. Needed for Leonardo only } Serial.println("LTE networks scanner"); /* Set if Access Point Name is empty */ if (strlen(APP_LTE_APN) == 0) { Serial.println("This sketch doesn't have a APN information."); readApnInformation(apn, &authtype, user_name, password); } Serial.println("=========== APN information ==========="); Serial.print("Access Point Name : "); Serial.println(apn); Serial.print("Authentication Type: "); Serial.println(authtype == LTE_NET_AUTHTYPE_CHAP ? "CHAP" : authtype == LTE_NET_AUTHTYPE_NONE ? "NONE" : "PAP"); if (authtype != LTE_NET_AUTHTYPE_NONE) { Serial.print("User Name : "); Serial.println(user_name); Serial.print("Password : "); Serial.println(password); } while (true) { /* Power on the modem and Enable the radio function. */ if (lteAccess.begin() != LTE_SEARCHING) { Serial.println("Could not transition to LTE_SEARCHING."); Serial.println("Please check the status of the LTE board."); for (;;) { sleep(1); } } /* The connection process to the APN will start. * If the synchronous parameter is false, * the return value will be returned when the connection process is started. */ if (lteAccess.attach(APP_LTE_RAT, apn, user_name, password, authtype, APP_LTE_IP_TYPE) == LTE_READY) { Serial.println("attach succeeded."); break; } /* If the following logs occur frequently, one of the following might be a cause: * - APN settings are incorrect * - SIM is not inserted correctly * - If you have specified LTE_NET_RAT_NBIOT for APP_LTE_RAT, * your LTE board may not support it. * - Rejected from LTE network */ Serial.println("An error has occurred. Shutdown and retry the network attach process after 1 second."); lteAccess.shutdown(); sleep(1); } } void loop() { // Wait 1 second to get the IP address correctly. sleep(1); // Assigned IP address IPAddress address = lteAccess.getIPAddress(); Serial.print("IP address: "); Serial.println(address); // currently connected carrier Serial.print("Current carrier: "); Serial.println(scannerNetworks.getCurrentCarrier()); // return signal strength Serial.print("Signal Strength: "); Serial.print(scannerNetworks.getSignalStrength()); Serial.println(" [dBm]"); } ``` ## Ambientの設定 この章ではSpresenseで取得したセンサデータやGNSSデータをブラウザ上で可視化し、誰でも確認する方法について共有します。Ambientとはマイコンなどで取得したセンサデータを可視化するサービスで、無料で使用することができます。また今回はソニーグローバルエディケーション株式会社の資料を参考にして、作成していきます。 参考サイト:https://sensing-solution-hackathon-materials.sonyged.com/SPRESENSE%E3%81%8B%E3%82%89%E3%81%AE%E3%83%86%E3%82%99%E3%83%BC%E3%82%BF%E3%82%92%E5%8F%AF%E8%A6%96%E5%8C%96%E3%81%97%E3%81%A6%E3%81%BF%E3%82%88%E3%81%86%EF%BC%81.pdf 太田さん作成のライブラリ:https://github.com/TE-YoshinoriOota/Ambient_SpresenseLTEM ### Ambientのセットアップ 1. 以下のサイトにアクセスして、ユーザー登録を行います。 https://ambidata.io/ 2. 「チャンネルを作る」のボタンを選択します。 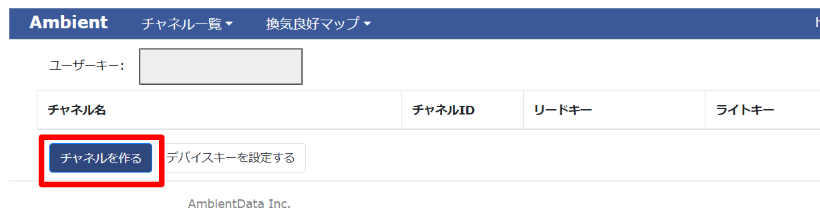 3. チャンネルが作成されると、「チャンネルID」と「ライトキー」が。 この2つはソースコードで実装するときに必要になりますのでメモしておいてください。  4. Ambient_SpresenseLTEM.cpp内のパスに先ほど生成したチャンネル名を入力します。 データをAmbientに送信するAPIのエンドポイントを指定します。 5. Arduino IDEのプログラム(inoファイル)で先ほど生成したライトキーを指定します。 (本来はmy_channelidに直接自分のチャンネルIDを入力すればいいはずです。。。) #### 修正前 ```c++ char path[] = "/api/v2/channels/"; String fullpath = path + String(mChannelId) + "/data"; ``` #### 修正後 ```c++ char path[] = "/api/v2/channels/Your_Channel/"; String fullpath = String(path) + "/data"; ``` ### ソースコード ```c++ ``` ### 実行結果 Spresenseで取得したGNSSデータ(緯度・経度)をAmbient上で表示することができました。 (プライバシーの観点から今回は都庁の緯度経度をAmbientに送信しています。) 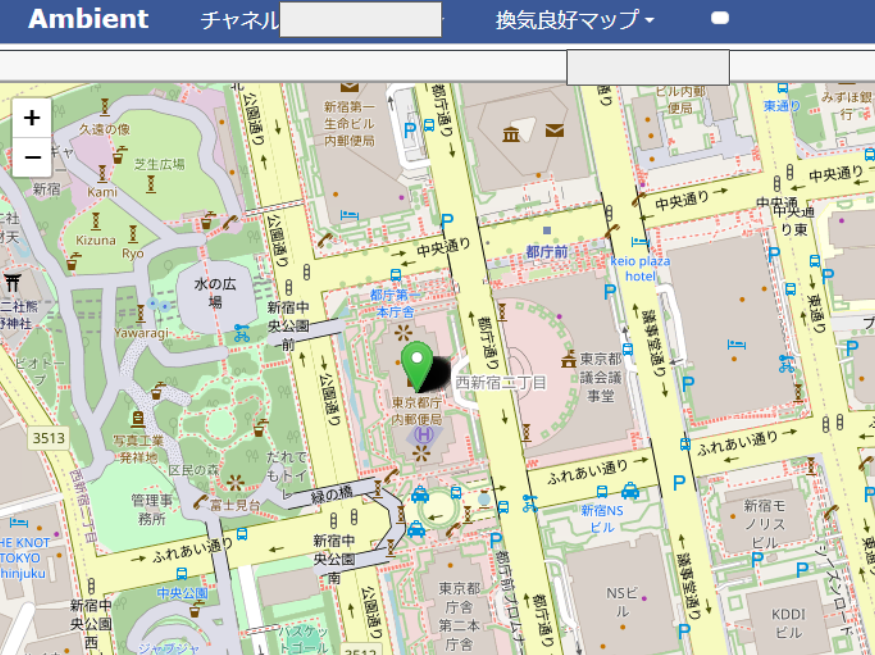 ## MQTT通信 以下のサイトに従ってSpresenseでMQTT通信のセットアップを行いました。この章ではSpresense側からMQTT通信でTestという文字列をM5Stack側に送信し、M5Stackがその文字列を受信するという https://sensing-solution-hackathon-materials.sonyged.com/SPRESENSE_LTE_2024.pdf MQTTのセットアップ手順 1. Arduino IDEを開く 2. 「ライブラリマネージャー」を開き、「ArduinoMqttClient」をインストール 3. SpresenseをMQTTブローカーとしてM5Stackに接続。 4. LTE ## LINE Notifyのセットアップ 1. 以下のLINEのサイトのアクセスし、自分のLINEのアカウントにログインする https://notify-bot.line.me/ja/ 2. 「マイページ」を開き、「トークンを発行する」を選択する。 3. トークンを発行し、LINEで通知を受け取るグループを設定し、「発行する」ボタンを押す。 4. Arduino IDEのコードにトークンを組み込み、通知を送信。 ```c++ #include <LTE.h> #include <ArduinoMqttClient.h> // APN name #define APP_LTE_APN "iijmio.jp" // replace your APN /* APN authentication settings * Ignore these parameters when setting LTE_NET_AUTHTYPE_NONE. */ #define APP_LTE_USER_NAME "mio@iij" // replace with your username #define APP_LTE_PASSWORD "iij" // replace with your password // APN IP type #define APP_LTE_IP_TYPE (LTE_NET_IPTYPE_V4V6) // IP : IPv4v6 // #define APP_LTE_IP_TYPE (LTE_NET_IPTYPE_V4) // IP : IPv4 // #define APP_LTE_IP_TYPE (LTE_NET_IPTYPE_V6) // IP : IPv6 // APN authentication type #define APP_LTE_AUTH_TYPE (LTE_NET_AUTHTYPE_CHAP) // Authentication : CHAP // #define APP_LTE_AUTH_TYPE (LTE_NET_AUTHTYPE_PAP) // Authentication : PAP // #define APP_LTE_AUTH_TYPE (LTE_NET_AUTHTYPE_NONE) // Authentication : NONE /* RAT to use * Refer to the cellular carriers information * to find out which RAT your SIM supports. * The RAT set on the modem can be checked with LTEModemVerification::getRAT(). */ #define APP_LTE_RAT (LTE_NET_RAT_CATM) // RAT : LTE-M (LTE Cat-M1) // #define APP_LTE_RAT (LTE_NET_RAT_NBIOT) // RAT : NB-IoT // MQTT broker #define BROKER_NAME "test.mosquitto.org" // replace with your broker #define BROKER_PORT 1883 // port 8883 is the default for MQTT over TLS. // for this client, if required by the server. // MQTT topic #define MQTT_TOPIC "spresense/mqtt" // replace with your topic // MQTT publish interval settings #define PUBLISH_INTERVAL_SEC 1 // MQTT publish interval in sec #define MAX_NUMBER_OF_PUBLISH 30 // Maximum number of publish LTE lteAccess; LTEClient client; MqttClient mqttClient(client); int numOfPubs = 0; unsigned long lastPubSec = 0; char broker[] = BROKER_NAME; int port = BROKER_PORT; char topic[] = MQTT_TOPIC; void doAttach() { while (true) { /* Power on the modem and Enable the radio function. */ if (lteAccess.begin() != LTE_SEARCHING) { Serial.println("Could not transition to LTE_SEARCHING."); Serial.println("Please check the status of the LTE board."); for (;;) { sleep(1); } } /* The connection process to the APN will start. * If the synchronous parameter is false, * the return value will be returned when the connection process is started. */ if (lteAccess.attach(APP_LTE_RAT, APP_LTE_APN, APP_LTE_USER_NAME, APP_LTE_PASSWORD, APP_LTE_AUTH_TYPE, APP_LTE_IP_TYPE, false) == LTE_CONNECTING) { Serial.println("Attempting to connect to network."); break; } /* If the following logs occur frequently, one of the following might be a cause: * - APN settings are incorrect * - SIM is not inserted correctly * - If you have specified LTE_NET_RAT_NBIOT for APP_LTE_RAT, * your LTE board may not support it. */ Serial.println("An error has occurred. Shutdown and retry the network attach preparation process after 1 second."); lteAccess.shutdown(); sleep(1); } } void setup() { // Open serial communications and wait for port to open Serial.begin(115200); while (!Serial) { ; // wait for serial port to connect. Needed for native USB port only } Serial.println("Starting ."); /* Connect LTE network */ doAttach(); int result; // Wait for the modem to connect to the LTE network. Serial.println("Waiting for successful attach."); LTEModemStatus modemStatus = lteAccess.getStatus(); while(LTE_READY != modemStatus) { if (LTE_ERROR == modemStatus) { /* If the following logs occur frequently, one of the following might be a cause: * - Reject from LTE network */ Serial.println("An error has occurred. Shutdown and retry the network attach process after 1 second."); lteAccess.shutdown(); sleep(1); doAttach(); } sleep(1); modemStatus = lteAccess.getStatus(); } Serial.println("attach succeeded."); Serial.print("Attempting to connect to the MQTT broker: "); Serial.println(broker); if (!mqttClient.connect(broker, port)) { Serial.print("MQTT connection failed! Error code = "); Serial.println(mqttClient.connectError()); // do nothing forevermore: for (;;) sleep(1); } Serial.println("You're connected to the MQTT broker!"); } void loop() { String testString = "test" + String(numOfPubs) + "!"; unsigned long currentTime = lteAccess.getTime(); if (currentTime >= lastPubSec + PUBLISH_INTERVAL_SEC) { // Publish to broker Serial.print("Sending message to topic: "); Serial.println(topic); Serial.print("Publish: "); Serial.println(testString); // send message, the Print interface can be used to set the message contents mqttClient.beginMessage(topic); mqttClient.print(testString); mqttClient.endMessage(); lastPubSec = currentTime; numOfPubs++; } if (numOfPubs >= MAX_NUMBER_OF_PUBLISH) { Serial.println("Publish end"); // do nothing forevermore: for (;;) sleep(1); } } ``` # おわりに