Daiton が 2021年02月06日23時10分58秒 に編集
初版
タイトルの変更
Arduinoモータードライバシールドで制御する可変式クローラロボットの開発
タグの変更
Arduino
ロボット
秋葉原2021
本文の変更
久しぶりの投稿になります。 今回は自分とクラスメイトの計三人で開発したクローラロボットの制御方法と機構について紹介させていただきます。 **1. 研究の動機** 私の通う高専の低学年自主研究のテーマとして比較的単純な構造をした小型クローラロボットを作ろうとしたのがきっかけです。 **2. 制御基板の紹介** DCモーターを最大4つ同時制御可能なL293Dモータードライバシールドを使用しました。モーターはRS380PHを用いました。 [](url)https://www.amazon.co.jp/L293D-ドライバー拡張ボード-基板モーター-モータ制御シールド-並行輸入品/dp/B011IGZ2CA/ref=sr_1_2?dchild=1&hvadid=474658879430&hvdev=c&jp-ad-ap=0&keywords=arduino+%E3%83%A2%E3%83%BC%E3%82%BF%E3%83%BC%E3%82%B7%E3%83%BC%E3%83%AB%E3%83%89&qid=1612524014&sr=8-2&tag=yahhyd-22 通信にはUSBホストシールドを使用しました。Bluetoothドングを差し込みps4のコントローラで操作できるようにしています。 [](url)https://www.amazon.co.jp/HAMILO-USBホストシールド-Arduino用-サイエンス-パソコン周辺機器/dp/B08685TRNJ/ref=sr_1_7?dchild=1&hvadid=467530877261&hvdev=c&jp-ad-ap=0&keywords=arduino+usb%E3%83%9B%E3%82%B9%E3%83%88%E3%82%B7%E3%83%BC%E3%83%AB%E3%83%89&qid=1612521806&sr=8-7&tag=yahhyd-22 電源はArduino本体用にモバイルバッテリー、モータードライバー用に9Vの電池を使いました。 配線を終えた基盤全体の図と写真です。  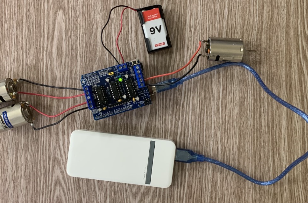 **3. プログラム** ```arduino:クローラロボットの制御 #include <AFMotor.h> #include<PS4BT.h> #include<usbhub.h> #ifdef dobogusinclude #include <spi4teensy3.h> #endif //#include <SPI.h> USB Usb; BTD Btd(&Usb); PS4BT PS4(&Btd, PAIR); bool printAngle, printTouch; uint8_t oldL2Value, oldR2Value; AF_DCMotor motor1(1, MOTOR12_64KHZ); //左側モータ AF_DCMotor motor3(3, MOTOR34_64KHZ); //右側モータ AF_DCMotor motor4(4, MOTOR34_64KHZ); //アームのモーター int pos_ry; int pos_ly; int motor_sp; const int motor_sp1 = 255; //旋回速度 const int motor_sp0 = 0; //低速 void setup() { Serial.begin(115200); #if !defined(__MIPSEL__) while (!Serial); // Wait for serial port to connect - used on Leonardo, Teensy and other boards with built-in USB CDC serial connection #endif if (Usb.Init() == -1) { Serial.print(F("\r\nOSC did not start")); while (1); // Halt } Serial.print(F("\r\nPS4 Bluetooth Library Started")); motor1.run(RELEASE); motor3.run(RELEASE); motor4.run(RELEASE); } void loop() { Usb.Task(); { if (PS4.connected()) { pos_ly = PS4.getAnalogHat(LeftHatY); //y pos_ry = PS4.getAnalogHat(RightHatY); //x if (PS4.getButtonClick(UP)) { //アーム上げる motor4.run(FORWARD); } if (PS4.getButtonClick(DOWN)) { //アーム下げる motor4.run(BACKWARD); } if (PS4.getButtonClick(RIGHT)) { motor4.setSpeed(0); motor4.run(RELEASE); } //左スティックがセンター付近は停止 if (pos_ry >= 117 && pos_ry <= 137 && pos_ly >= 117 && pos_ly <= 137) { motor1.setSpeed(0); motor1.run(RELEASE); motor3.setSpeed(0); motor3.run(RELEASE); } //前進 else if (pos_ly < 117 && pos_ry < 117) { motor_sp = map(pos_ly, 117, 0, 0, 255); //map(fromlow,fromhigh,tolow,tohigh)に変換 motor1.setSpeed(motor_sp); motor1.run(FORWARD); motor3.setSpeed(motor_sp); motor3.run(FORWARD); } //後進 else if ( pos_ly > 137 && pos_ry > 137) { motor_sp = map(pos_ly, 137, 255, 0, 255); motor1.setSpeed(motor_sp); motor1.run(BACKWARD); motor3.setSpeed(motor_sp); motor3.run(BACKWARD); } //時計回り else if (pos_ly < 117 && pos_ry > 137) { motor1.setSpeed(motor_sp1); motor1.run(FORWARD); motor3.setSpeed(motor_sp1); motor3.run(BACKWARD); } //反時計回り else if (pos_ly > 137 && pos_ry < 117) { motor1.setSpeed(motor_sp1); motor1.run(BACKWARD); motor3.setSpeed(motor_sp1); motor3.run(FORWARD); } } } } ``` このコードはgithubにも公開しています。[](url)https://github.com/akimoto-tt/crawlerRobot/blob/main/robotSketch コントローラの配置は以下の通りです。 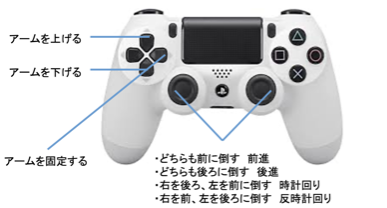 **4. 機構と本体の紹介** 先端にホイールをつけたアームを楕円軌道上に作動させることで履帯(キャタピラ)を変形させ障害物を踏破します。 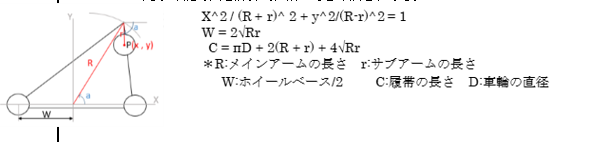 また小型化のためギアボックスの自作もしました。 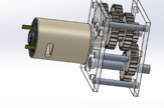 設計はCAD(solidworks)で行い製造はプラスチックをレーザー加工したり3Dプリンタを用いました。全体の3Dデータは以下の通りです。 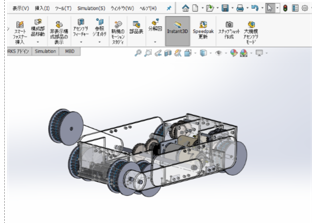 **5. 総括** コロナ下で休校が続く中でなるべく簡略化した制御方法をとることができました。簡単な制御方法と製造までスピーディに行えたことが発表会でも評価していただけました。 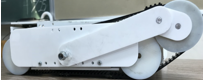 新学期からもこのロボットの改良を続けセンサやカメラを搭載したりWi-Fiモジュールなどを活用したいと思っています。 つたない文章でしたがありがとうございました。