kou が 2025年01月31日23時57分35秒 に編集
初版
タイトルの変更
SpresenseとLoRaを使って畑を監視してみる
タグの変更
SPRESENSE
LoRa
Spresense
メイン画像の変更
記事種類の変更
製作品
本文の変更
# 概要 外にある畑などを監視する際に消費電力が少ないSpresenseを活用できるのでは?と思い畑を監視するカメラを作ってみました! # 利用したハードウェア 1. Spresense本体 2. SPRESENSE HDRカメラボード 3. LoRaアドオンボード(https://www.switch-science.com/products/8958) 提供いただいたボードを組み合わせ,LoRaのアドオンボードとHDRカメラをSpresense本体に装着しました. 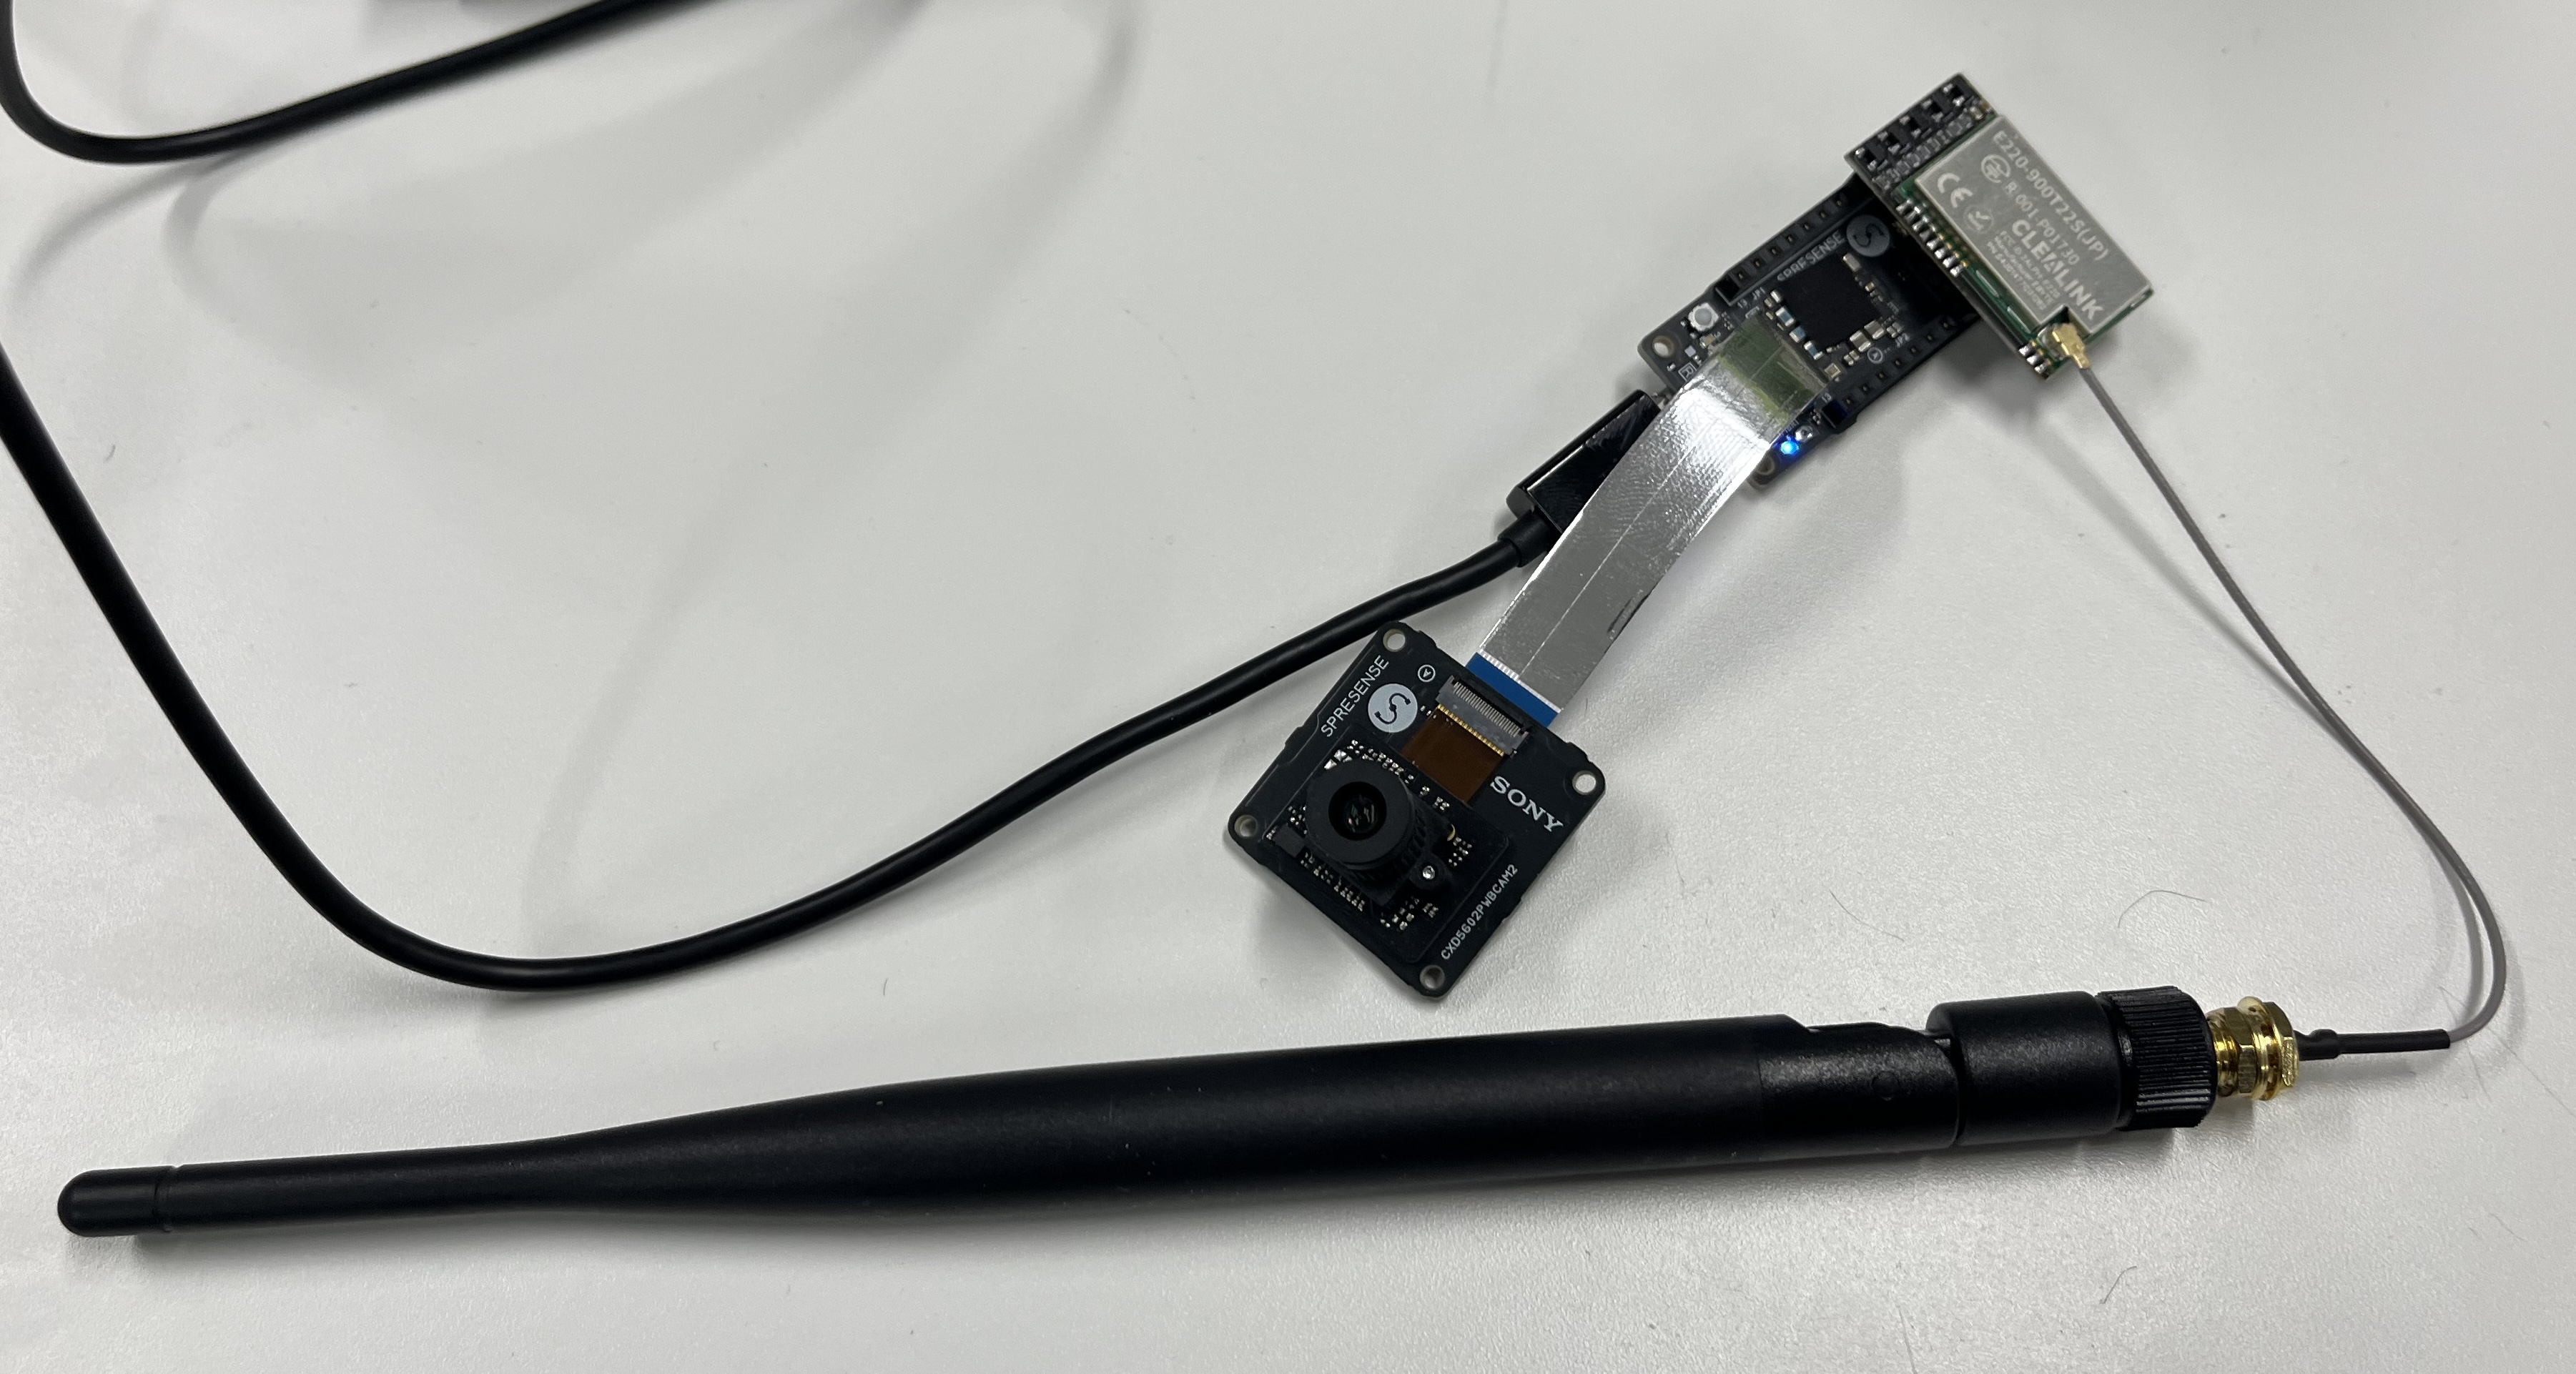 4. AirChecker C3/USBセット (https://akizukidenshi.com/catalog/g/g129502/) 今回PC側から画像を確認するために,AirCheckerC3というLoRaモジュールとESP32 C3が一体化された製品を利用しました. 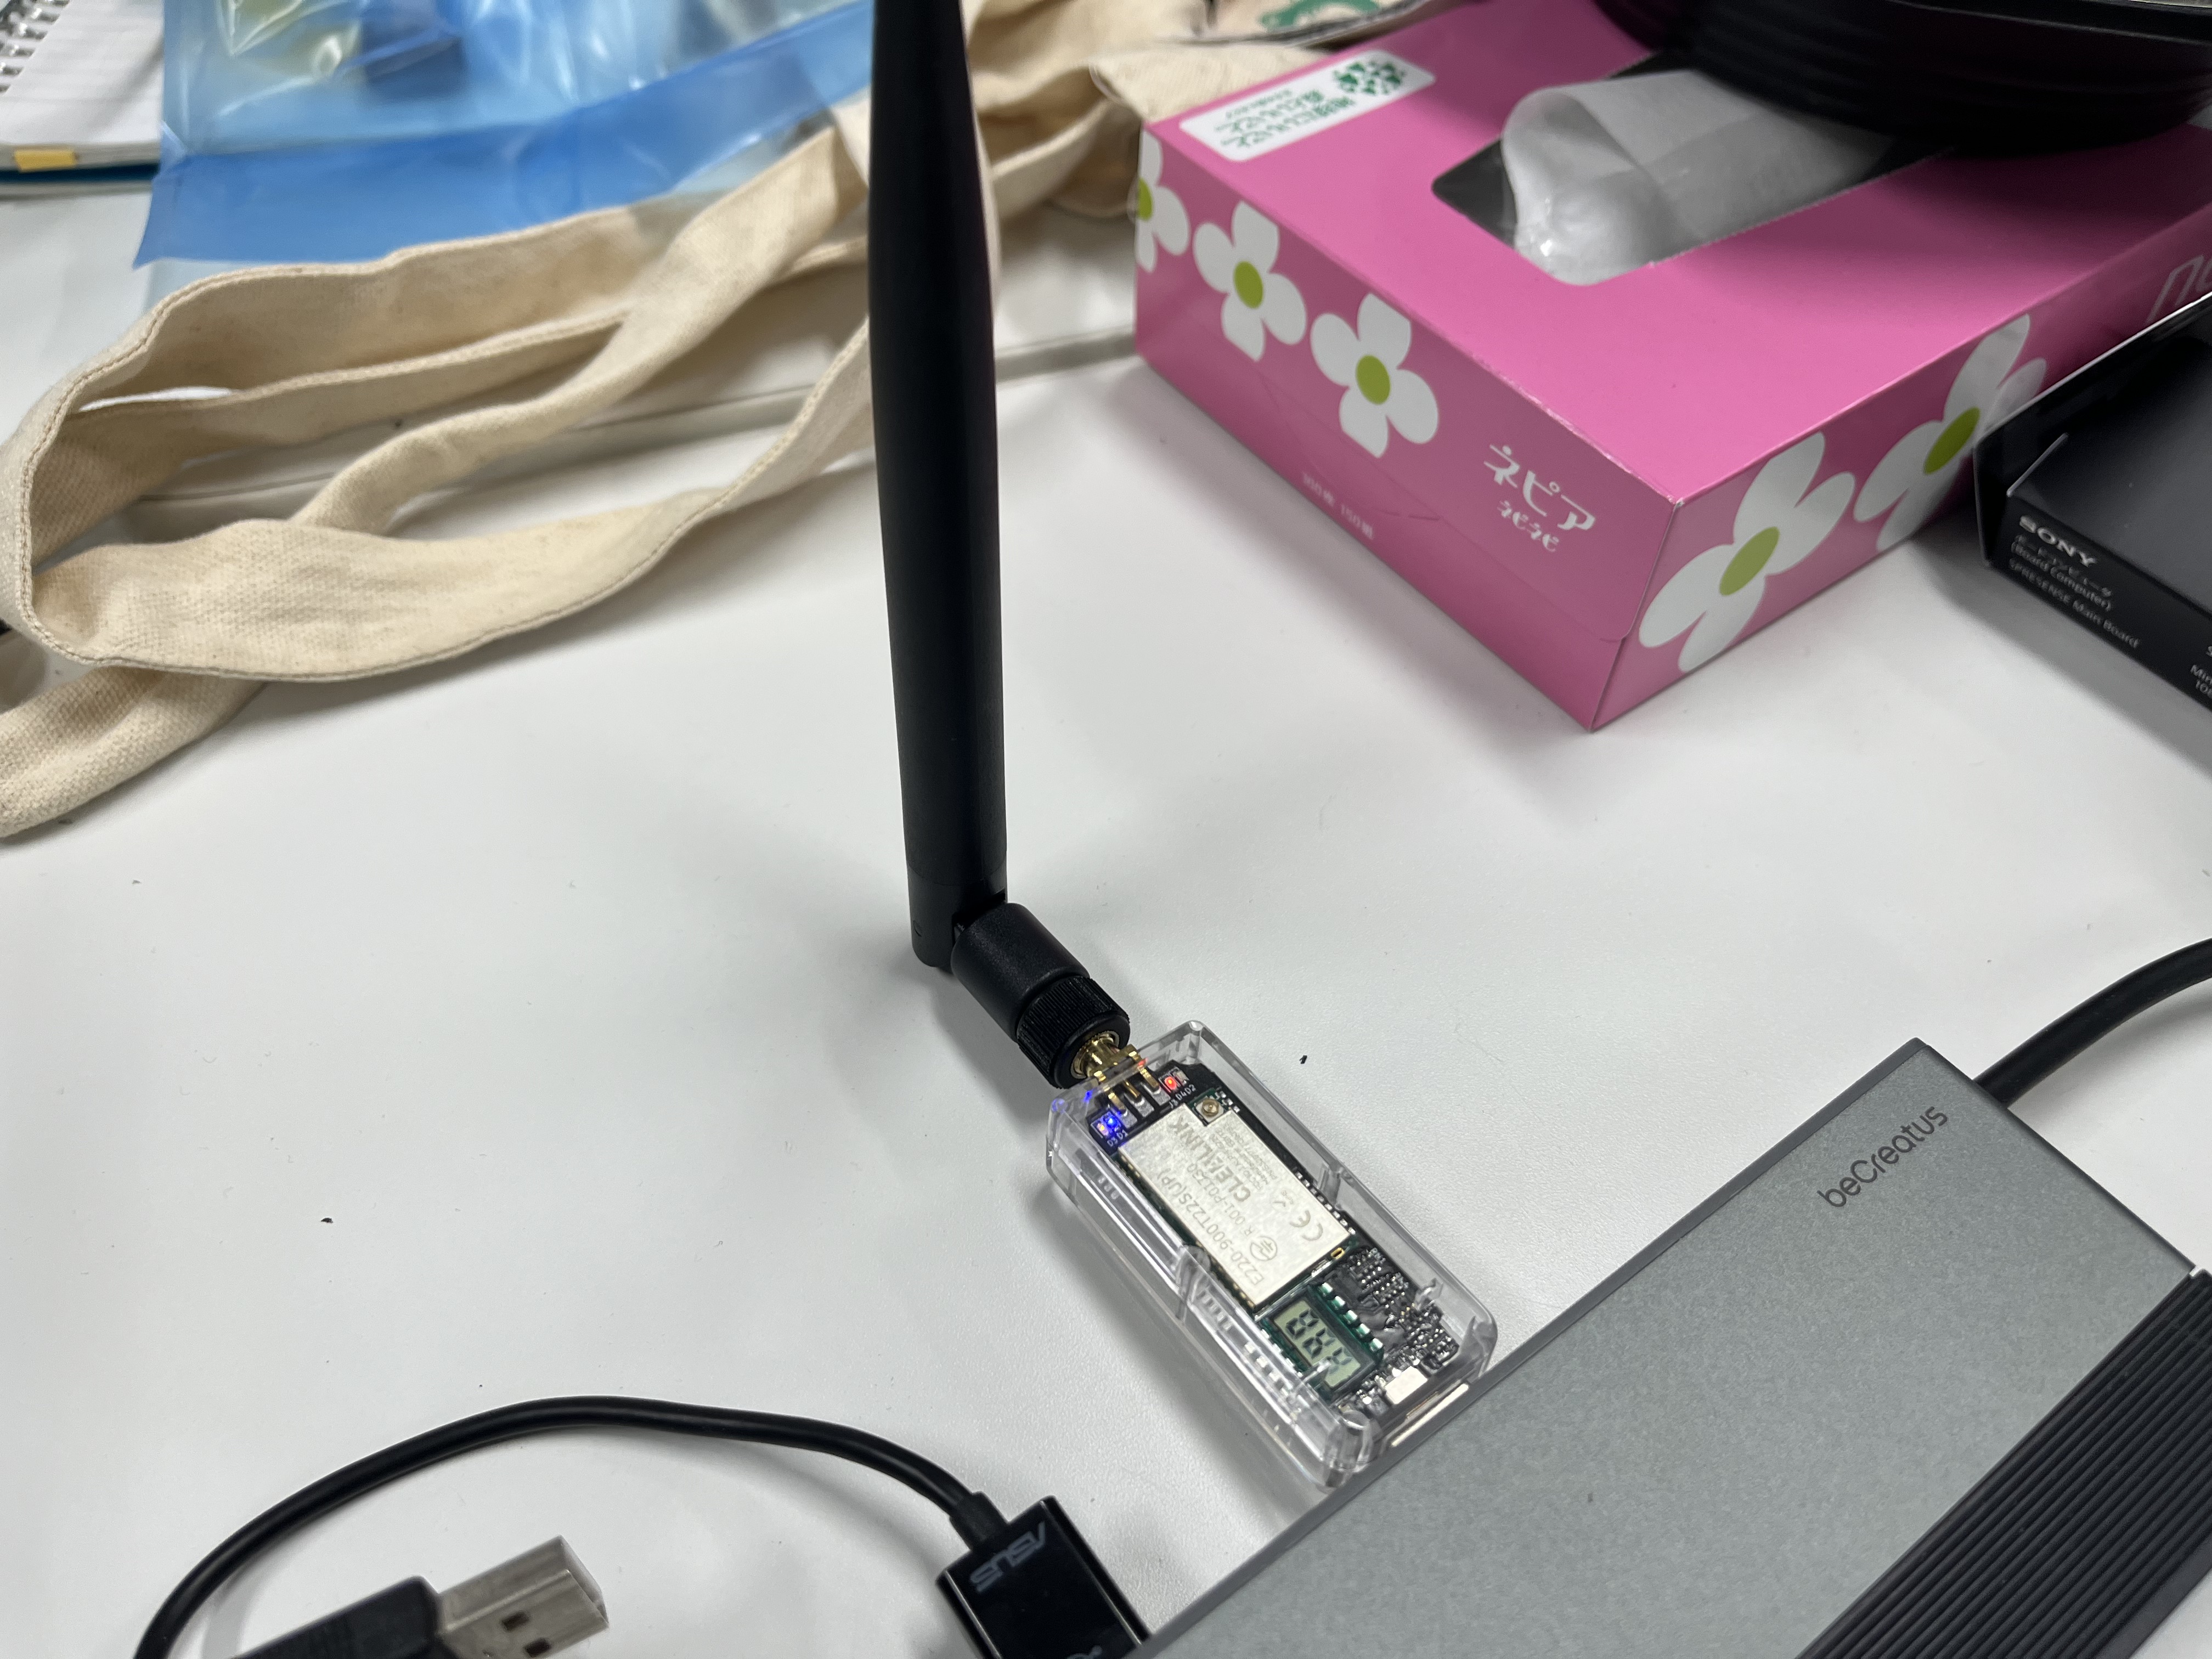 # システムの概要 今回システムは以下の流れで畑の映像を可視化します. 1. Spresenseで画像を撮影 2. LoRaで送信 3. 受信機側で取得 4. PC画面で可視化 また,LoRaは見通しが良いところだと数km届くらしいです. ただし,1回に送信できるデータが200byteで5秒おきにしか送れないので,リアルタイムな映像転送は少し苦しいです.今回は40x30の画像をYUV422という形式で送るので,合計で2400byteですが,2400/200=12なので,約1分ほどで1毎ぐらいの画像を送信できます. 畑で使うならこのぐらいで便利ですね! # Spresenseでの画像の送信 以下は今回使用したSpresenseのコードです. LoRaで190byteずつ分割して5秒おきに送信するようにしました. また,送信を始めるときには最初に0xffffffのようなデータを送信することで区別するようにしました. ```Arduino #include <Arduino.h> #include <vector> #include <Camera.h> #include "spresense_e220900t22s_jp_lib.h" CLoRa lora; void ReadDataFromConsole(char *msg, int max_msg_len); const uint8_t start_packet[190]; void printError(enum CamErr err) { Serial.print("Error: "); switch (err) { case CAM_ERR_NO_DEVICE: Serial.println("No Device"); break; case CAM_ERR_ILLEGAL_DEVERR: Serial.println("Illegal device error"); break; case CAM_ERR_ALREADY_INITIALIZED: Serial.println("Already initialized"); break; case CAM_ERR_NOT_INITIALIZED: Serial.println("Not initialized"); break; case CAM_ERR_NOT_STILL_INITIALIZED: Serial.println("Still picture not initialized"); break; case CAM_ERR_CANT_CREATE_THREAD: Serial.println("Failed to create thread"); break; case CAM_ERR_INVALID_PARAM: Serial.println("Invalid parameter"); break; case CAM_ERR_NO_MEMORY: Serial.println("No memory"); break; case CAM_ERR_USR_INUSED: Serial.println("Buffer already in use"); break; case CAM_ERR_NOT_PERMITTED: Serial.println("Operation not permitted"); break; default: break; } } void setup() { // memset(start_packet, 0xff, 200 * sizeof(uint8_t)); // put your setup code here, to run once: pinMode(LED0, OUTPUT); pinMode(LED1, OUTPUT); pinMode(LED2, OUTPUT); pinMode(LED3, OUTPUT); /* Set serial baudrate. */ Serial.begin(115200); CamErr err; // カメラ設定 Serial.println("Prepare camera"); err = theCamera.begin(); if (err != CAM_ERR_SUCCESS) { printError(err); } Serial.println("Set Auto white balance parameter"); err = theCamera.setAutoWhiteBalanceMode(CAM_WHITE_BALANCE_DAYLIGHT); if (err != CAM_ERR_SUCCESS) { printError(err); } Serial.println("Set still picture format"); err = theCamera.setStillPictureImageFormat( CAM_IMGSIZE_QQVGA_H, CAM_IMGSIZE_QQVGA_V, CAM_IMAGE_PIX_FMT_YUV422); if (err != CAM_ERR_SUCCESS) { printError(err); } /* Wait HW initialization done. */ sleep(1); Serial.printf("program start\n"); // LoRa設定値 struct LoRaConfigItem_t config = { 0x0001, // own_address 1 0b011, // baud_rate 9600 bps 0b10000, // air_data_rate SF:9 BW:125 0b00, // subpacket_size 200 0b1, // rssi_ambient_noise_flag 有効 0b0, // transmission_pause_flag 有効 0b01, // transmitting_power 13 dBm 0x08, // own_channel 0 0b1, // rssi_byte_flag 有効 0b1, // transmission_method_type 固定送信モード 0b0, // lbt_flag 有効 0b011, // wor_cycle 2000 ms 0x0000, // encryption_key 0 0xFFFF, // target_address 2 0x08 // target_channel 0 }; // E220-900T22S(JP)へのLoRa初期設定 if (lora.InitLoRaModule(config)) { SerialMon.printf("init error\n"); return; } else { Serial.printf("init ok\n"); } // ノーマルモード(M0=0,M1=0)へ移行する SerialMon.printf("switch to normal mode\n"); lora.SwitchToNormalMode(); memset(start_packet, 0xff, 200 * sizeof(uint8_t)); while (1) { sleep(1); /* wait for one second to take still picture. */ // LoRa送信 char msg[200] = { 0 }; CamImage img = theCamera.takePicture(); if (img.isAvailable()) { // 撮影に成功したら CamImage resized; CamErr err = img.resizeImageByHW(resized, 40, 30); if (!resized.isAvailable()) { Serial.println("Clip and Reize Error:" + String(err)); return; } size_t length = resized.getImgSize(); uint8_t *buffer = resized.getImgBuff(); // 200byte毎に分割して送信する const size_t chunkSize = 190; size_t offset = 0; lora.SendFrame(config, start_packet, sizeof(start_packet)); while (offset < length) { size_t sendSize = (length - offset > chunkSize) ? chunkSize : (length - offset); Serial.println(sendSize); if (lora.SendFrame(config, buffer + offset, sendSize) == 0) { SerialMon.printf("Chunk %zu-%zu send succeeded.\n", offset, offset + sendSize); } else { SerialMon.printf("Chunk %zu-%zu send failed.\n", offset, offset + sendSize); } offset += sendSize; delay(5000); } } delay(1); break; } } void loop() { } void ReadDataFromConsole(char *msg, int max_msg_len) { int len = 0; char *start_p = msg; while (len < max_msg_len) { if (SerialMon.available() > 0) { char incoming_byte = SerialMon.read(); if (incoming_byte == 0x00 || incoming_byte > 0x7F) continue; *(start_p + len) = incoming_byte; // 最短で3文字(1文字 + CR LF) if (incoming_byte == 0x0a && len >= 2 && (*(start_p + len - 1)) == 0x0d) { break; } len++; } delay(1); } // msgからCR LFを削除 len = strlen(msg); for (int i = 0; i < len; i++) { if (msg[i] == 0x0D || msg[i] == 0x0A) { msg[i] = '\0'; } } } ``` # PC側のコード Air Checkerで取得したデータを元に,PCで可視化するコードを作成しました. 今回はWebSerial APIを用いてブラウザ上でPCのシリアルポートにアクセスし,190byte毎に送られるデータを集計して1毎の画像にしています. ```html <!DOCTYPE html> <html lang="ja"> <head> <meta charset="utf-8" /> <meta name="viewport" content="width=device-width, initial-scale=1" /> <title>LoRa Camera Viewer</title> </head> <body> <h1>LoRa Camera Viewer</h1> <button onclick="onConnectButtonClick()">Connect</button> 115200 Only <br /> <textarea cols="80" rows="6" id="outputArea" readonly></textarea> <h1>画像データ</h1> <canvas id="canvas"></canvas> <script> let port; function yuv422ToRgb(yuvBuffer, width, height) { const rgbBuffer = new Uint8ClampedArray(width * height * 4); let yIndex = 0, uvIndex = 0; for (let i = 0; i < height; i++) { for (let j = 0; j < width; j += 2) { const Y1 = yuvBuffer[yIndex++]; const Y2 = yuvBuffer[yIndex++]; const U = yuvBuffer[uvIndex++] - 128; const V = yuvBuffer[uvIndex++] - 128; const [R1, G1, B1] = yuvToRgb(Y1, U, V); const [R2, G2, B2] = yuvToRgb(Y2, U, V); const index1 = (i * width + j) * 4; const index2 = (i * width + j + 1) * 4; rgbBuffer.set([R1, G1, B1, 255], index1); rgbBuffer.set([R2, G2, B2, 255], index2); } } return rgbBuffer; } function yuvToRgb(Y, U, V) { const R = Math.min(255, Math.max(0, Y + 1.402 * V)); const G = Math.min(255, Math.max(0, Y - 0.344136 * U - 0.714136 * V)); const B = Math.min(255, Math.max(0, Y + 1.772 * U)); return [R, G, B]; } function drawYUV422(yuvBuffer, width, height) { const canvas = document.getElementById("canvas"); canvas.width = width * 10; canvas.height = height * 10; const ctx = canvas.getContext("2d"); const imageData = ctx.createImageData(width, height); imageData.data.set(yuv422ToRgb(yuvBuffer, width, height)); ctx.putImageData(imageData, 0, 0); ctx.drawImage(canvas, 0, 0, width, height, 0, 0, width * 10, height * 10); } async function onConnectButtonClick() { try { port = await navigator.serial.requestPort(); await port.open({ baudRate: 19200 }); while (port.readable) { const reader = port.readable.getReader(); try { while (true) { const { value, done } = await reader.read(); if (done) { addSerial("Canceled\n"); break; } const inputValue = new TextDecoder().decode(value); addSerial(inputValue); } } catch (error) { addSerial("Error: Read" + error + "\n"); } finally { reader.releaseLock(); } } } catch (error) { addSerial("Error: Open" + error + "\n"); } } function addSerial(msg) { parser(msg); var textarea = document.getElementById('outputArea'); textarea.value += msg; textarea.scrollTop = textarea.scrollHeight; } var imageBinary = []; function parser(msg) { // DATA:から始まるデータがあれば、そのデータを取り出す if (msg.indexOf("DATA:") != -1) { // DATA:FFFFのようなだったらStart if (msg.indexOf("DATA:ffff") != -1) { if (imageBinary != null) { // YUV422の40x30の画像データとして表示 // imageBinaryをUint8Arrayに変換してdrawYUV422に渡す const width = 40, height = 30; const yuvData = new Uint8Array(imageBinary); drawYUV422(yuvData, width, height); // drawYUV422(imageBinary, 40, 30); } } else { var data = msg.split(":")[1]; // 2文字ずつ取り出して、16進数に変換してimageBinaryに追加 for (var i = 0; i < data.length; i += 2) { imageBinary.push(parseInt(data.substr(i, 2), 16)); } } } } // YUV422 (ダミーデータ) の生成 const width = 40, height = 30; const yuvData = new Uint8Array(width * height * 2); for (let i = 0; i < yuvData.length; i++) { yuvData[i] = Math.random() * 256; // 仮のデータ } drawYUV422(yuvData, width, height); </script> </body> </html> ``` # 動作確認 以下が実際にSpresenseからデータを送信して可視化した様子です. 何となく画像データは表示されているのでそれっぽいですが,なんか何が写っているのかと言われると謎ですね... おそらく,どこかでデータの欠損などが合ったのではないかと思います 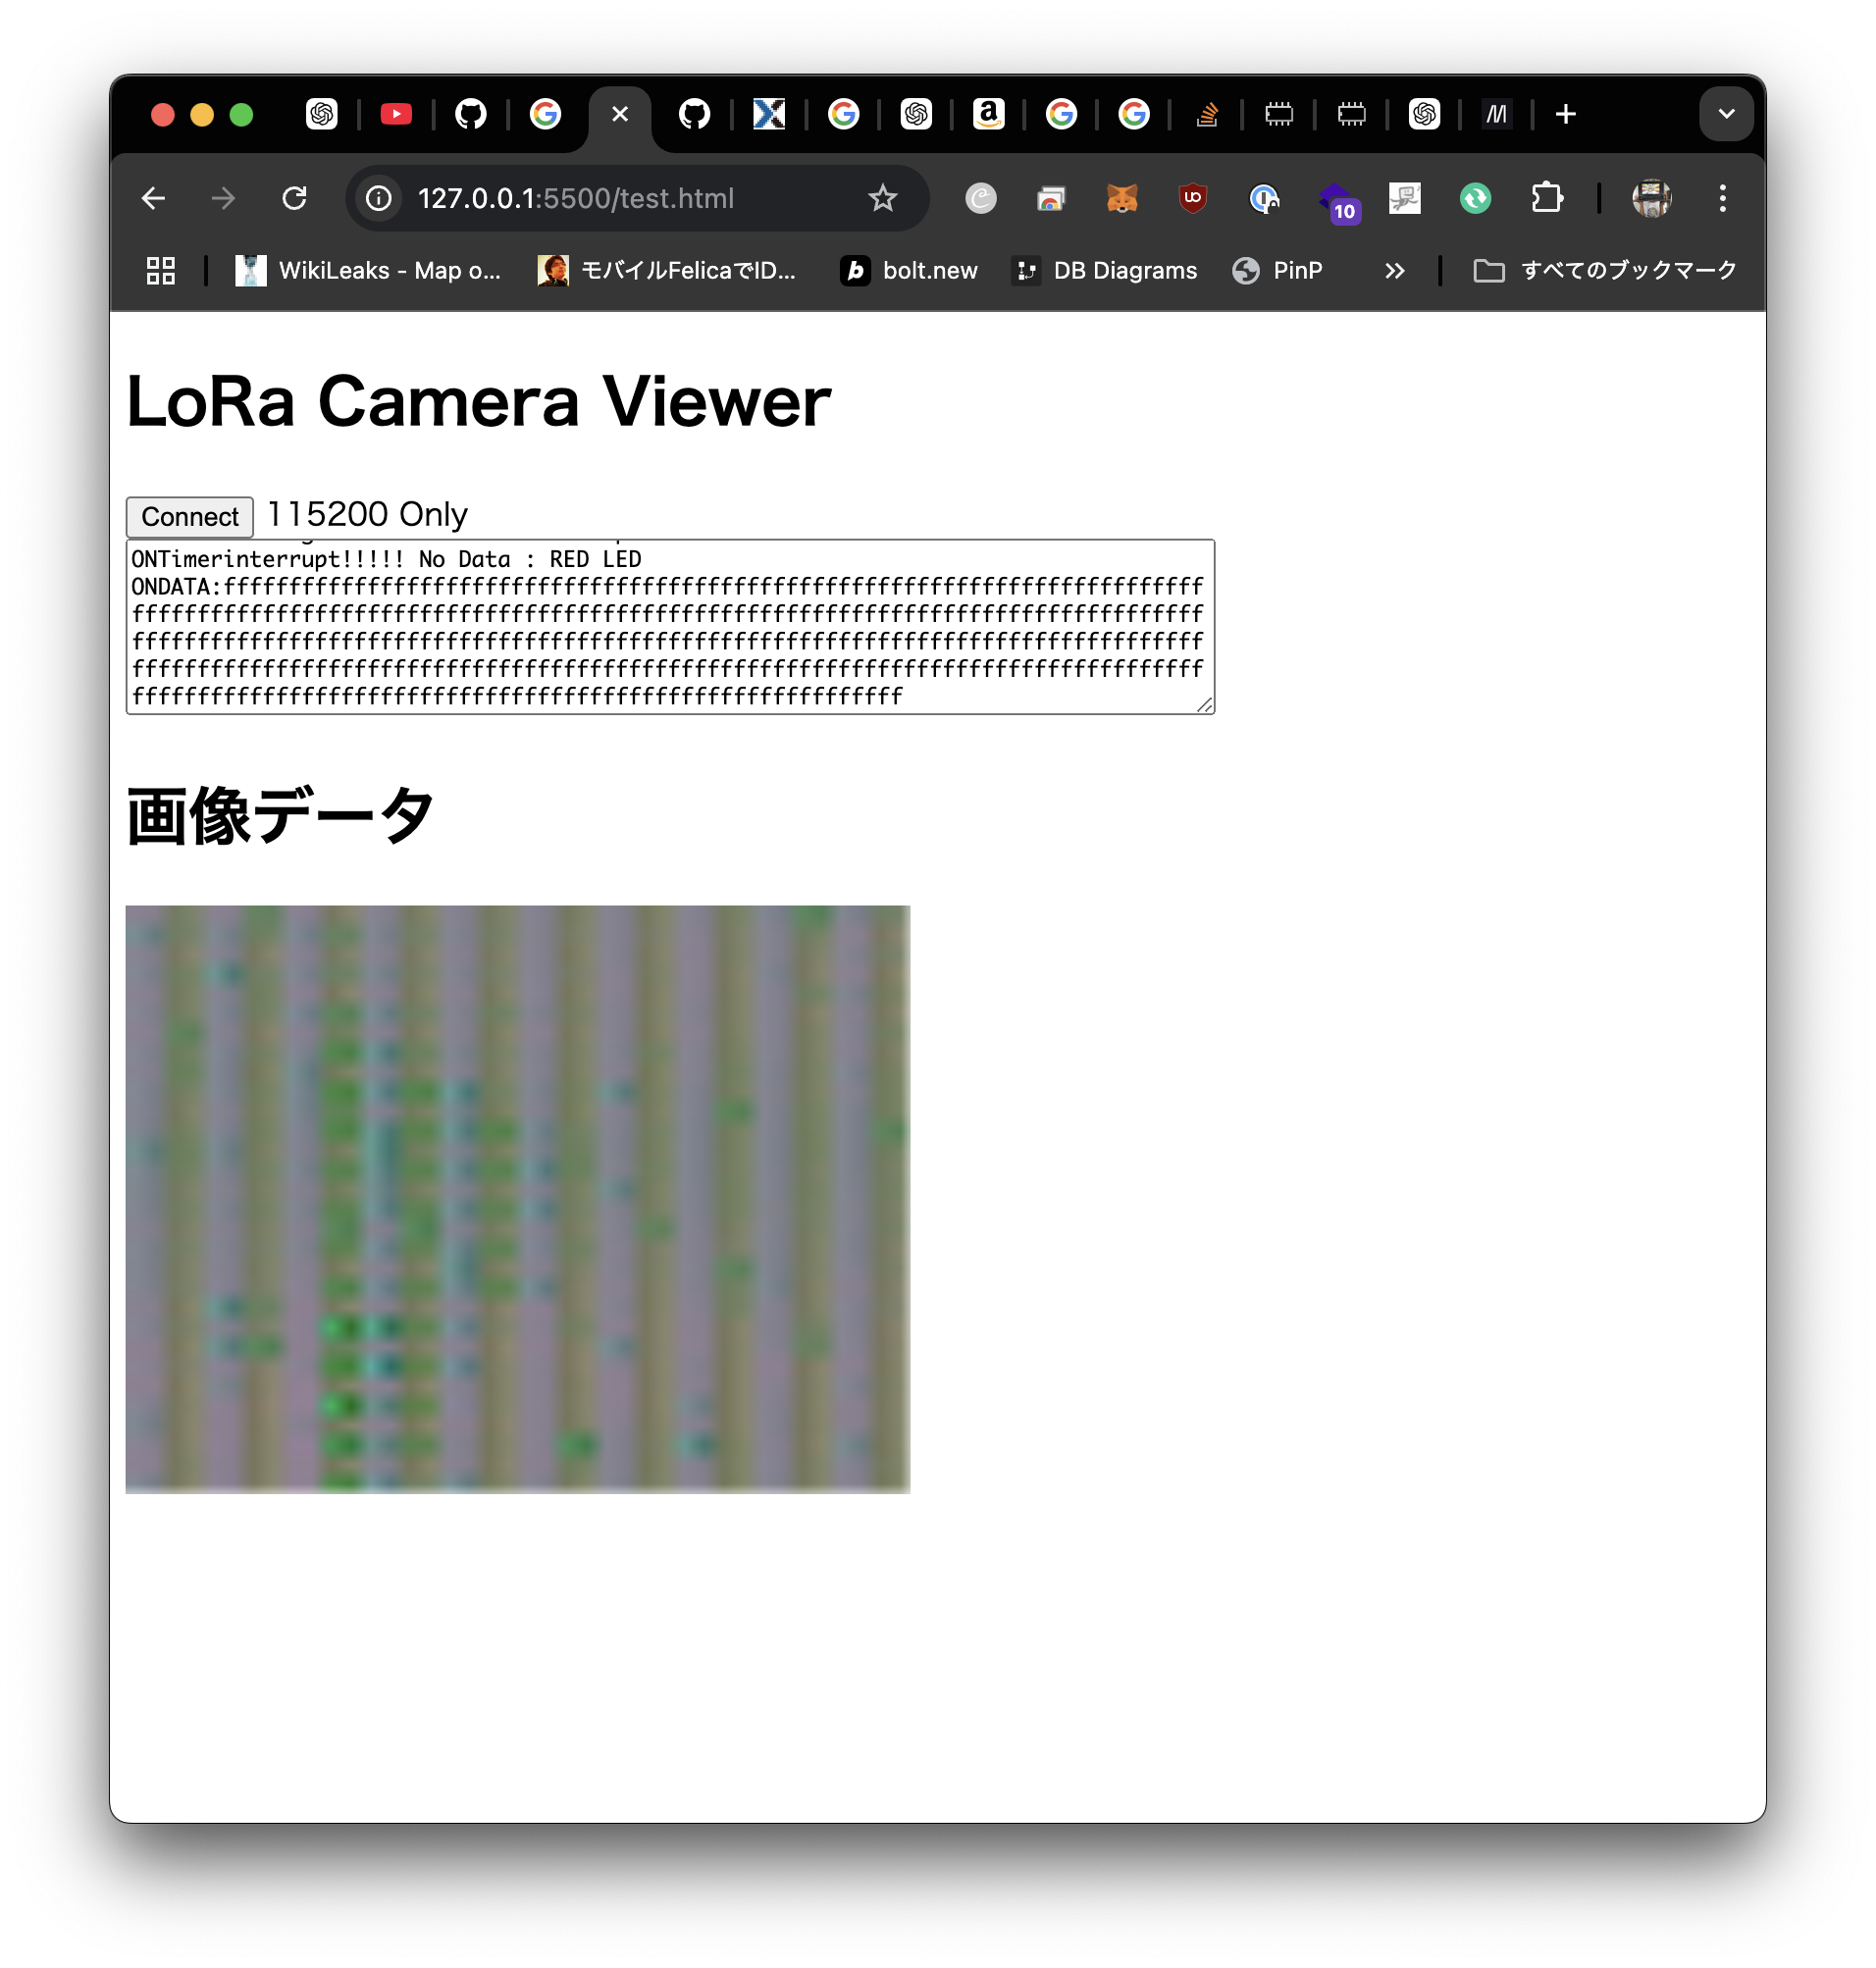 # 終わりに 今回はSpresenseとLoRaを活用して畑の遠隔監視ができるシステムを開発しました. 実際に畑に設置することまではできませんでしたが,LoRaを介して実際に画像データが送信できるところまで確認できました. 一部データの欠損などがあり完璧とは言えないので,今後色々な状況で試してみたいと思います!