miso.develop が 2021年05月16日00時25分30秒 に編集
コメント無し
記事種類の変更
製作品
本文の変更
# はじめに 「[OTTO](https://www.ottodiy.com/)」というオープンソースロボットプロジェクトがあります。 4つのサーボモーターで動かせる足と距離センサーにブザー、そして3Dプリントデータが公開されている筐体を組み立てて動かすロボットです。 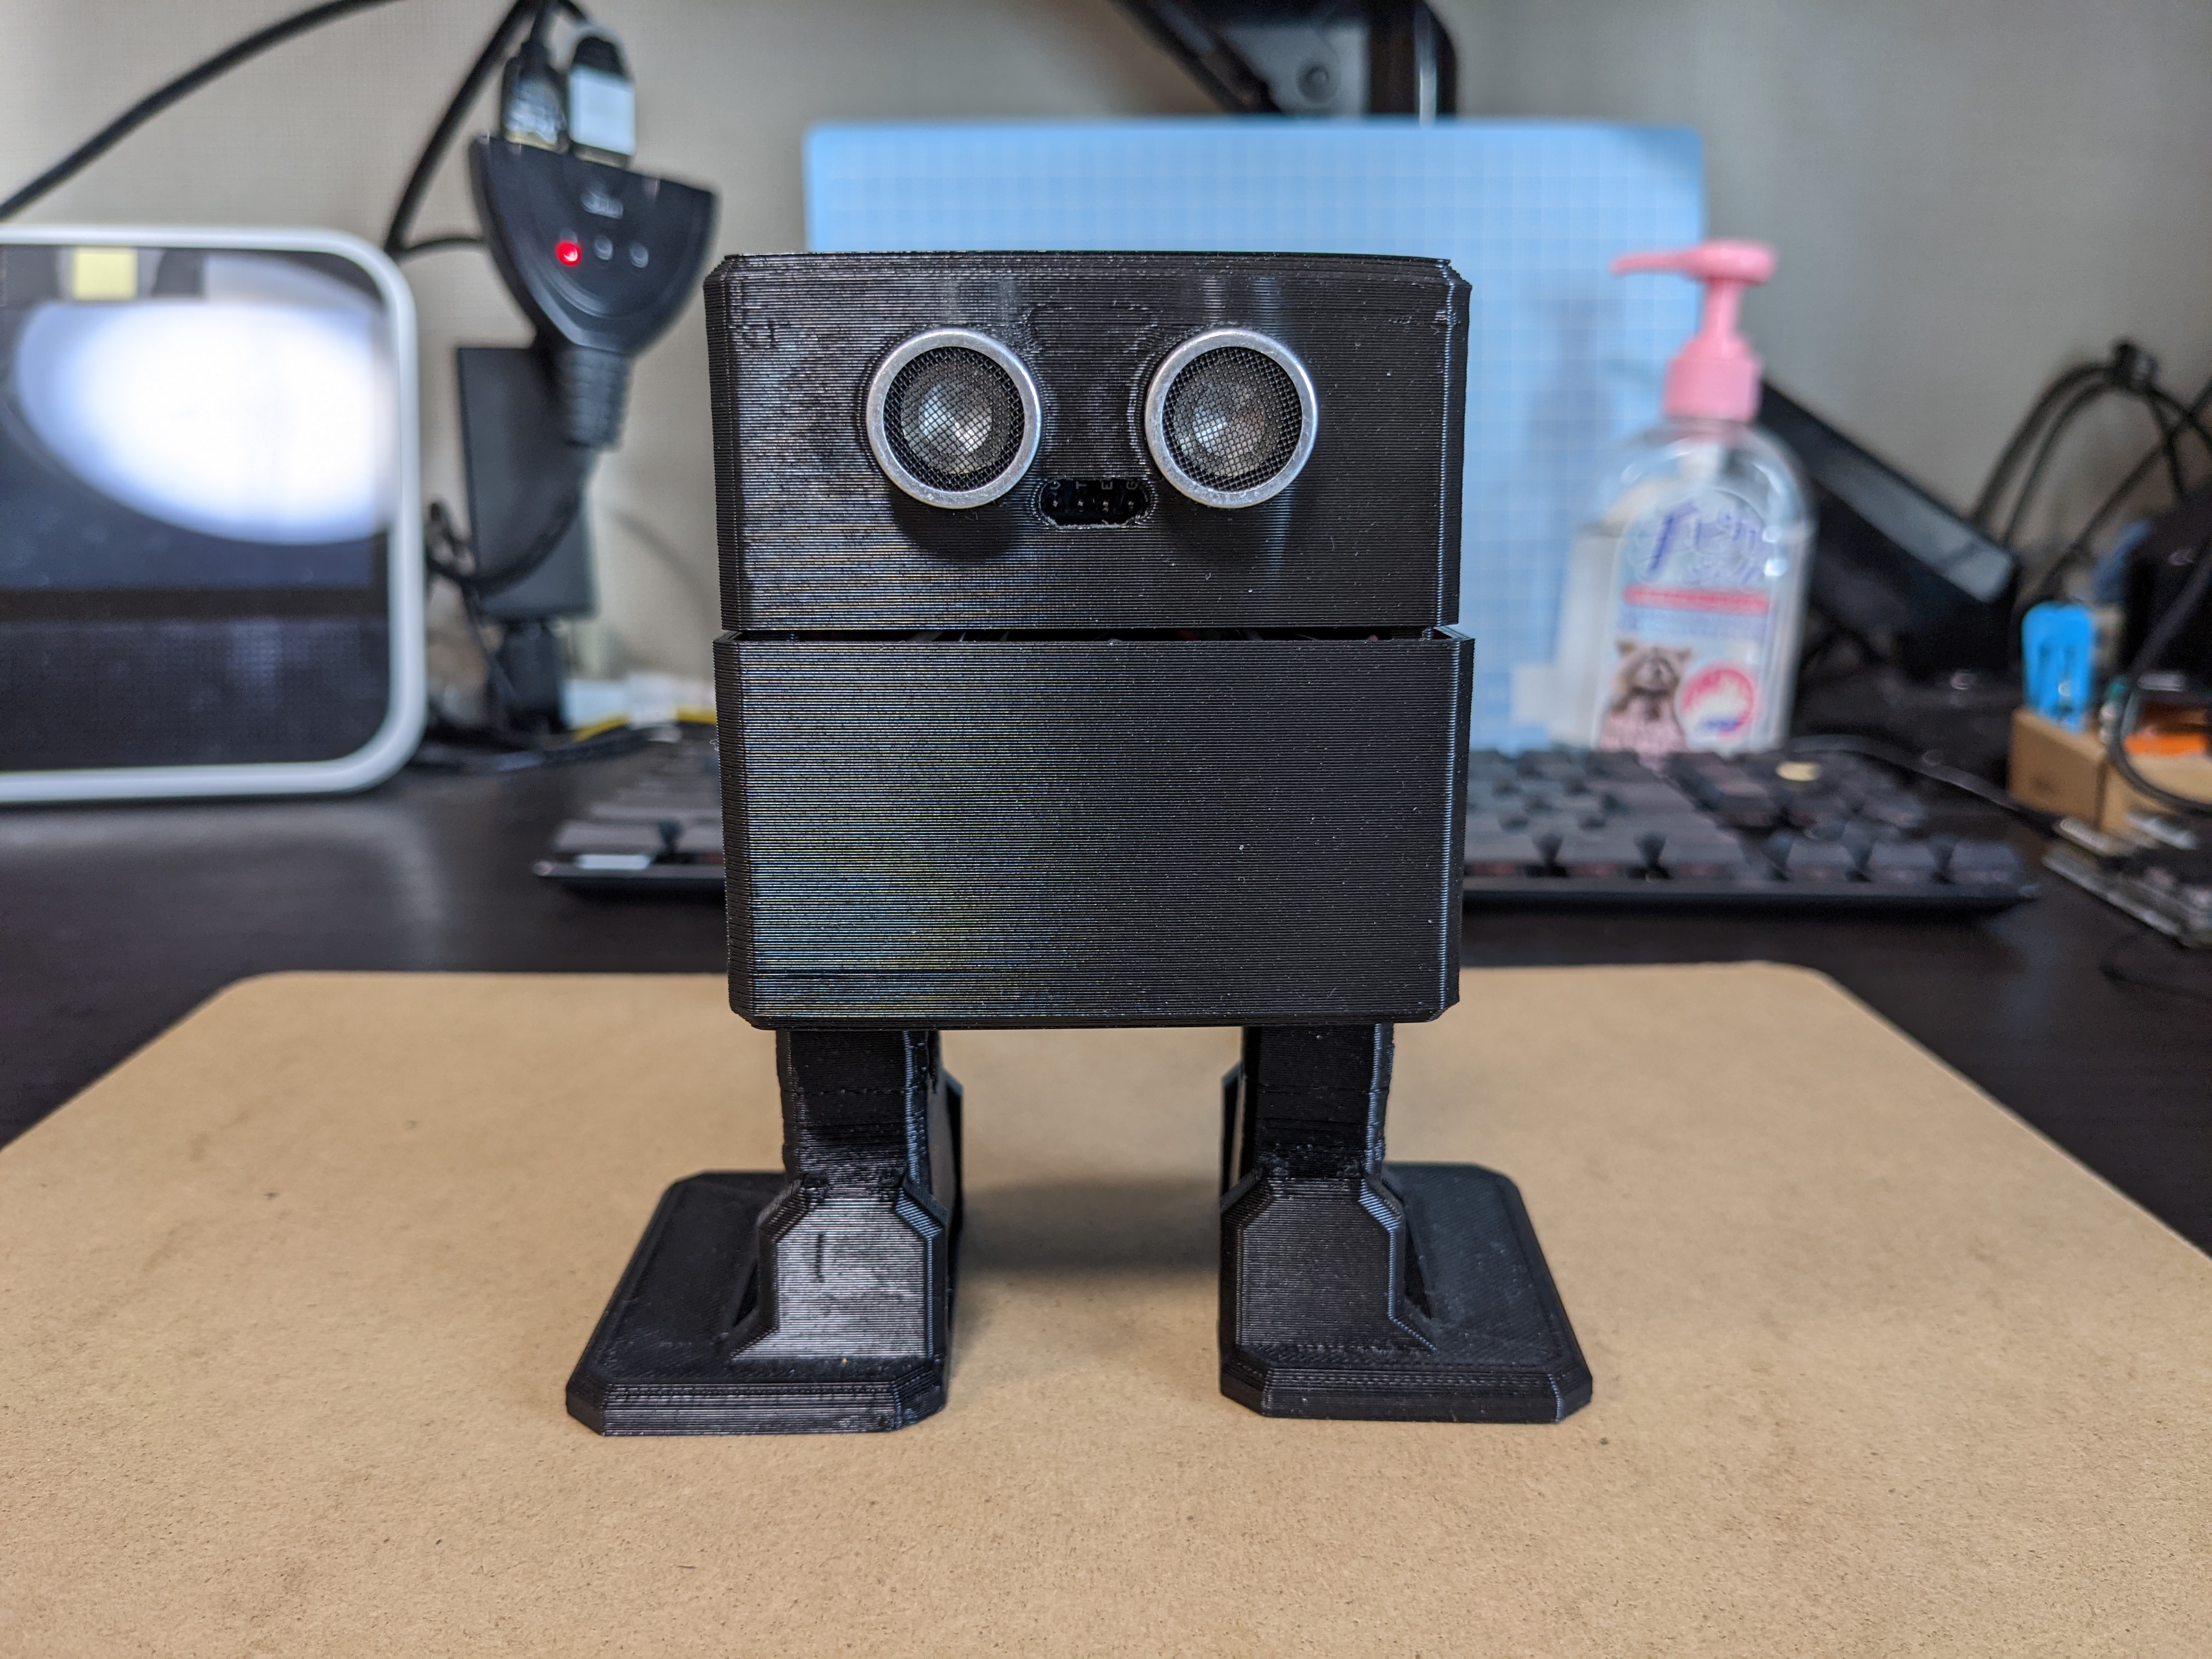 このプロジェクトはマイコンとしてArduinoが使われています。 そこで今回obniz向けにプログラムをゼロから実装してみました。 また筐体についてもギリギリobnizが収まらないサイズだったため当初ボディを削っていたのですが、[ごじさん(@goji2100)](https://twitter.com/goji2100)になんと[obniz用3Dプリントデータ](https://goji2100.com/blog/?p=1162)を作成いただきました。 ※obniz Board向けになります(obniz Board 1Yはぴったりハマりはしませんが内蔵はできます) 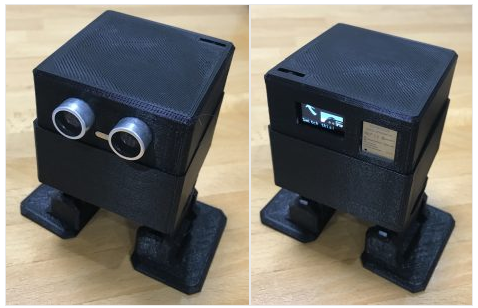 # デモ動画 @[twitter](https://twitter.com/miso_develop/status/1393571413877874689) @[twitter](https://twitter.com/miso_develop/status/1393571442839547906) @[twitter](https://twitter.com/miso_develop/status/1393571472665317377) # 必要なパーツ |パーツ|個数|備考| |---|---|---| |[obniz Board](https://www.amazon.co.jp/dp/B07DD6FK8G/)|1|obniz Board 1Yでも動作します| |[筐体(obniz用)](https://goji2100.com/blog/?p=1162)|1セット|Arduino版筐体は[コチラ](https://www.aliexpress.com/item/32861199410.html)([少し加工](https://github.com/miso-develop/otto-obniz#%E9%A0%AD%E3%83%91%E3%83%BC%E3%83%84%E3%81%AE%E5%8A%A0%E5%B7%A5)が必要です)| |[サーボモーター](https://akizukidenshi.com/catalog/g/gM-08761/)|4|付属のホーン、ネジも使用します| |[超音波距離センサー](https://akizukidenshi.com/catalog/g/gM-11009/)|1|| |[電子ブザー](https://akizukidenshi.com/catalog/g/gP-09704/)|1|| |[電池ボックス](https://akizukidenshi.com/catalog/g/gP-02678/)(※1)|1|単3×4、背中合わせ| |単3電池(※1)|4|うち2本をニッケル水素電池(1.2V)にして直列で合計5Vほどになるように| |ピン、ワイヤー、ブレッドボード|適量|| ※1 USB給電でも動きますので、USB給電のまま動かす場合は電池は不要です # ハードウェアセットアップ(組み立て方) ハードウェア(筐体)の組み立て方を解説していきます。 ## サーボモーターの調整 最初に各サーボモーターの角度を90度に固定します。 まずobnizとサーボモーターを接続します。 写真のように、0ピンから順番に黄色(signal)、赤(vcc)、茶色(gnd)の順になるようサーボモーターをobnizと接続してください。 このとき[両端ロングピンヘッダ](https://akizukidenshi.com/catalog/g/gC-09056/)を使うとobnizに簡単に接続できます。 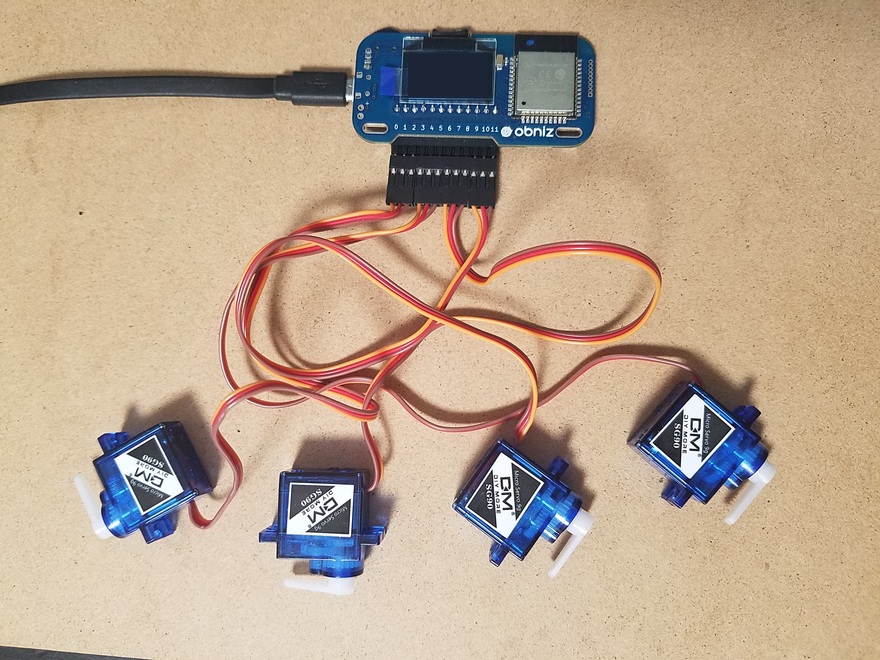 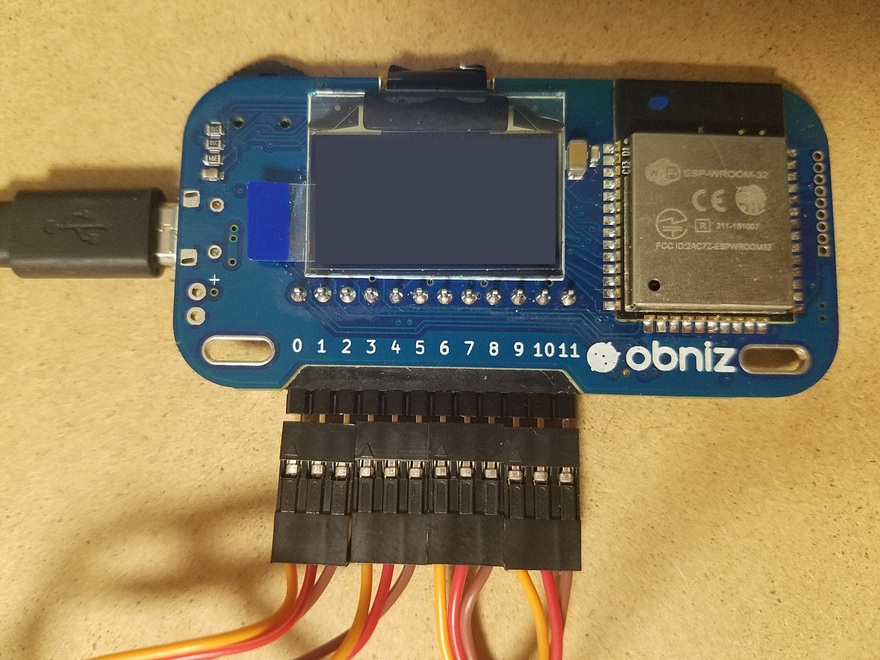 次に以下のソースをコピペし`calibration.js`を作成します。 `const obnizId = "obniz ID"`にお持ちのobnizのIDを入力してください。 ```js:calibration.js const Obniz = require("obniz") const obnizId = "obniz ID" const obniz = new Obniz(obnizId) obniz.onconnect = async function () { const servoMotor1 = obniz.wired("ServoMotor", {signal:0, vcc:1, gnd:2}) const servoMotor2 = obniz.wired("ServoMotor", {signal:3, vcc:4, gnd:5}) const servoMotor3 = obniz.wired("ServoMotor", {signal:6, vcc:7, gnd:8}) const servoMotor4 = obniz.wired("ServoMotor", {signal:9, vcc:10, gnd:11}) servoMotor1.angle(90) servoMotor2.angle(90) servoMotor3.angle(90) servoMotor4.angle(90) } ``` そして以下のコマンドを実行し、obnizのパッケージインストールとサーボモーターの調整を行います。 ```sh:console $ npm install -g obniz $ node calibration.js ``` ## 脚側サーボモーターの取り付け 脚側のサーボモーターを胴体パーツに取り付けます。 サーボモーターに付属のネジで固定します。 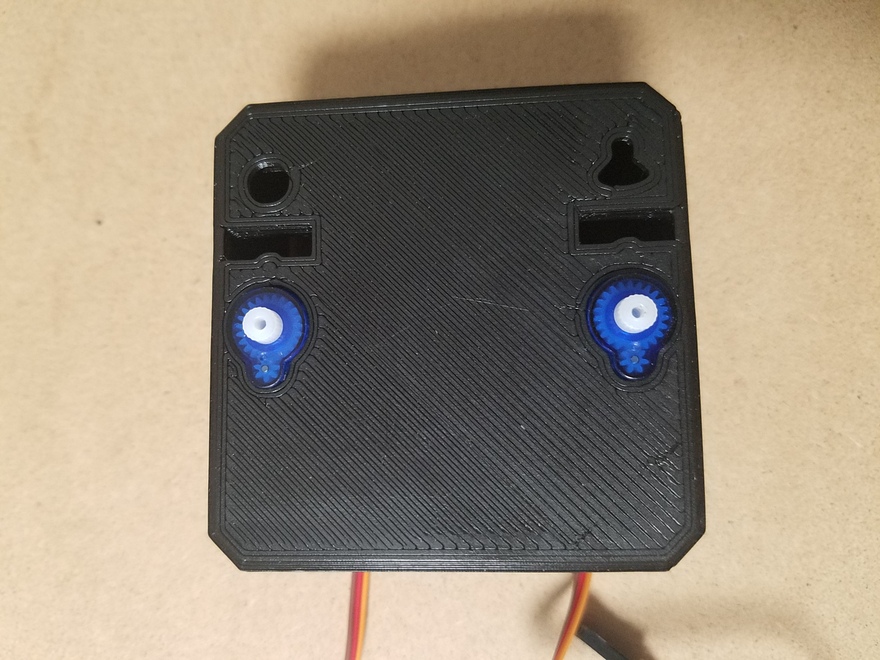 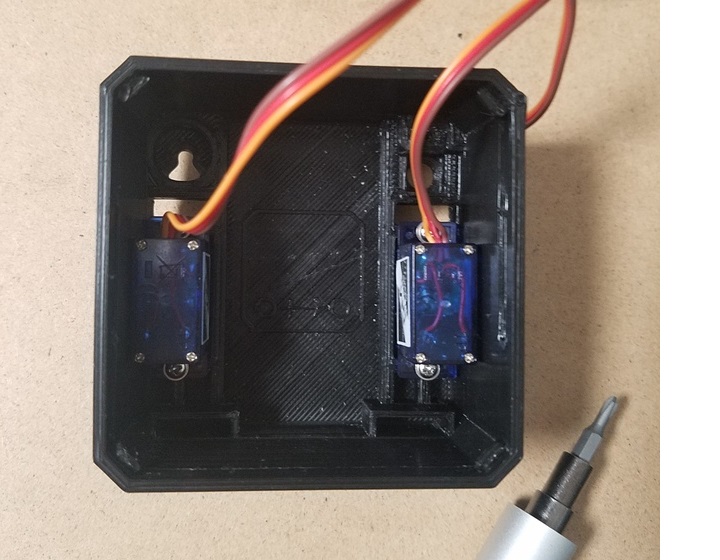 ## 脚パーツの取り付け まずサーボモーターに付属のサーボホーンを加工します。 写真のように片側を中心から数えて5つ目の穴で、もう片側を中心から数えて2つ目の穴でカットします。 カットにはニッパーを使うとやりやすいです。 これを2つ加工します。  次に写真のようにサーボモーターのケーブルを脚パーツに通したあと胴体パーツの穴に通してください。 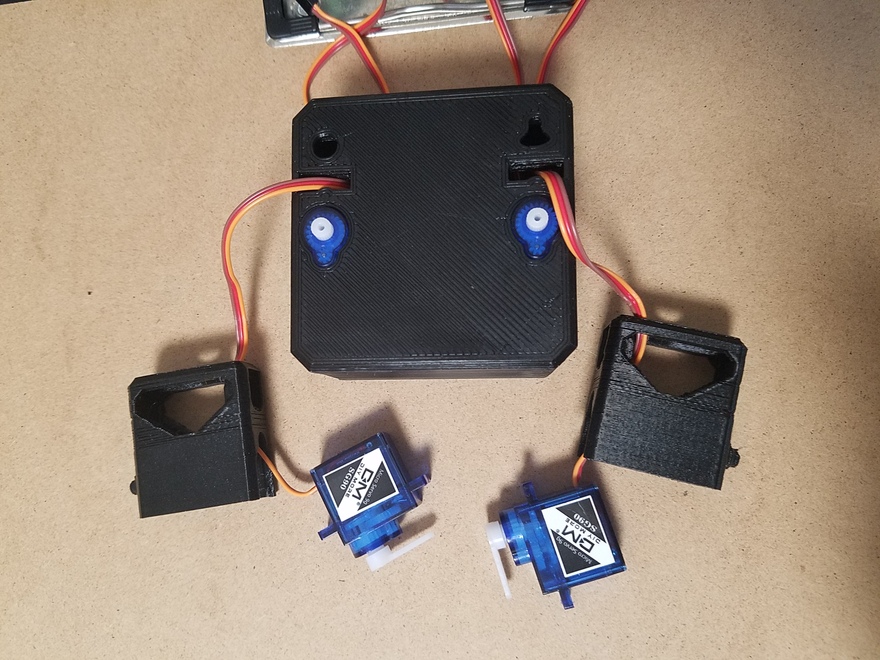 そして先ほど加工したサーボホーンを脚パーツにはめ込みます。 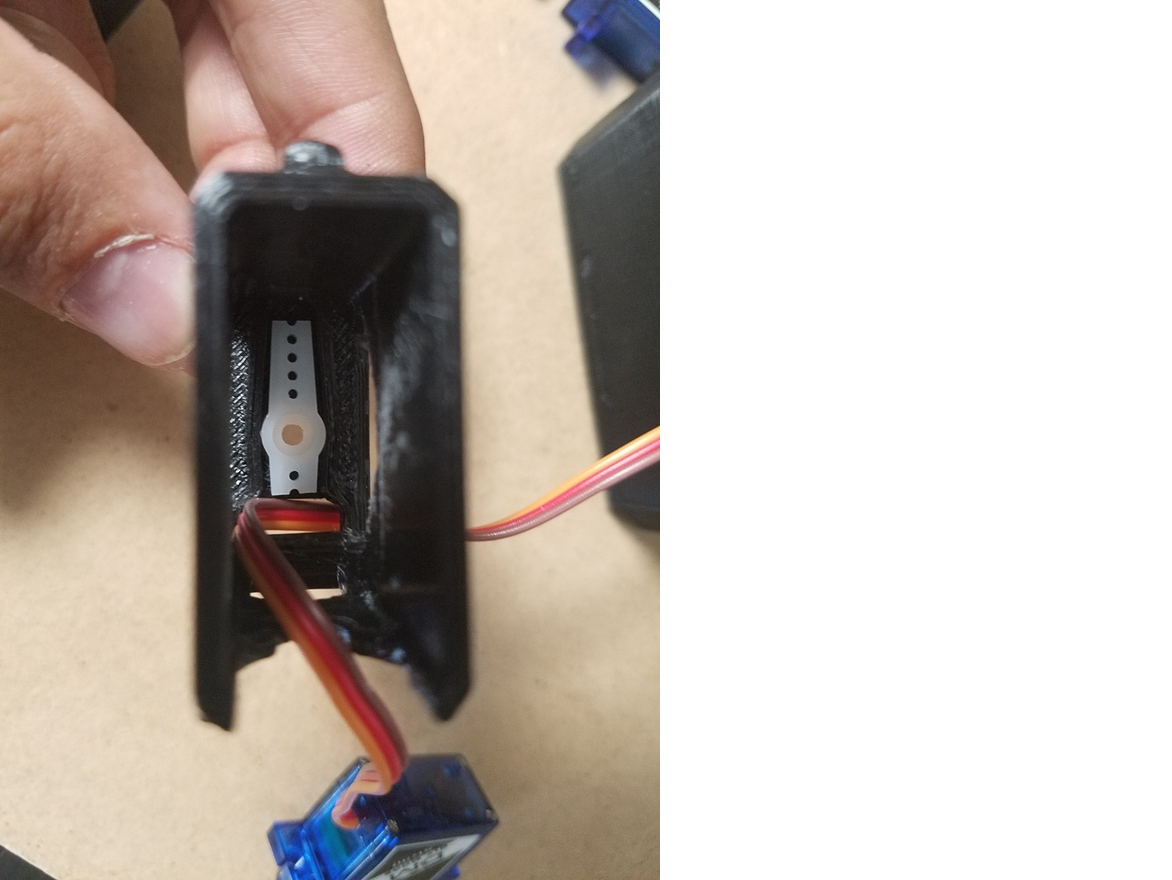 最後に胴体パーツに固定したサーボモータと脚パーツを組み合わせ、サーボモーター付属のネジで固定します。 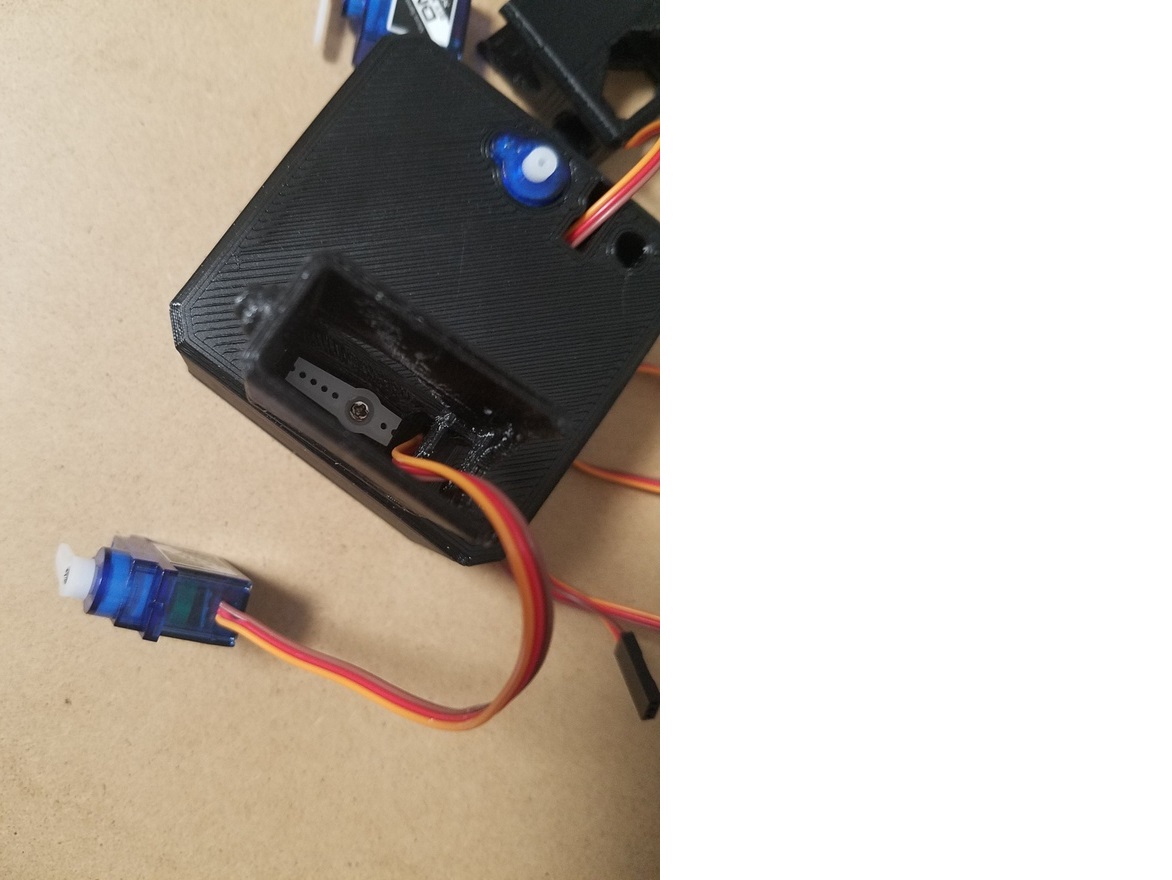 ## 足側サーボモーターの取り付け まず足側のサーボモーターに写真のような付属サーボホーンを取り付け、同じく付属ネジで固定します。 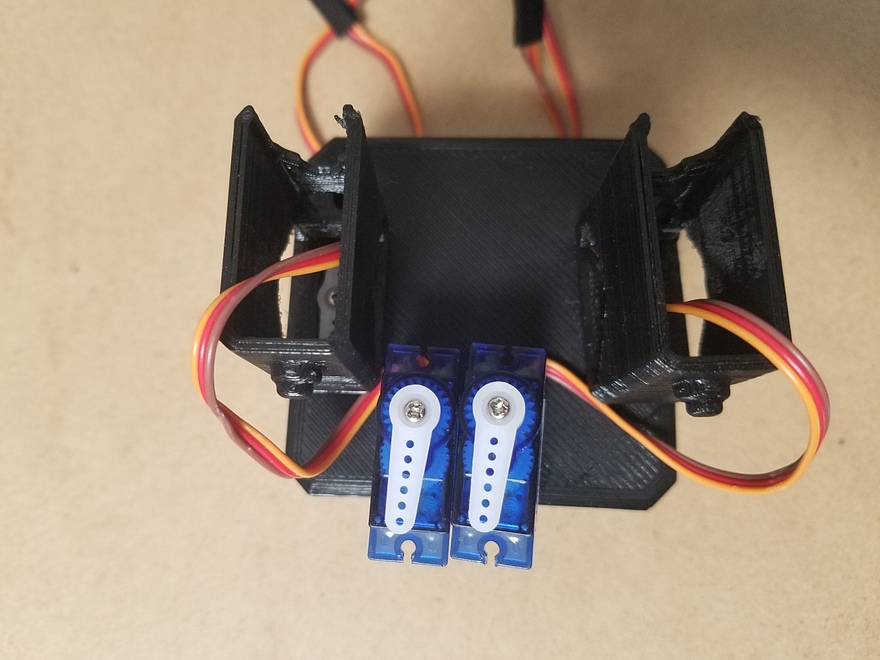 そしてサーボモーターを脚パーツのくぼみに合わせはめ込みます。 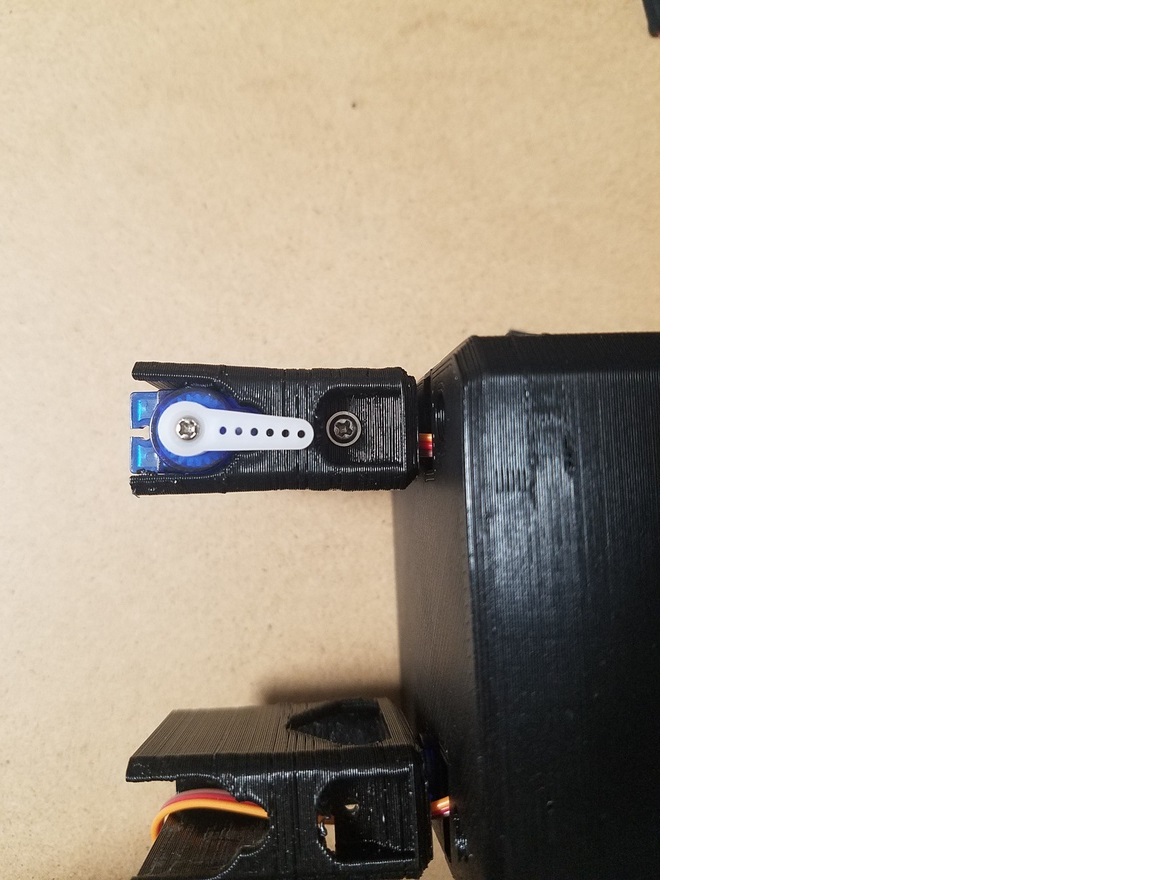 脚パーツにネジ穴があるので、サーボモーター付属ネジでサーボモーターと固定します。 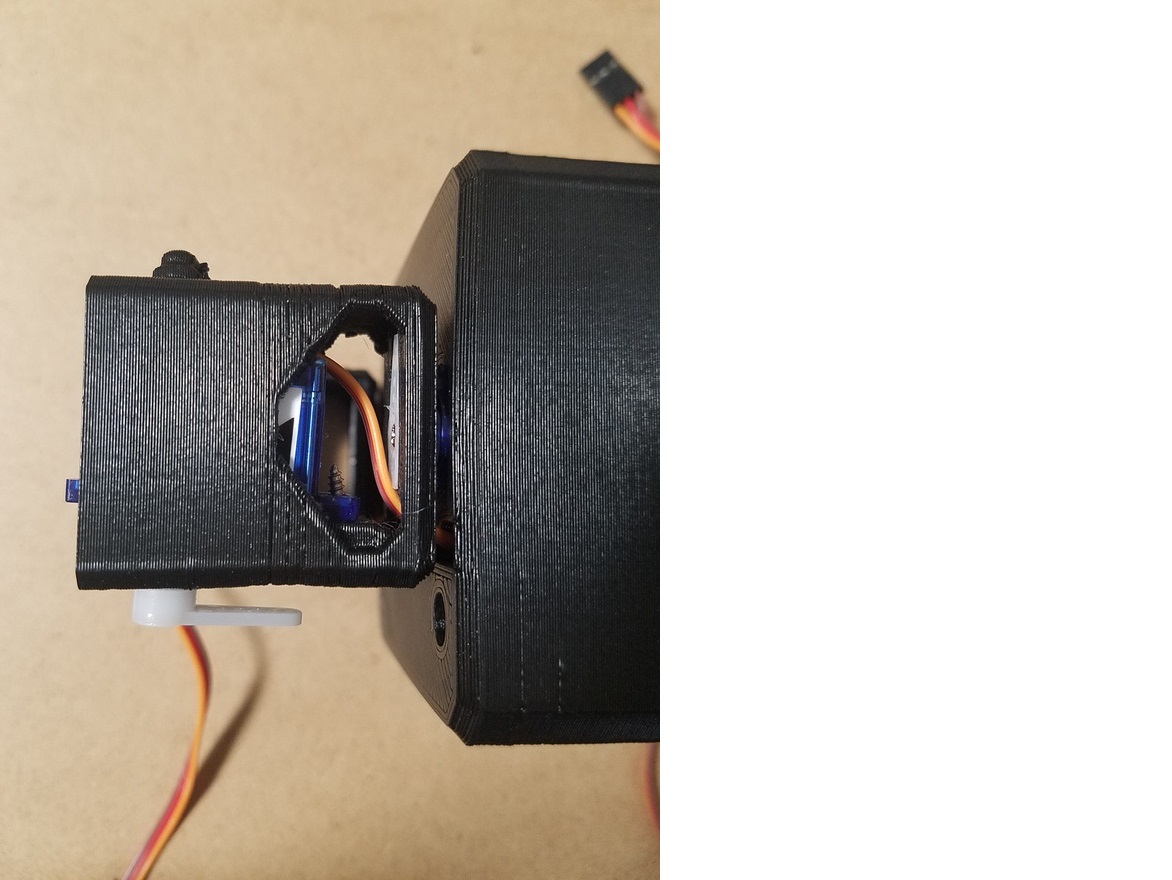 ## 足パーツの取り付け 足パーツを取り付けます。 写真のようにサーボホーン側をはめてからずらすようにすると取り付けやすいです。 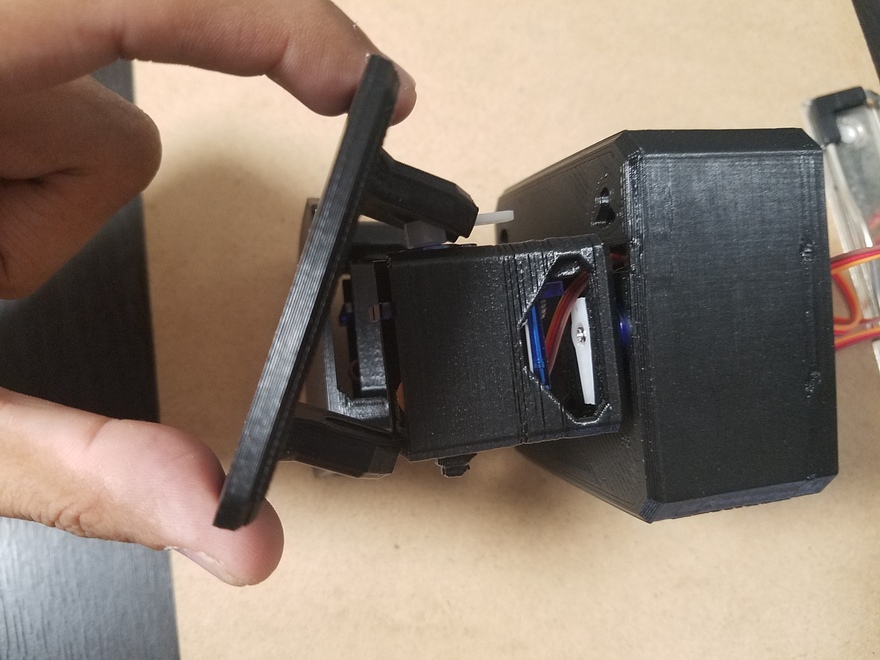  以上で胴体&脚部は完成です。 ## 頭パーツの取り付け 次に頭パーツの取り付けです。 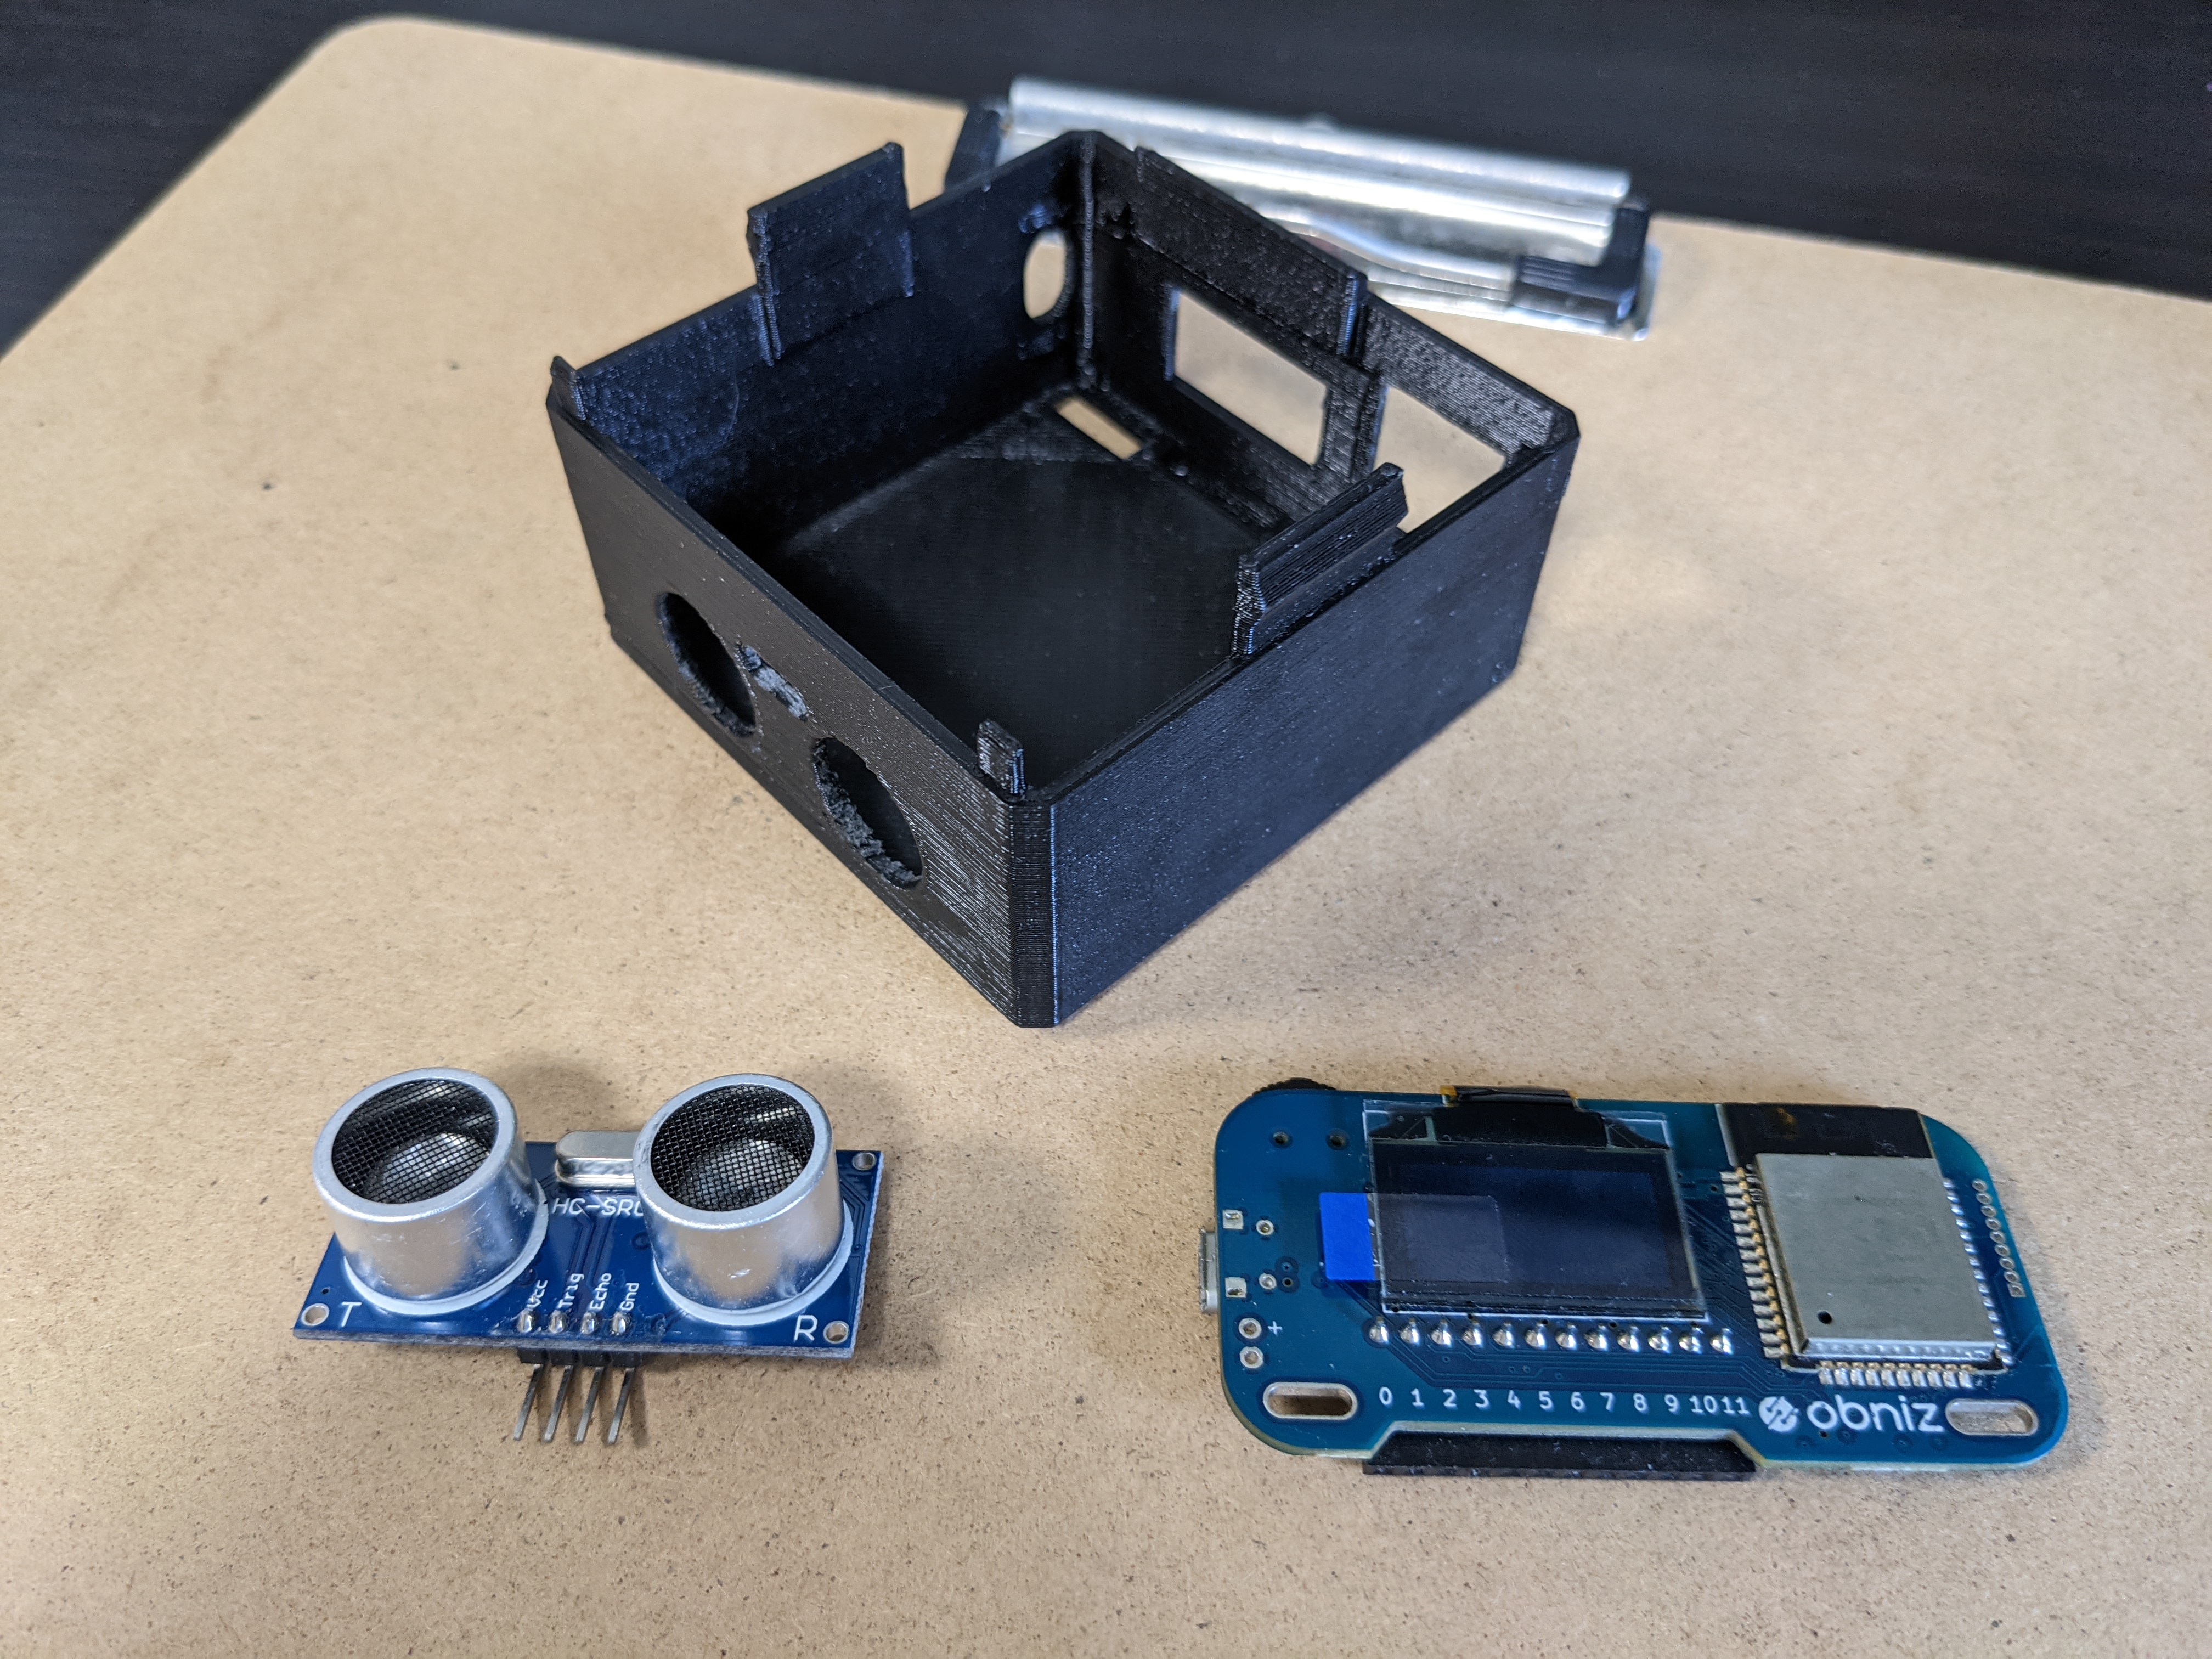 まず超音波距離センサーを頭パーツの前面側にはめ込みます。  そしてobnizを頭パーツの後頭部側にはめ込みます。 ※obniz Board 1Yも頭パーツ内に収まりはしますが、固定はできません 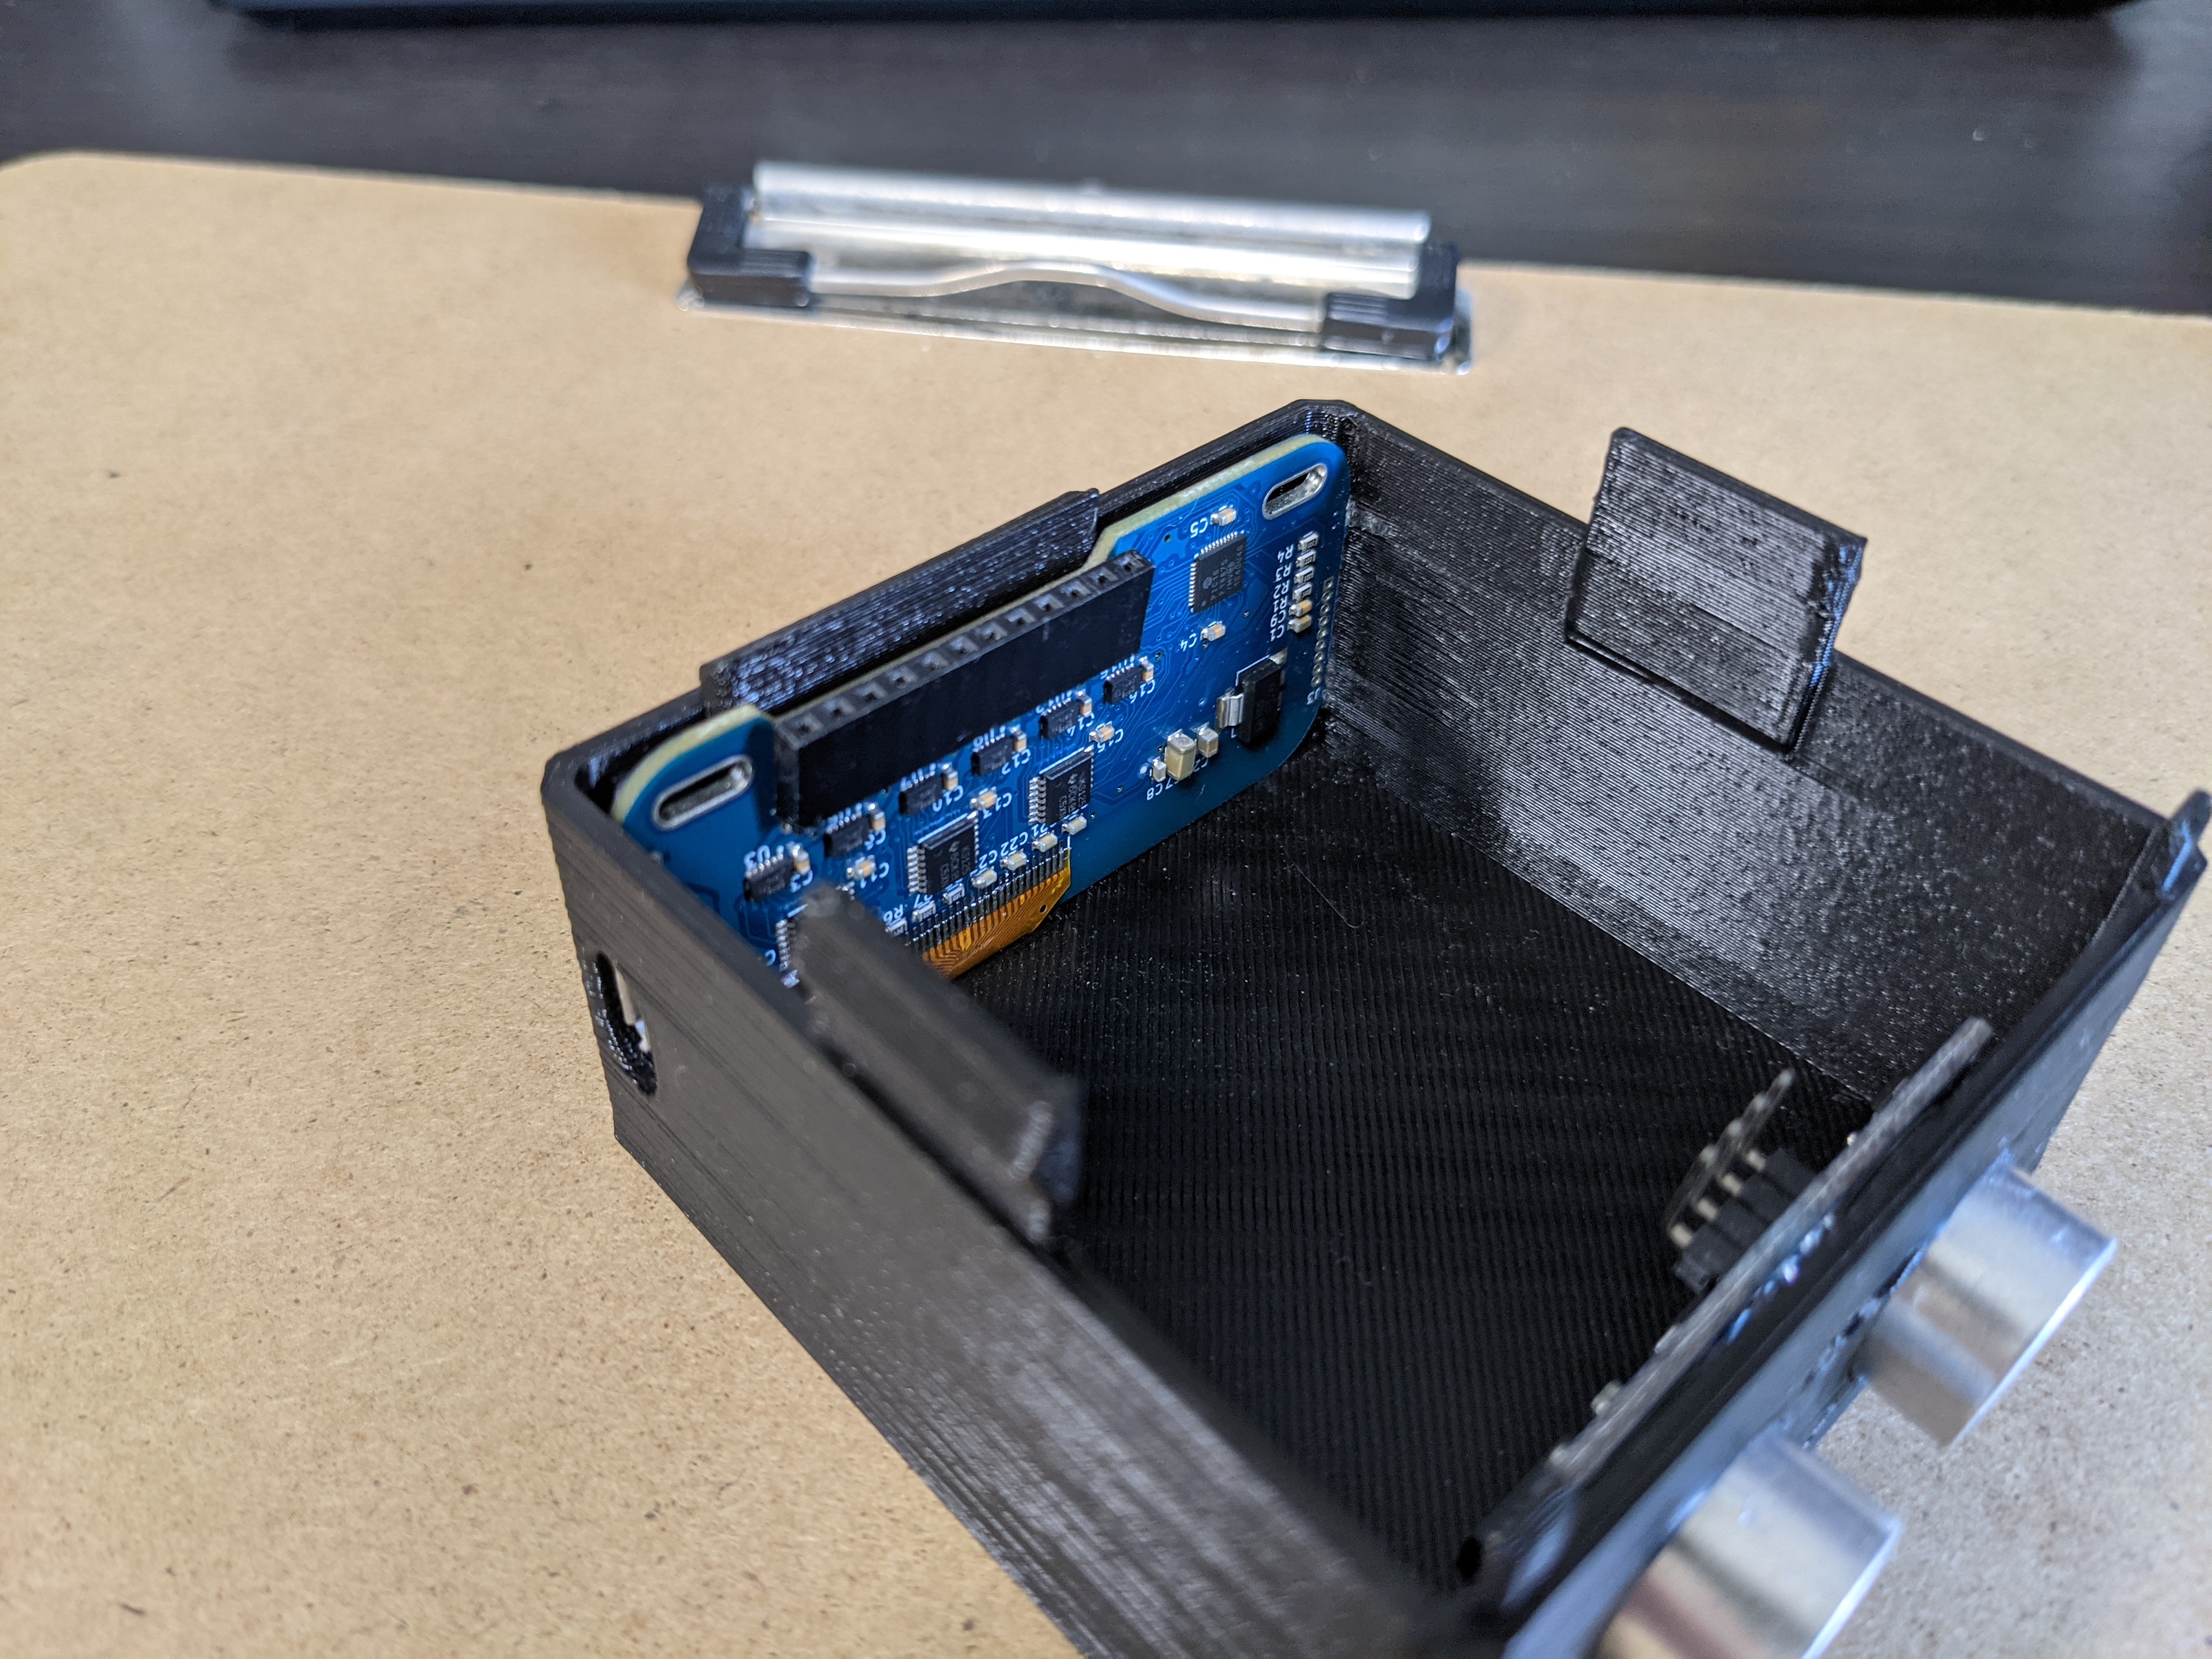 ## 配線 胴体パーツ、頭パーツともに取り付けを終えたら続いて以下の図のように配線を行います。 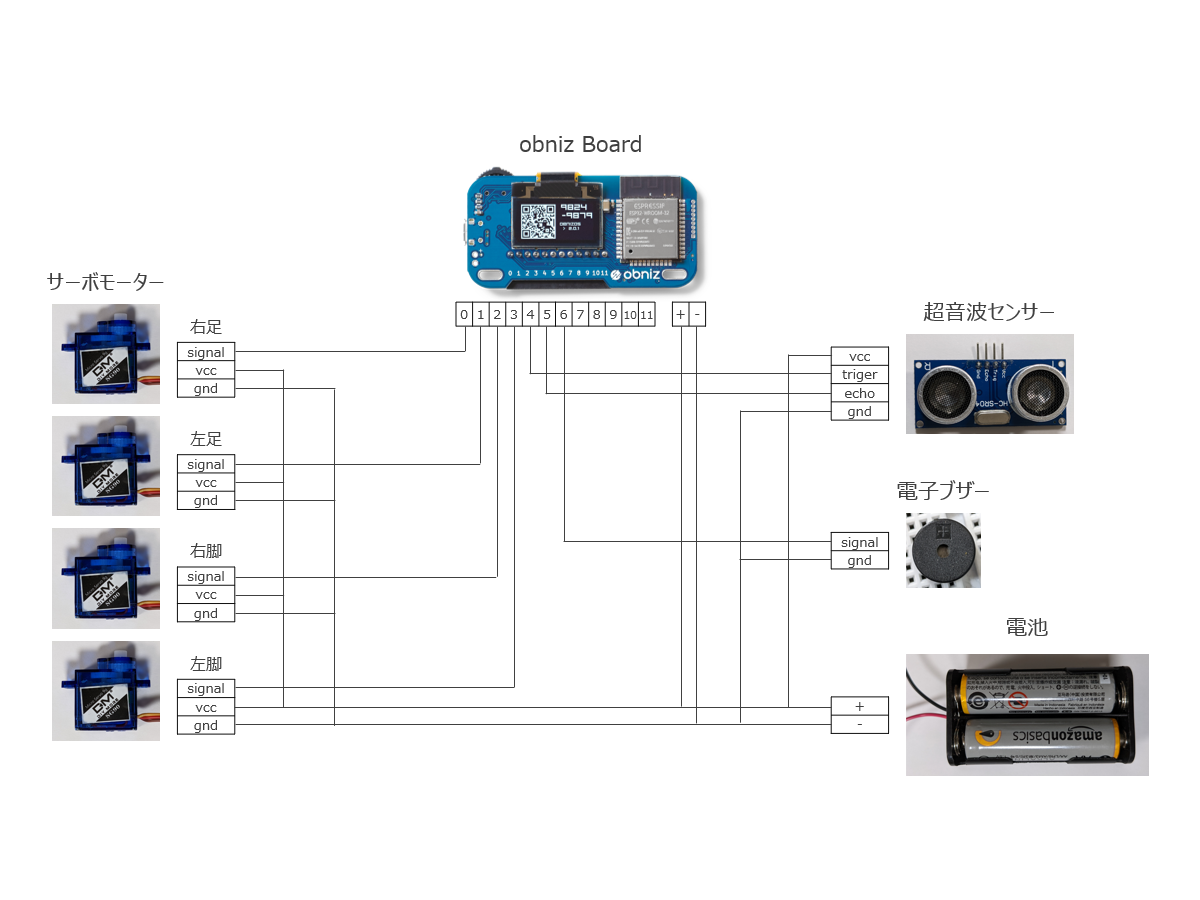 ここでポイントとなるのは`vcc`、`gnd`をobnizのナンバリングされているピンに接続するのではなく、J1端子に接続することです。 サーボモーターは`signal`、`vcc`、`gnd`の3本の接続が必要でOTTOでは4台のサーボモーターが必要ですが、ナンバリングされているピンのみを使用するとこれだけでピンが埋まってしまいます。 `vcc`、`gnd`はJ1端子を使用することで超音波距離センサーや電子ブザー分のピンを確保しています。 配線に工夫がいりますが、一例として私はピンヘッダを3枚くっつけ、片側をobnizに、もう片側にサーボモーターのピンを縦に挿して接続しています。 このときサーボモーターの`vcc`と`gnd`がつながるピンヘッダは一列すべてはんだづけして繋がるようにしています。  上記の3枚重ねピンヘッダを使用するとサーボモーターの配線がすっきりしますので、残りの超音波センサー、電子ブザー、電池ボックスは小さめのブレッドボードで簡単に配線しています。 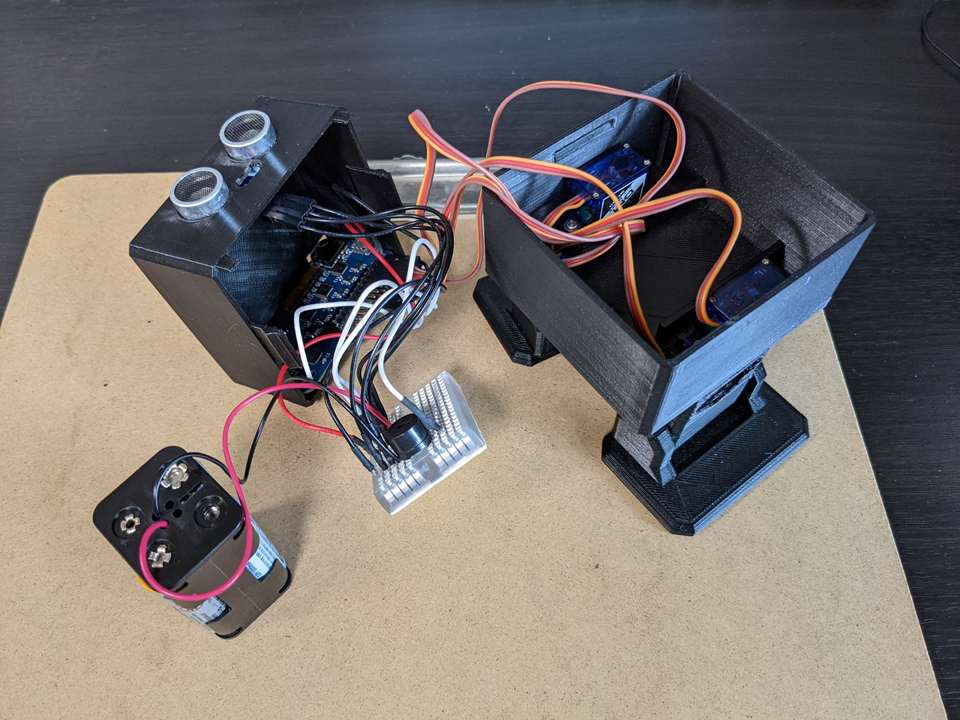 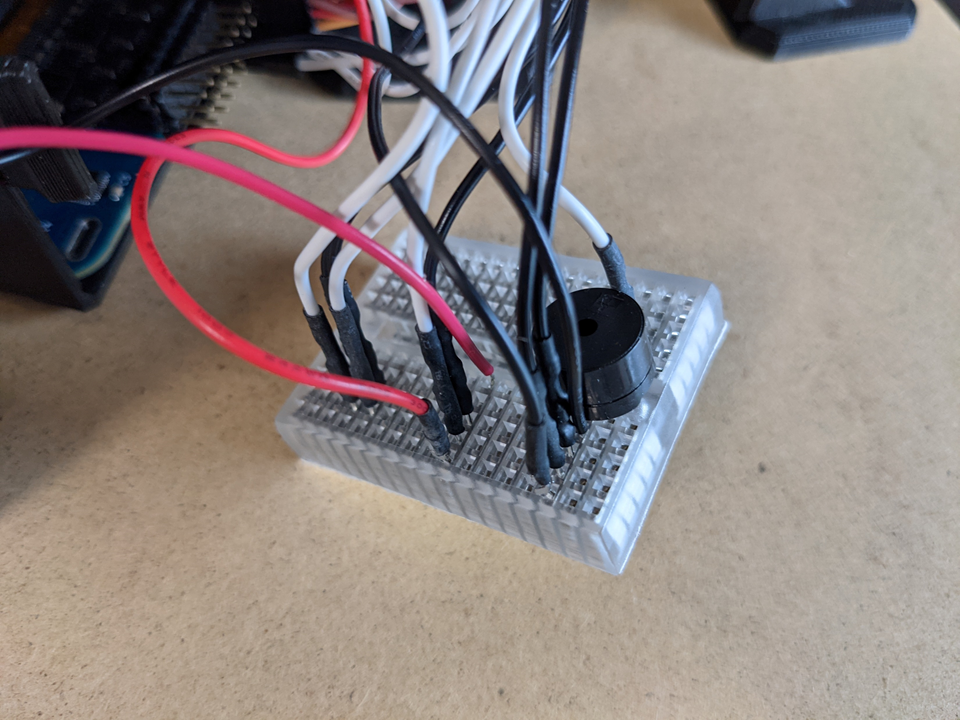 配線を終えたら頭パーツと胴体パーツをくっつければハードウェアは完成ですが、その前にソフトウェアセットアップを行って正しく動作するか確認することをおすすめします。 ※頭パーツと胴体パーツをくっつける際はブレッドボードを胴体側、電池ボックスを頭側に寄せるとハマりやすいです。 ## 完成形 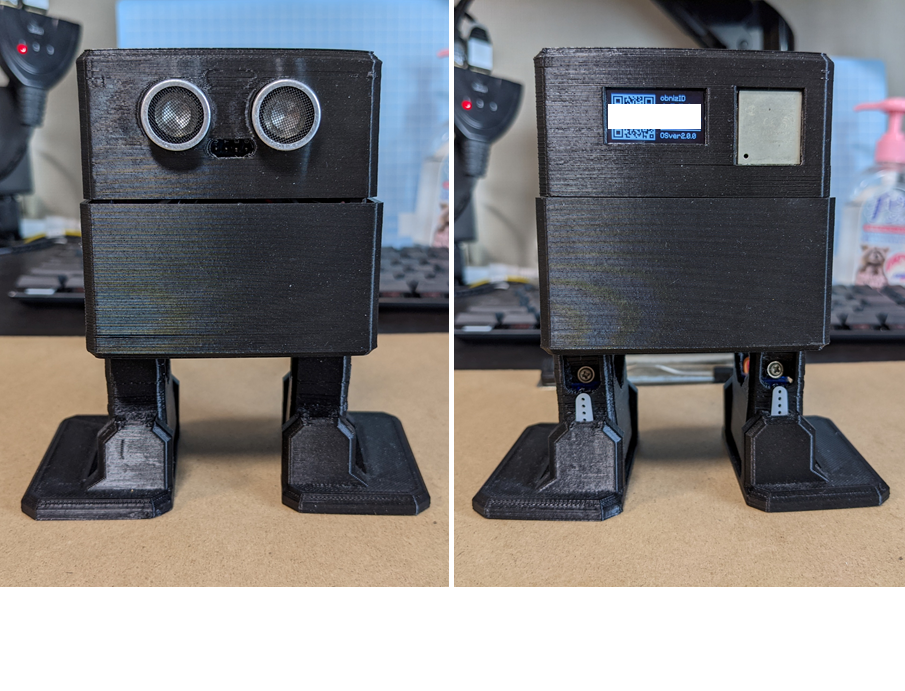 # ソフトウェアセットアップ 続いてソフトウェア側のセットアップを行います。 ## 必要環境 以下のソフトウェアがインストールされている必要があります。 * Git * Node.js v12以上 ## ソースリポジトリのgit clone 以下のコマンドを実行してソースリポジトリをcloneし、関連モジュールをインストールします。 ```sh:console $ git clone https://github.com/miso-develop/otto-obniz-elchika $ cd otto-obniz-elchika $ npm i ``` ## 環境設定ファイル(`.env`)の作成 以下のコマンドを実行し環境設定ファイル(`.env`)ファイルを作成し、obniz IDを書き込みます。 ```sh:console $ cp .env.template .env ``` ```text:.env OBNIZ_ID=xxxx-xxxx ``` ## キャリブレーションの実行 以上でソフトウェアのセットアップはできている状態です。 サーボモーターのキャリブレーションを実行し、正常に動作するか確認します。 OTTOの足を少し角度をつけた状態で以下のコマンドを実行してください。 足並みがそろったら正常に動作しています。 ```sh:console $ npm run calibration ``` ## プログラムの実行 以下のコマンドを実行するとメインプログラムが実行されます。 デフォルトでは左右に揺れるようなダンスをしつつ「かえるの歌」を歌います。 ```sh:console $ npm run start ``` ## 動作の変更方法 OTTOの動作を変更するにはcloneしたソースリポジトリ内の`src/index.ts`を書き換えます。 33行目以降が以下のように記載されています。 コメントアウトを切り替えていろいろなアクションを試してみましょう。 現在(2021/5/15時点)のobniz版OTTOは歩く/走る/踊る/歌うことができます。 ```ts:src/index.ts(33行目から) await Promise.race([ // 歌いながらダンス otto.dance(100), otto.sing(otto.song.frog), // 歩く // otto.walkForward(4), // 走る // otto.dashForward(8), ]) ``` # ソースコード cloneしたソースリポジトリの`src`ディレクトリ配下がソースコードとなり、TypeScriptで書かれています。 `src/index.ts`がOTTOを操作するアプリケーション用プログラムとなり、`src/otto/`ディレクトリ配下がOTTOの制御プログラムとなります。 ```ts:src/index.ts require("dotenv").config() import Obniz from "obniz" import OTTO from "./otto/" import { log, sleep, round } from "./otto/utils" ; (async () => { const obnizId = process.env.OBNIZ_ID || "" if (!obnizId) throw new Error("Error: obniz id is invalid!") const obniz: Obniz = new Obniz(obnizId) if (!(await obniz.connectWait({timeout: 3}))) throw new Error("Error: Failed to connect obniz!") // MEMO: `obniz.wired("OTTO", {rightLeg: 0, leftLeg: 1 ...})`の代わり const otto: OTTO = await new OTTO(obniz, { rightLeg: 0, leftLeg: 1, rightFoot: 2, leftFoot: 3, eyeTrigger: 4, eyeEcho: 5, voice: 6, vcc: 10, // MEMO: このピンへは接続しないが省略するとエラーが出るためダミー指定 gnd: 11 // MEMO: このピンへは接続しないが省略するとエラーが出るためダミー指定 }) await otto.calibration() await sleep(1000) await Promise.race([ // 歌いながらダンス otto.dance(100), otto.sing(otto.song.frog), // 歩く // otto.walkForward(4), // 走る // otto.dashForward(8), ]) otto.stop() process.exit(0) })() log("OTTO start!") ``` ```ts:src/calibration.ts require("dotenv").config() import Obniz from "obniz" const obnizId = process.env.OBNIZ_ID || "" const obniz = new Obniz(obnizId) obniz.onconnect = async () => { calibration() setTimeout(() => process.exit(0), 3000) } const calibration = async () => { const rightLeg = obniz.wired("ServoMotor", {signal:0, vcc:10, gnd:11}) const leftLeg = obniz.wired("ServoMotor", {signal:1, vcc:10, gnd:11}) const rightFoot = obniz.wired("ServoMotor", {signal:2, vcc:10, gnd:11}) const leftFoot = obniz.wired("ServoMotor", {signal:3, vcc:10, gnd:11}) const angle = 90 rightLeg.angle(angle) leftLeg.angle(angle) rightFoot.angle(angle) leftFoot.angle(angle) } ``` ```ts:src/otto/index.ts require("dotenv").config() import Obniz from "obniz" import { Step, Direction } from "./step" import Eye from "./eye" import Voice from "./voice" import Song from "./song" import { log, sleep, round } from "./utils" type PinNumber = 0 | 1 | 2 | 3 | 4 | 5 | 6 | 7 | 8 | 9 | 10 | 11 type PinAssign = { rightLeg: PinNumber, leftLeg: PinNumber, rightFoot: PinNumber, leftFoot: PinNumber, eyeTrigger: PinNumber, eyeEcho: PinNumber, voice: PinNumber, vcc: PinNumber, gnd: PinNumber, } class OTTO { step: Step eye: Eye voice: Voice song: Song obniz: Obniz pinAssign: PinAssign fps: number msec: number constructor(obniz: Obniz, pinAssign: PinAssign, fps = 60) { this.obniz = obniz this.pinAssign = pinAssign this.fps = fps this.msec = 1000 / fps this.step = new Step(this) this.eye = new Eye(this) this.voice = new Voice(this) this.song = new Song() } public stop(): void { this.obniz.close() } public async calibration(): Promise<void> { await this.step.calibration() } public async walkForward(step = 1): Promise<void> { await this.step.walk(step, Direction.Forward) } public async walkBackward(step = 1): Promise<void> { await this.step.walk(step, Direction.Backward) } public async dashForward(step = 1): Promise<void> { await this.step.dash(step, Direction.Forward) } public async dashBackward(step = 1): Promise<void> { await this.step.dash(step, Direction.Backward) } public async dance(step = 1): Promise<void> { await this.step.dance(step) } public async sing(score: Song.Score): Promise<void> { await this.voice.sing(score) } } export default OTTO ``` ```ts:src/otto/eye.ts require("dotenv").config() import HCSR04 from "obniz/dist/src/parts/DistanceSensor/HC-SR04" import OTTO from "./" import { log, sleep, round } from "./utils" export interface EyeInterface { } export class Eye implements EyeInterface { private otto: OTTO private hcsr04: HCSR04 private _temp: number private _distanceThreshold: number private _canForward: boolean = true constructor(otto: OTTO, temp = 20, distanceThreshold = 100) { this.otto = otto this.hcsr04 = otto.obniz.wired("HC-SR04", { trigger: otto.pinAssign.eyeTrigger, echo: otto.pinAssign.eyeEcho, vcc: otto.pinAssign.vcc, gnd: otto.pinAssign.gnd, }) this._temp = temp this._distanceThreshold = distanceThreshold // TODO: // this.canForwardLoop() } private async canForwardLoop(): Promise<void> { while (true) { this._canForward = !!(await this.hcsr04.measureWait() > this._distanceThreshold) await sleep(100) } } get canForward(): boolean { return this._canForward } set distanceThreshold(distanceThreshold: number) { this._distanceThreshold = distanceThreshold } get distanceThreshold(): number { return this._distanceThreshold } set temp(temp: number) { this._temp = temp this.hcsr04.temp = temp } get temp(): number { return this._temp } } export default Eye ``` ```ts:src/otto/song.ts require("dotenv").config() import { log, sleep, round } from "./utils" enum Pitch { NONE = 0, A0 = 28, AS0 = 29, BF0 = 29, B0 = 31, C1 = 33, CS1 = 35, DF1 = 35, D1 = 37, DS1 = 39, EF1 = 39, E1 = 41, F1 = 44, FS1 = 46, GF1 = 46, G1 = 49, GS1 = 52, AF1 = 52, A1 = 55, AS1 = 58, BF1 = 58, B1 = 62, C2 = 65, CS2 = 69, DF2 = 69, D2 = 73, DS2 = 78, EF2 = 78, E2 = 82, F2 = 87, FS2 = 92, GF2 = 92, G2 = 98, GS2 = 104, AF2 = 104, A2 = 110, AS2 = 117, BF2 = 117, B2 = 123, C3 = 131, CS3 = 139, DF3 = 139, D3 = 147, DS3 = 156, EF3 = 156, E3 = 165, F3 = 175, FS3 = 185, GF3 = 185, G3 = 196, GS3 = 208, AF3 = 208, A3 = 220, AS3 = 233, BF3 = 233, B3 = 247, C4 = 262, CS4 = 277, DF4 = 277, D4 = 294, DS4 = 311, EF4 = 311, E4 = 330, F4 = 349, FS4 = 370, GF4 = 370, G4 = 392, GS4 = 415, AF4 = 415, A4 = 440, AS4 = 466, BF4 = 466, B4 = 494, C5 = 523, CS5 = 554, DF5 = 554, D5 = 587, DS5 = 622, EF5 = 622, E5 = 659, F5 = 698, FS5 = 740, GF5 = 740, G5 = 784, GS5 = 831, AF5 = 831, A5 = 880, AS5 = 932, BF5 = 932, B5 = 988, C6 = 1047, CS6 = 1109, DF6 = 1109, D6 = 1175, DS6 = 1245, EF6 = 1245, E6 = 1319, F6 = 1397, FS6 = 1480, GF6 = 1480, G6 = 1568, GS6 = 1661, AF6 = 1661, A6 = 1760, AS6 = 1865, BF6 = 1865, B6 = 1976, C7 = 2093, CS7 = 2217, DF7 = 2217, D7 = 2349, DS7 = 2489, EF7 = 2489, E7 = 2637, F7 = 2794, FS7 = 2960, GF7 = 2960, G7 = 3136, GS7 = 3322, AF7 = 3322, A7 = 3520, AS7 = 3729, BF7 = 3729, B7 = 3951, C8 = 4186, } enum Length { Whole = 4, Half = 2, Quoter = 1, Eighth = 0.5, Sixteenth = 0.25, DotHalf = 3, DotQuoter = 1.5, DotEighth = 0.75, DotSixteenth = 0.375, } namespace Song { export type Note = [Pitch, Length] export type Score = { bpm: number melody: Note[] } } class Song { doremi: Song.Score = { bpm: 120, melody: [ [Pitch.C4 , Length.Quoter], [Pitch.D4 , Length.Quoter], [Pitch.E4 , Length.Quoter], [Pitch.F4 , Length.Quoter], [Pitch.G4 , Length.Quoter], [Pitch.A4 , Length.Quoter], [Pitch.B4 , Length.Quoter], [Pitch.C5 , Length.Quoter], ] } frog: Song.Score = { bpm: 80, melody: [ [Pitch.C4 , Length.Eighth], [Pitch.D4 , Length.Eighth], [Pitch.E4 , Length.Eighth], [Pitch.F4 , Length.Eighth], [Pitch.E4 , Length.Eighth], [Pitch.D4 , Length.Eighth], [Pitch.C4 , Length.Eighth], [Pitch.NONE , Length.Eighth], [Pitch.E4 , Length.Eighth], [Pitch.F4 , Length.Eighth], [Pitch.G4 , Length.Eighth], [Pitch.A4 , Length.Eighth], [Pitch.G4 , Length.Eighth], [Pitch.F4 , Length.Eighth], [Pitch.E4 , Length.Eighth], [Pitch.NONE , Length.Eighth], [Pitch.C4 , Length.Eighth], [Pitch.NONE , Length.Eighth], [Pitch.C4 , Length.Eighth], [Pitch.NONE , Length.Eighth], [Pitch.C4 , Length.Eighth], [Pitch.NONE , Length.Eighth], [Pitch.C4 , Length.Eighth], [Pitch.NONE , Length.Eighth], [Pitch.C4 , Length.Sixteenth], [Pitch.C4 , Length.Sixteenth], [Pitch.D4 , Length.Sixteenth], [Pitch.D4 , Length.Sixteenth], [Pitch.E4 , Length.Sixteenth], [Pitch.E4 , Length.Sixteenth], [Pitch.F4 , Length.Sixteenth], [Pitch.F4 , Length.Sixteenth], [Pitch.E4 , Length.Sixteenth], [Pitch.NONE , Length.Sixteenth], [Pitch.D4 , Length.Sixteenth], [Pitch.NONE , Length.Sixteenth], [Pitch.C4 , Length.Eighth], [Pitch.NONE , Length.Eighth], ] } } export default Song ``` ```ts:src/otto/step.ts require("dotenv").config() import ServoMotor from "obniz/dist/src/parts/Moving/ServoMotor" import OTTO from "./" import { log, sleep, round } from "./utils" interface ServoMotors { rightLeg: ServoMotor, rightFoot: ServoMotor, leftLeg: ServoMotor, leftFoot: ServoMotor, } export enum Direction { Forward = 1, Backward = -1 } export interface StepInterface { walk(step: number, direction: Direction): Promise<void> dash(step: number, direction: Direction): Promise<void> dance(step: number): Promise<void> } export class Step implements StepInterface { private otto: OTTO private servoMotors: ServoMotors private preAngles: number[] = [0, 0, 0, 0] private readonly msec: number constructor(otto: OTTO) { this.otto = otto const rightLeg = otto.obniz.wired("ServoMotor", { signal: otto.pinAssign.rightLeg, vcc: otto.pinAssign.vcc, gnd: otto.pinAssign.gnd }) const leftLeg = otto.obniz.wired("ServoMotor", { signal: otto.pinAssign.leftLeg, vcc: otto.pinAssign.vcc, gnd: otto.pinAssign.gnd }) const rightFoot = otto.obniz.wired("ServoMotor", { signal: otto.pinAssign.rightFoot, vcc: otto.pinAssign.vcc, gnd: otto.pinAssign.gnd }) const leftFoot = otto.obniz.wired("ServoMotor", { signal: otto.pinAssign.leftFoot, vcc: otto.pinAssign.vcc, gnd: otto.pinAssign.gnd }) this.servoMotors = { rightLeg, rightFoot, leftLeg, leftFoot } this.msec = otto.msec } async walk(step = 1, direction: Direction = Direction.Forward): Promise<void> { const speed = 150 const legAngle = 30 * direction const footAngle = 30 for (let i = 0; i < step; i++) { if (direction === Direction.Forward && !this.otto.eye.canForward) { await this.otto.voice.alert() continue } // right await this.move([0, 0, 0, -1 * footAngle], speed) await this.move([-1 * legAngle, legAngle, 0, -1 * footAngle], speed) await this.move([-1 * legAngle, legAngle, 0, 0], speed) // left await this.move([0, 0, -1 * footAngle, 0], speed) await this.move([legAngle, -1 * legAngle, -1 * footAngle, 0], speed) await this.move([legAngle, -1 * legAngle, 0, 0], speed) } await this.move([0, 0, 0, 0], speed) } public async dash(step = 1, direction: Direction = Direction.Forward): Promise<void> { const speed = 80 const legAngle = 60 * direction const footAngle = 30 for (let i = 0; i < step; i++) { if (direction === Direction.Forward && !this.otto.eye.canForward) { await this.otto.voice.alert() continue } // right await this.move([0, 0, 0, -1 * footAngle], speed) await this.move([-1 * legAngle, legAngle, 0, -1 * footAngle], speed) await this.move([-1 * legAngle, legAngle, 0, 0], speed) // left await this.move([0, 0, -1 * footAngle, 0], speed) await this.move([legAngle, -1 * legAngle, -1 * footAngle, 0], speed) await this.move([legAngle, -1 * legAngle, 0, 0], speed) } await this.move([0, 0, 0, 0], speed) } public async dance(step = 1): Promise<void> { const speed = 200 const footAngle = 45 for (let i = 0; i < step; i++) { // right await this.move([0, 0, footAngle, 0], speed) await this.move([0, 0, 0, 0], speed) await this.move([0, 0, -1 * footAngle, 0], speed) await this.move([0, 0, 0, 0], speed) // left await this.move([0, 0, 0, footAngle], speed) await this.move([0, 0, 0, 0], speed) await this.move([0, 0, 0, -1 * footAngle], speed) await this.move([0, 0, 0, 0], speed) } await this.move([0, 0, 0, 0], speed) } public async calibration(): Promise<void> { const angle = 90 this.servoMotors.rightLeg.angle(angle) this.servoMotors.leftLeg.angle(angle) this.servoMotors.rightFoot.angle(angle) this.servoMotors.leftFoot.angle(angle) } private async move(angles: number[], speed: number): Promise<void> { const frameNum: number = speed / this.msec || 1 const anglesDiff: number[] = this.getAnglesDiff(angles) // console.log(anglesDiff) const frameAngles: number[] = anglesDiff.map((angle) => round(angle / frameNum, 0.1)) // console.log(frameAngles) await this.frameLoop(frameNum, frameAngles) this.preAngles = angles } private async frameLoop(frameNum: number, frameAngles: number[]): Promise<void> { for (let i = 0; i < frameNum; i++) { const anglesIncrement: number[] = frameAngles.map((angle) => round(angle * (i + 1), 1)) const preAnglesSum: number[] = this.getPreAnglesSum(anglesIncrement) await this.setAngles(preAnglesSum) } } private async setAngles(angles: number[]): Promise<void> { angles = angles.map((angle: number, i: number) => i % 2 ? 90 - angle : 90 + angle) this.isCorrectAngles(angles) // console.log(angles) this.servoMotors.rightLeg.angle(angles[0]) this.servoMotors.leftLeg.angle(angles[1]) this.servoMotors.rightFoot.angle(angles[2]) this.servoMotors.leftFoot.angle(angles[3]) await sleep(this.msec) } private isCorrectAngles(angles: number[]): void { angles.map((angle) => { if (angle < 0 || angle > 180) throw new Error("Error: Angle range over!") }) } private getPreAnglesSum(angles: number[]): number[] { const result: number[] = [] for (let i = 0; i < 4; i++) { result.push(angles[i] + this.preAngles[i]) } return result } private getAnglesDiff(angles: number[]): number[] { const result: number[] = [] for (let i = 0; i < 4; i++) { result.push(angles[i] - this.preAngles[i]) } return result } } ``` ```ts:src/otto/voice.ts require("dotenv").config() import Speaker from "obniz/dist/src/parts/Sound/Speaker" import OTTO from "./" import Song from "./song" import { log, sleep, round } from "./utils" export interface VoiceInterface { speak(): Promise<void> } export class Voice implements VoiceInterface { private otto: OTTO private speaker: Speaker constructor(otto: OTTO) { this.otto = otto this.speaker = otto.obniz.wired("Speaker", { signal: otto.pinAssign.voice, gnd: otto.pinAssign.gnd, }) } public async speak(): Promise<void> { this.speaker.play(523) await this.otto.obniz.wait(160) this.speaker.play(587) await this.otto.obniz.wait(160) this.speaker.play(659) await this.otto.obniz.wait(160) this.speaker.stop() } public async alert(): Promise<void> { this.speaker.play(523) await this.otto.obniz.wait(160) this.speaker.play(587) await this.otto.obniz.wait(160) this.speaker.play(659) await this.otto.obniz.wait(160) this.speaker.stop() } public async sing(score: Song.Score): Promise<void> { const beat = 60 * 1000 / score.bpm for (const note of score.melody) { const pitch = note[0] * 2 const length = note[1] * beat log(pitch, length) note[0] ? this.speaker.play(pitch) : this.speaker.stop() await sleep(length - 10) this.speaker.stop() await sleep(10) } this.speaker.stop() } } export default Voice ``` ```ts:src/otto/utils.ts require("dotenv").config() export const log = (...v: any[]) => console.log(...v) export const sleep = (ms: number): Promise<void> => { return new Promise(r => setTimeout(r, ms)) } export const round = (value: number, base: number): number => { return Math.round(value / base) * base } ``` # おわりに まだまだ荒削りではありますが、OTTOをobnizで動作させることができました。 今回は着手できていませんが、GUIから各種動作をコントロールさせられるようにもしていきたいと考えています。 またobnizのピンも5本余っている状態ですので、これらのピンも活用してさまざまなセンサーを搭載してみてもおもしろそうだなと考えています。 みなさまもぜひご自身のOTTOを組み立てカスタマイズされてみてはいかがでしょうか。 本記事がその一助となれば幸いです。
# おまけ ## スマートスピーカースキル(LINE CLOVA)
# (おまけ)スマートスピーカースキル(LINE CLOVA)
LINE社のスマートスピーカー「LINE CLOVA」の拡張機能(スキル)として「[OTTO Controller](https://clova.line.me/clova-ai/skillstore/skill/miso.develop.ottocontroller)」をリリースしています。 obniz版OTTOをスマートスピーカーから音声操作できるユニークなスキルです。 ※このスキルではサーボモーターを使用した動作のみ行えます