
mint が 2021年02月28日20時36分46秒 に編集
初版
タイトルの変更
M5Stackで電子メトロノームを作ってみた
タグの変更
秋葉原2021
M5Stack
メイン画像の変更
記事種類の変更
製作品
本文の変更
## 仕様 ずっと欲しかった、電子メトロノームをM5Stackを使って作ってみました。 機能は以下の通りです。 - start/stop ボタンでメトロノームをON/OFF - 左のつまみを回すことで音量を調整 - 右のつまみを回すことでテンポを調整 ## デモ動画 https://youtu.be/lp_jh2fu5GA ## 部品 - [M5Stack Gray](https://www.switch-science.com/catalog/3648/) - [M5Stack用回転角ユニット](https://www.switch-science.com/catalog/6551/) 2個 - [M5Stack用I/Oハブユニット](https://www.switch-science.com/catalog/6064/) 1個 ## 接続図 各モジュールを次の写真のように接続します。 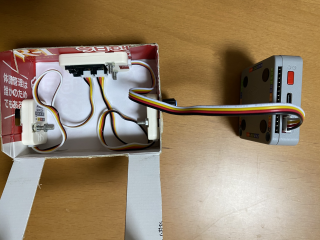 ## プログラム ```arduino:metoronome.ino #include <M5Stack.h> #include <Wire.h> #include "porthub.h" PortHub porthub; uint8_t HUB_ADDR[2]={HUB5_ADDR,HUB6_ADDR}; //HUB5_ADDR: 5から入力されたアングル HUB6_ADDR: 6から入力されたアングル float x[20]; float y[20]; int tempos[223]; int tempos1[223]; int volumes[60]; int volume = 1; //現在の音量 int b_volume = 1; //1個前の音量 int tempo = 60; //現在のテンポ int b_tempo = 60; //一個前のテンポ int angle5; //5から入力された角度 int b_angle6; //6から入力された現在の角度 int c_angle6; //6から入力された一個前の角度 float interval = 100; int n = 0; //針が何番目の位置にあるか int tempoi = 15; //tempos[tempoi] int volumei = 0; //volumes[volumei] int homeBtnB = 0; //メトロノームが動いていたら1 int temposetting1 = 0; //テンポ設定中(テンポは1ずつ変化)かどうか unsigned long start; int skip = 0; void setup(){ M5.begin(); M5.Power.begin(); porthub.begin(); M5.Speaker.begin(); // ノイズをミュート M5.Speaker.mute(); homemark(); /*テンポ-----------------------------------*/ tempos[0]=30; b_angle6 = porthub.hub_a_read_value(HUB_ADDR[1]); for (int i=0; i<223; ){ if(i < 30){ for (int j = 0; j < 2; j++){ tempos[i + j] = i + 30; } i += 2; }else if(i < 42){ for (int j = 0; j < 3; j++){ tempos[i + j] = i + 30; } i += 3; }else if(i < 90){ for (int j = 0; j < 4; j++){ tempos[i + j] = i + 30; } i += 4; }else if(i < 114){ for (int j = 0; j < 6; j++){ tempos[i + j] = i + 30; } i += 6; }else if(i < 210){ for (int j = 0; j < 8; j++){ tempos[i + j] = i + 30; } i += 8; }else if(i < 222){ for (int j = 0; j < 12; j++){ tempos[i + j] = i + 30; } i += 12; }else{ tempos[i] = 252; i ++; } } for (int i=0; i< 223; i++){ tempos1[i] = i + 30; } /*音量-----------------------------------*/ for(int i=0; i < 60; i++){ if(i < 11){ volumes[i] = i; }else{ volumes[i] = volumes[i -1] + 5; } } /*針の座標-----------------------------------*/ for (int i=0; i < 20; i++){ if(i < 11){ x[i] = 164 + 160*cos(5*PI/6 - i*PI/15); y[i] = 180 - 160*sin(5*PI/6 - i*PI/15); }else{ x[i] = x[20-i]; y[i] = y[20-i]; } } } void loop(){ M5.update(); /*メトロノームの針---------------------------*/ if(m5.BtnB.wasPressed()){ homeBtnB = 1 - homeBtnB; } if(homeBtnB == 1){ M5.Lcd.drawLine(164,180,x[n],y[n],WHITE); if(n == 0 || n == 10){ //針が端に来た時に音を鳴らす beep(932, 100, volume); } if(volume > 0){ if((interval - 10 - millis() + start) >= 0){ skip = 0; delay(interval - 10 - millis() + start); }else if((interval*2 - 20 - millis() + start) >= 0) { skip = 1; delay(interval*2 - 20 - millis() + start); } }else{ if((interval - 10 - millis() + start) >= 0){ skip = 0; delay(interval - 10 - millis() + start); }else if((interval*2 - 20 - millis() + start) >= 0) { skip = 1; delay(interval*2 - 20 - millis() + start); } } if((interval - millis() + start) >= 0){ skip = 0; delay(interval - millis() + start); }else if((interval*2 - millis() + start) >= 0) { skip = 1; delay(interval*2 - millis() + start); } M5.Lcd.drawLine(164,180,x[n],y[n],BLACK); if(n < 19){ n += skip +1; }else{ n = 0; } }else{ M5.Lcd.drawLine(164,180,x[0],y[0],WHITE); n = 0; } start = millis(); /*音量調節-------------------------------*/ angle5 = porthub.hub_a_read_value(HUB_ADDR[0]); if((angle5/11.8) < 60){ volumei = angle5/11.8; }else{ volumei = 59; } volume = volumes[volumei]; if(volume != b_volume){ M5.Lcd.setCursor(55,140); M5.Lcd.setTextColor(BLACK); M5.Lcd.println(b_volume); M5.Lcd.setCursor(55,140); M5.Lcd.setTextColor(WHITE); M5.Lcd.println(volume); b_volume = volume; } /*テンポ調節---------------------------------*/ if(tempo != b_tempo){ M5.Lcd.setTextColor(BLACK); M5.Lcd.setCursor(250,140); M5.Lcd.println(b_tempo); M5.Lcd.setTextColor(WHITE); M5.Lcd.setCursor(250,140); M5.Lcd.println(tempo); b_tempo = tempo; } if(m5.BtnC.wasPressed()){ //Cボタンが押されたら1ずつ変化 temposetting1 = 1 - temposetting1; } b_angle6 = c_angle6; c_angle6 = porthub.hub_a_read_value(HUB_ADDR[1]); //6から入力せれた角度 if((c_angle6 / 3.07) < 223){ tempoi = c_angle6 / 3.07; }else{ tempoi = 222; } if(temposetting1 == 0){ M5.Lcd.drawFastHLine(247,158,39,BLACK); //下線を消す if(c_angle6 != b_angle6){ tempo = tempos[tempoi]; } }else{ if(tempo < 100){ M5.Lcd.drawFastHLine(273,158,13,BLACK); //余分な下線を消す M5.Lcd.drawFastHLine(247,158,26,WHITE); //下線を引く }else{ M5.Lcd.drawFastHLine(247,158,39,WHITE); //下線を引く } if(c_angle6 != b_angle6){ tempo = tempos1[tempoi]; } } interval = 6000 / tempo ; //BPMを間隔に変換 } /*homeマーク----------------------------------------*/ void homemark(){ M5.Lcd.fillRect(0,181,330,60,BLACK); volumemark(); startstopmark(); Tempomark(); } /*音量マーク----------------------------------------*/ void volumemark(){ M5.Lcd.fillRect(47,200,10,20,WHITE); M5.Lcd.fillTriangle(67,190,67,230,47,210,WHITE); M5.Lcd.drawEllipse(81,210,11,20,WHITE); M5.Lcd.fillRect(68,190,13,40,BLACK); M5.Lcd.drawEllipse(77,210,8,15,WHITE); M5.Lcd.fillRect(68,190,10,40,BLACK); M5.Lcd.drawEllipse(73,210,5,10,WHITE); M5.Lcd.fillRect(68,190,6,40,BLACK); M5.Lcd.setCursor(55,140); M5.Lcd.setTextColor(WHITE); M5.Lcd.println(volume); } /*Start/Stop----------------------------*/ void startstopmark(){ M5.Lcd.setCursor(130,190); M5.Lcd.setTextColor(WHITE); M5.Lcd.setTextSize(2); M5.Lcd.println("Start"); M5.Lcd.setCursor(145,210); M5.Lcd.println("/Stop"); } /*Tempo-------------------------------*/ void Tempomark(){ M5.Lcd.setCursor(228,200); M5.Lcd.setTextColor(WHITE); M5.Lcd.print("Tempo"); M5.Lcd.setCursor(250,140); M5.Lcd.setTextColor(WHITE); M5.Lcd.setTextSize(2); M5.Lcd.println(tempo); } ``` ```arduino:beep.ino #include <M5Stack.h> #define SPEKAER_PIN 25 void beep(int freq, int duration, uint8_t volume0){ // freq(Hz), duration(ms), volume0(1~255) int t = 1000000 / freq / 2; unsigned long start = millis(); while((millis() - start) < duration){ dacWrite(SPEAKER_PIN, 0); delayMicroseconds(t); dacWrite(SPEAKER_PIN, volume0); delayMicroseconds(t); } dacWrite(SPEAKER_PIN, 0); } ``` ```arduino:porthub.cpp #include "porthub.h" PortHub::PortHub(){ } void PortHub::begin(){ Wire.begin(); } uint16_t PortHub::hub_a_read_value(uint8_t reg){ Wire.beginTransmission(IIC_ADDR); Wire.write(reg | 0x06); Wire.endTransmission(); uint8_t RegValue_L,RegValue_H; Wire.requestFrom(IIC_ADDR,2); while(Wire.available()){ RegValue_L = Wire.read(); RegValue_H = Wire.read(); } return (RegValue_H<<8) | RegValue_L; } ``` ```arduino:porthub.h #ifndef __PORTHUB_H__ #define __PORTHUB_H__ #include <Wire.h> #define IIC_ADDR 0x61 #define HUB1_ADDR 0x40 #define HUB2_ADDR 0x50 #define HUB3_ADDR 0x60 #define HUB4_ADDR 0x70 #define HUB5_ADDR 0x80 #define HUB6_ADDR 0xA0 class PortHub { public: PortHub(); void begin(); uint16_t hub_a_read_value(uint8_t reg); uint8_t hub_d_read_value_A(uint8_t reg); uint8_t hub_d_read_value_B(uint8_t reg); void hub_d_wire_value_A(uint8_t reg,uint16_t level); void hub_d_wire_value_B(uint8_t reg,uint16_t level); void hub_a_wire_value_A(uint8_t reg,uint16_t duty); void hub_a_wire_value_B(uint8_t reg,uint16_t duty); void hub_wire_length(uint8_t reg,uint16_t length); void hub_wire_index_color(uint8_t reg,uint16_t num,uint8_t r,int8_t g,uint8_t b); void hub_wire_fill_color(uint8_t reg,uint16_t first, uint16_t count, uint8_t r,int8_t g,uint8_t b); void hub_wire_setBrightness(uint8_t reg,uint8_t brightness); public: private: private: }; #endif ``` porthub.cpp、porthub.h は、 ファイル→スケッチ例→M5Stack→Unit→PbHUB で開くことのできるスケッチ例を参考にしてます。 ## 組み立て 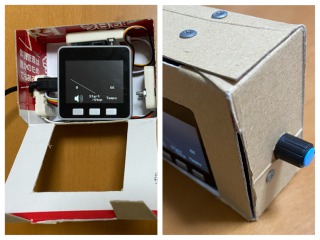 大まかに下図のように段ボールを切り取って組み立てます。 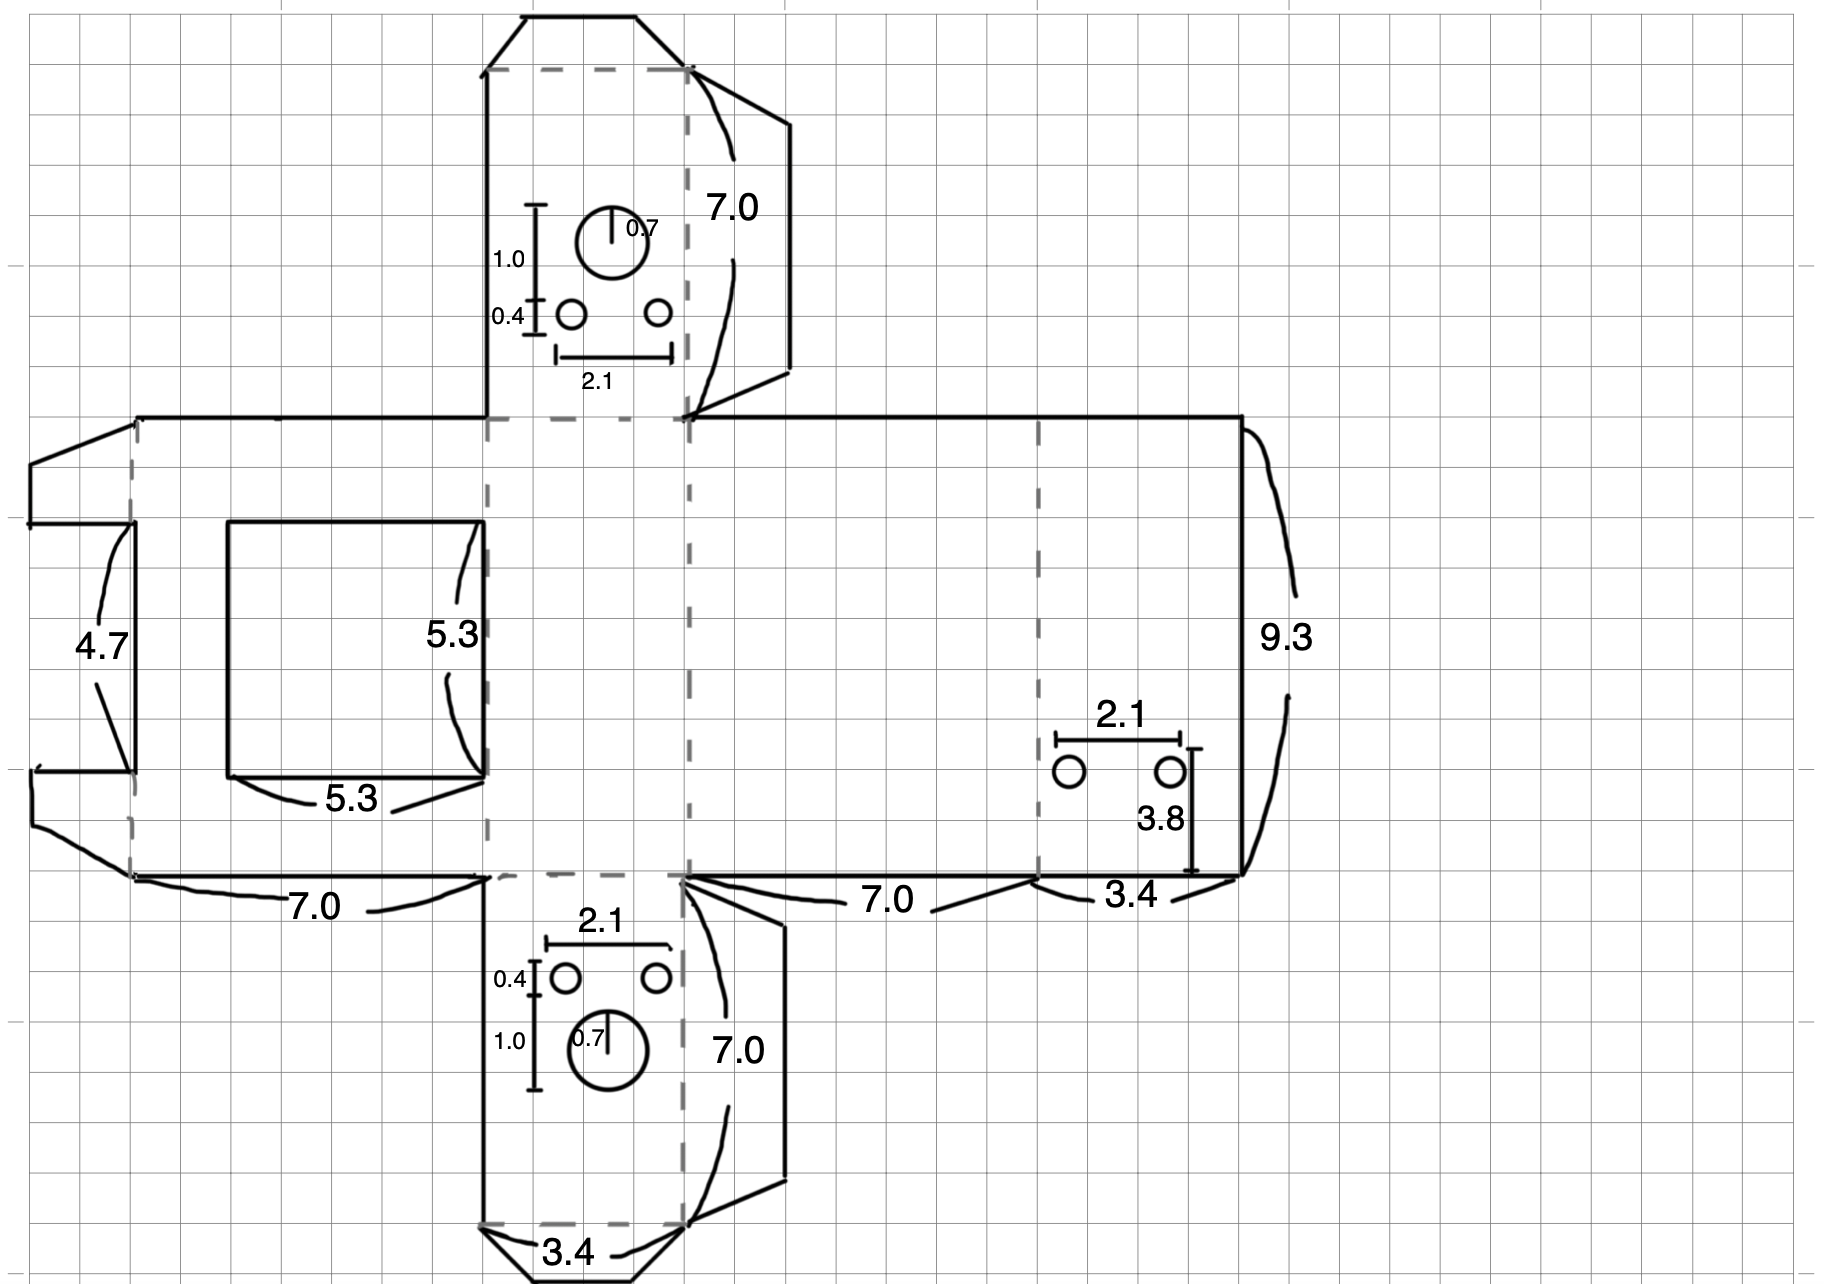 ## 終わりに M5Stackを使って、とても簡単に電子メトロノームが作れたので満足しています。 正確で、かなり大きな音が出せるので使いやすいです。 M5Stackはまだまだいろんなことができそうなので、また何か作ってみようと思います!