Ketunorobio が 2022年08月04日23時07分24秒 に編集
コメント無し
本文の変更
手乗りサイズの2足歩行ロボットを作ってみましたので、ここでまとめさせていただこうかと思います。 ## 全てを小型化する バッテリーはlipoの1100mAhが十分小さいので、これを基準に考えました。 動体の部分にlipoがぎりぎり入るサイズにしたいので、マイコン、サーボドライバ、サーボモーターもlipo同等かそれ以下のサイズに変更しています。 サーボモーター、及びマイコンに関してはいいネットでいい感じの物を見つけました。 ## サーボモーター @[twitter](https://twitter.com/ketunorobio/status/1523946069406617600?ref_src=twsrc%5Etfw%7Ctwcamp%5Etweetembed%7Ctwterm%5E1523946069406617600%7Ctwgr%5E606de1db1ab6073b65537b4f1b8c039c7648cbdd%7Ctwcon%5Es1_&ref_url=https%3A%2F%2Fdenkenmusic.com%2Fe6898be4b997e3828ae382b5e382a4e382bae381aee5b08fe38195e381842e8b6b3e6ada9e8a18ce383ade3839ce38383e38388e38292e887aae4bd9ce38197e381a6%2F) ご覧の通り、SG90の約半分の大きさになっております。 サーボモーターはこれを使う事にしました。 ## マイコンボード @[twitter](https://twitter.com/ketunorobio/status/1530694357090594816) マイコンは、ESP32ベースの「tiny pico」という基板があったので、これを使ってみる事にしました。 こちらもご覧の通り、ESP32の半分位の大きさになっています。素晴らしい。 ## サーボドライバ こちらに関しては、PCA9685より小さい基板が見つからず。。 苦肉の策として「基板を半分カットしてみる」方法を取りました。 ※現在は@PONDA_makeさんがminiサーボモータドライバを開発、販売してくれています。 ## 制御に関して tiny picoはESP32ベースで、micropythonがデフォルトでプリインストールされているみたいですので、とりあえずmicropythonで開発を進めました。 コントローラーにはm5stack core2を使用し、タッチパネルでロボットを操作したいと思います。 通信にはUDPを使います。(本当はbleがいいけどmicropythonのbleの記述が上手くいかないので。。) 流れ的にはこんな感じです↓ m5stack ⇒ UDP ⇒ tinypico ⇒ i2c ⇒ pca9685 ⇒ サーボモーター ## 使用部材 ・tinypico ・ミニサーボ ・PCA9685(加工品) ・lipo BT カメラに関しては、今回は小型化するのに邪魔なので、搭載はしない方向でいきます。 ## PCA9685の加工 @[twitter](https://twitter.com/ketunorobio/status/1531371183593074688?ref_src=twsrc%5Etfw%7Ctwcamp%5Etweetembed%7Ctwterm%5E1531371183593074688%7Ctwgr%5Ec70ad65620bb54ea7e3fdd95f5a6ee2d415b2aa7%7Ctwcon%5Es1_&ref_url=https%3A%2F%2Fdenkenmusic.com%2Fe6898be4b997e3828ae382b5e382a4e382bae381aee5b08fe38195e381842e8b6b3e6ada9e8a18ce383ade3839ce38383e38388e38292e887aae4bd9ce38197-3%2F) tweetの通りですが、PCA9685の右半分は、サーボの9~16チャンネル、i2cのアドレス設定(パターン短絡で設定可能)、i2cの連結部分(他のデバイスを数珠繋ぎできる)になります。 サーボモータの9~16チャンネルは使わず、i2cのアドレスもデフォルトのままで、他のi2cデバイスを連結させないのであれば、この部分はオープンの状態です。 つまり、「無い」とみなしていい訳です。 ということは、切っちゃえばいいんじゃないかと。。かなり強引な考えですが(-_- @[twitter](https://twitter.com/ketunorobio/status/1531927525613457409?ref_src=twsrc%5Etfw%7Ctwcamp%5Etweetembed%7Ctwterm%5E1531927525613457409%7Ctwgr%5Ec70ad65620bb54ea7e3fdd95f5a6ee2d415b2aa7%7Ctwcon%5Es1_&ref_url=https%3A%2F%2Fdenkenmusic.com%2Fe6898be4b997e3828ae382b5e382a4e382bae381aee5b08fe38195e381842e8b6b3e6ada9e8a18ce383ade3839ce38383e38388e38292e887aae4bd9ce38197-3%2F) 初めにカッターナイフで切り込みを入れて、その後、のこぎりでぎこぎこやります。 @[twitter](https://twitter.com/ketunorobio/status/1531934914857209857?ref_src=twsrc%5Etfw%7Ctwcamp%5Etweetembed%7Ctwterm%5E1531934914857209857%7Ctwgr%5Ec70ad65620bb54ea7e3fdd95f5a6ee2d415b2aa7%7Ctwcon%5Es1_&ref_url=https%3A%2F%2Fdenkenmusic.com%2Fe6898be4b997e3828ae382b5e382a4e382bae381aee5b08fe38195e381842e8b6b3e6ada9e8a18ce383ade3839ce38383e38388e38292e887aae4bd9ce38197-3%2F) 成功です。とりあえず、カットできました。基板って、めっちゃ簡単にのこぎりで切れる事がわかりました。 動作確認もOK。 ## ロボットのボディをスケッチ、印刷 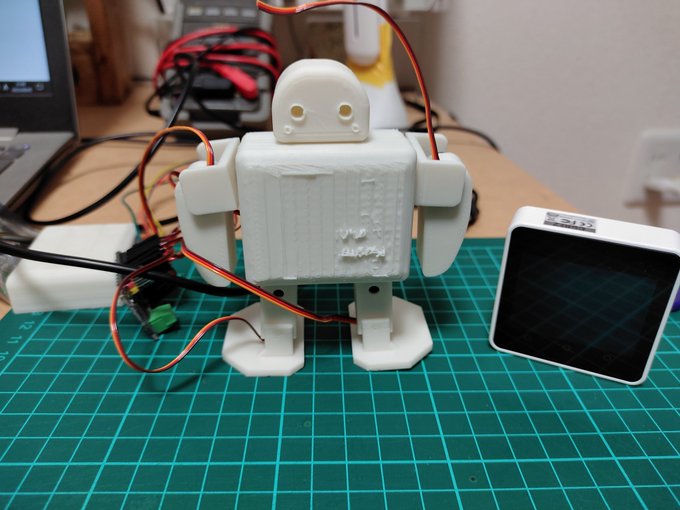 とりあえず印刷出来ましたので、部品は入れずに仮で組み立てました。 横のM5Stackと比べると大きさが分かると思います。手乗りサイズといっても良いでしょう。 ## 部品の収納と配線
@[twitter](https://twitter.com/ketunorobio/status/1532479612323700736?ref_src=twsrc%5Etfw%7Ctwcamp%5Etweetembed%7Ctwterm%5E1532479612323700736%7Ctwgr%5E6814095e05124e88ed64b7152991cb97a8f4647a%7Ctwcon%5Es1_&ref_url=https%3A%2F%2Fdenkenmusic.com%2Fe6898be4b997e3828ae382b5e382a4e382bae381aee5b08fe38195e381842e8b6b3e6ada9e8a18ce383ade3839ce38383e38388e38292e887aae4bd9ce38197-5%2F)
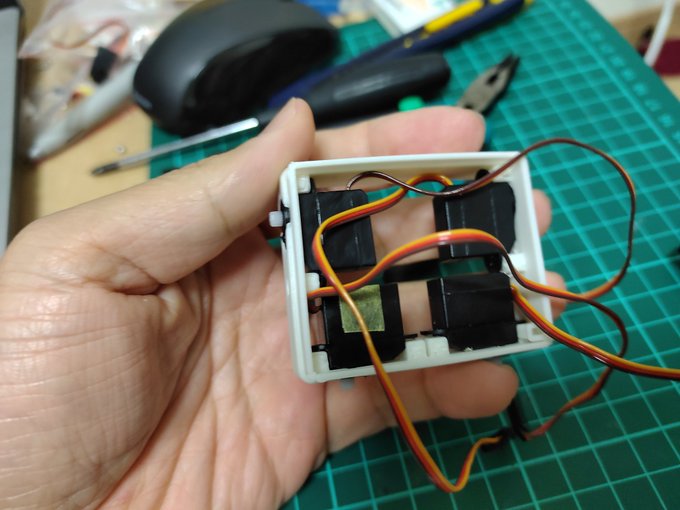
サーボモーターを収納、うまく収まってくれて一安心。 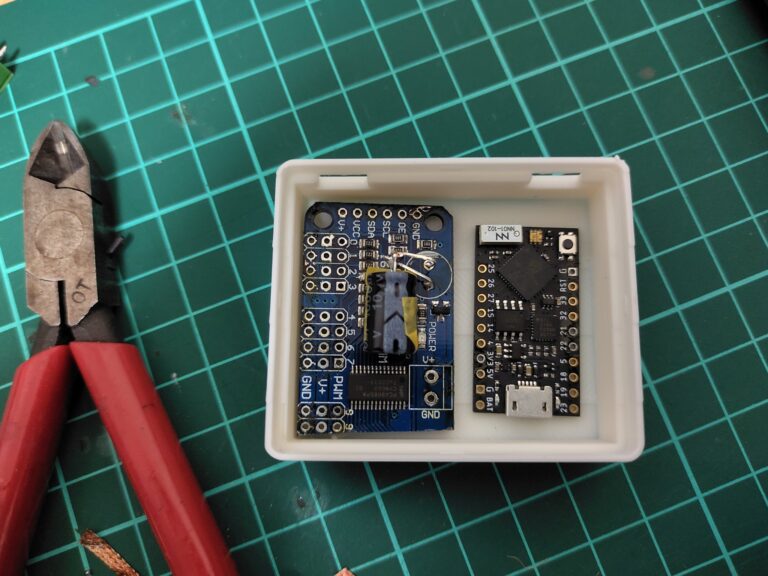 TinyPicoとPCA9685。 こちらも良い感じで収まっています。 PCA9685のピンソケットは配線の際に場所を取るので、全て外しました。またコンデンサの足を延長して寝かせています。 しかしTinyPico、小さい!これでESP32同等の機能を持ってるのが素敵すぎる。 では、地獄の配線作業にとりかかります。。。 ## 配線
@[twitter] (https://twitter.com/ketunorobio/status/1534283138733514753?ref_src=twsrc%5Etfw%7Ctwcamp%5Etweetembed%7Ctwterm%5E1534283138733514753%7Ctwgr%5E27bff2bb81c2d882441a022484bcc261f5a2b511%7Ctwcon%5Es1_&ref_url=https%3A%2F%2Fdenkenmusic.com%2Fe6898be4b997e3828ae382b5e382a4e382bae381aee5b08fe38195e381842e8b6b3e6ada9e8a18ce383ade3839ce38383e38388e38292e887aae4bd9ce38197-5%2F)
@[twitter](https://twitter.com/ketunorobio/status/1534283138733514753?ref_src=twsrc%5Etfw%7Ctwcamp%5Etweetembed%7Ctwterm%5E1534283138733514753%7Ctwgr%5E27bff2bb81c2d882441a022484bcc261f5a2b511%7Ctwcon%5Es1_&ref_url=https%3A%2F%2Fdenkenmusic.com%2Fe6898be4b997e3828ae382b5e382a4e382bae381aee5b08fe38195e381842e8b6b3e6ada9e8a18ce383ade3839ce38383e38388e38292e887aae4bd9ce38197-5%2F)
TinyPico – i2c – PCA9685 – サーボモータ のような感じで配線を施していきます。 ソケットを抜いたので、半田で直付けになるのが大変でした。せめて温度調整できる半田こてがあればまだ楽だったのですが、いかんせんコーナンで買ったどでかい一本ものの温度調整もなにもないただの半田こてしかなかったもので(-_-。。こても買いたいんだけど、高いんだよね。。 ってことで配線終了!続いてプログラムを書き込みます。 ## プログラム ### Tiny Pico側(micropython) ``` from socket import socket, AF_INET, SOCK_DGRAM import time import network from machine import Pin, I2C import pca9685 import servo import _thread p = 90 i = 95 n = 93 t = 80 a = 105 b = 85 x = 90 z = 95 i2c = I2C(0, scl=Pin(22), sda=Pin(21)) sev = servo.Servos(i2c) p0 = Pin(19, Pin.OUT) p1 = Pin(23, Pin.OUT) HOST = "TinyPicoのIP" PORT = ポート番号 wlan = network.WLAN(network.STA_IF) wlan.active(True) if not wlan.isconnected(): print('connecting to network...') wlan.connect('SSID', 'PASS') while not wlan.isconnected(): pass print('network config:', wlan.ifconfig()) s = socket(AF_INET, SOCK_DGRAM) s.bind((HOST, PORT)) print("bind") msg = "nane" def recieve(): while(True): global msg msg = s.recv(64) msg = msg.decode() print(msg) time.sleep(0.01) _thread.start_new_thread(recieve, ()) while(True): if msg =="F": while(n <= 133): sev.position(5, t) sev.position(4, n) sev.position(0, a) sev.position(2, b) time.sleep(0.005) n = n + 1 a = a + 1 b = b + 1 if t <= 95: t = t + 1 while(i >= 55): sev.position(3, i) time.sleep(0.005) i = i - 1 while(n >= 93): sev.position(5, t) sev.position(4, n) sev.position(0, a) sev.position(2, b) time.sleep(0.005) n = n - 1 a = a - 1 b = b - 1 if t >= 80: t = t - 1 while(i <= 95): sev.position(3, i) time.sleep(0.005) i = i + 1 while(t >= 40): sev.position(5, t) sev.position(4, n) sev.position(0, a) sev.position(2, b) time.sleep(0.005) t = t - 1 a = a - 1 b = b - 1 if n >= 78: n = n - 1 while(p <= 130): sev.position(1, p) time.sleep(0.005) p = p + 1 while(t <= 80): sev.position(5, t) sev.position(4, n) sev.position(0, a) sev.position(2, b) time.sleep(0.005) t = t + 1 a = a + 1 b = b + 1 if n <= 93: n = n + 1 while(p >= 90): sev.position(1, p) time.sleep(0.005) p = p - 1 elif msg == "B": while(n <= 133): sev.position(5, t) sev.position(4, n) sev.position(0, a) sev.position(2, b) time.sleep(0.005) n = n + 1 a = a + 1 b = b + 1 if t <= 95: t = t + 1 while(i <= 135): sev.position(3, i) time.sleep(0.005) i = i + 1 while(n >= 93): sev.position(5, t) sev.position(4, n) sev.position(0, a) sev.position(2, b) time.sleep(0.005) n = n - 1 a = a - 1 b = b - 1 if t >= 80: t = t - 1 while(i >= 95): sev.position(3, i) time.sleep(0.005) i = i - 1 while(t >= 40): sev.position(5, t) sev.position(4, n) sev.position(0, a) sev.position(2, b) time.sleep(0.005) t = t - 1 a = a - 1 b = b - 1 if n >= 78: n = n - 1 while(p >= 50): sev.position(1, p) time.sleep(0.005) p = p - 1 while(t <= 80): sev.position(5, t) sev.position(4, n) sev.position(0, a) sev.position(2, b) time.sleep(0.005) t = t + 1 a = a + 1 b = b + 1 if n <= 93: n = n + 1 while(p <= 90): sev.position(1, p) time.sleep(0.005) p = p + 1 elif msg == "L": while(t >= 40): sev.position(5, t) sev.position(4, n) sev.position(0, a) sev.position(2, b) time.sleep(0.005) t = t - 1 a = a + 1 b = b + 1 if n >= 78: n = n - 1 while(p >= 50): sev.position(1, p) time.sleep(0.005) p = p - 1 while(t <= 80): sev.position(5, t) sev.position(4, n) sev.position(0, a) sev.position(2, b) time.sleep(0.005) t = t + 1 a = a - 1 b = b - 1 if n <= 93: n = n + 1 while(p <= 90): sev.position(1, p) time.sleep(0.005) p = p + 1 elif msg == "R": while(n <= 133): sev.position(5, t) sev.position(4, n) sev.position(0, a) sev.position(2, b) time.sleep(0.005) n = n + 1 a = a - 1 b = b - 1 if t <= 95: t = t + 1 while(i <= 135): sev.position(3, i) time.sleep(0.005) i = i + 1 while(n >= 93): sev.position(5, t) sev.position(4, n) sev.position(0, a) sev.position(2, b) time.sleep(0.005) n = n - 1 a = a + 1 b = b + 1 if t >= 80: t = t - 1 while(i >= 95): sev.position(3, i) time.sleep(0.005) i = i - 1 elif msg == "on": p0.on() p1.on() elif msg == "off": p0.off() p1.off() time.sleep(0.01) ``` PCA9685関連のライブラリは別途WEBからDLして、TinyPicoのフラッシュに書き込んでいます。 UDPでM5Stackと通信しています。 特筆する点は、「UDPのデータ受信」と「サーボ駆動」を並列で処理している所です。 ここを1つにまとめてしまうと、処理がおっつかなくなって意図する動作になりません。 ### M5Stack CORE2側(micropython) ``` from m5stack_ui import * from socket import socket, AF_INET, SOCK_DGRAM import time import network from m5stack import * #from m5stack import lcd from machine import Pin from uiflow import * screen = M5Screen() screen.clean_screen() screen.set_screen_bg_color(0xFFFFFF) dstip = "TinyPicoのIP" dstport = ポート番号 wlan = network.WLAN(network.STA_IF) wlan.active(True) if not wlan.isconnected(): print('connecting to network...') wlan.connect('SSID', 'PASS') while not wlan.isconnected(): pass print('network config:', wlan.ifconfig()) print('network config:', wlan.ifconfig()) s = socket(AF_INET, SOCK_DGRAM) #s.bind((dstip, dstport)) touch_button0 = M5Btn(text='Button', x=110, y=10, w=100, h=80, bg_c=0xFFFFFF, text_c=0x000000, font=FONT_MONT_14, parent=None) touch_button1 = M5Btn(text='Button', x=10, y=80, w=100, h=80, bg_c=0xFFFFFF, text_c=0x000000, font=FONT_MONT_14, parent=None) touch_button2 = M5Btn(text='Button', x=210, y=80, w=100, h=80, bg_c=0xFFFFFF, text_c=0x000000, font=FONT_MONT_14, parent=None) touch_button3 = M5Btn(text='Button', x=110, y=150, w=100, h=80, bg_c=0xFFFFFF, text_c=0x000000, font=FONT_MONT_14, parent=None) touch_button4 = M5Btn(text='Button', x=116, y=100, w=40, h=40, bg_c=0xFFFFFF, text_c=0x000000, font=FONT_MONT_14, parent=None) touch_button5 = M5Btn(text='Button', x=165, y=100, w=40, h=40, bg_c=0xFFFFFF, text_c=0x000000, font=FONT_MONT_14, parent=None) def touch_button0_pressed(): global data data = "F" def touch_button3_pressed(): global data data = "B" def touch_button1_pressed(): global data data = "L" def touch_button2_pressed(): global data data = "R" #touch_button0.pressed(touch_button0_pressed) # ボタン"A" が「離された」時の処理 def touch_button0_released(): global data data = "S" def touch_button4_pressed(): global data data = "on" def touch_button5_pressed(): global data data = "off" #data = touch_button0.released(touch_button0_released) data = "nane" stamp = 0 while(True): #global data touch_button0.pressed(touch_button0_pressed) touch_button1.pressed(touch_button1_pressed) touch_button2.pressed(touch_button2_pressed) touch_button3.pressed(touch_button3_pressed) touch_button4.pressed(touch_button4_pressed) touch_button5.pressed(touch_button5_pressed) #data = "A" touch_button0.released(touch_button0_released) touch_button1.released(touch_button0_released) touch_button2.released(touch_button0_released) touch_button3.released(touch_button0_released) s.sendto(data, (dstip, dstport)) print(data) #print(Slider2.get_value()) time.sleep(0.1) ``` ボタン操作のプログラムはUIFlowを使いました。 設置したボタン毎に値を振り分け、TinyPico側で値に応じた動作をするようにしています。 また、ボタンを押し続けている間はその動作をし続けるようにしています。(あ、これはTinyPico側か。) ## 動作確認 @[twitter](https://twitter.com/ketunorobio/status/1535007895955324928) ほぼ完成でございますが、目を光らせたいです。 ## 頭部にLED収納 @[twitter](https://twitter.com/ketunorobio/status/1535386792685228032?ref_src=twsrc%5Etfw%7Ctwcamp%5Etweetembed%7Ctwterm%5E1535386792685228032%7Ctwgr%5E4e8511fe6d7668fc78f81f3b1d6aa9c500c03035%7Ctwcon%5Es1_&ref_url=https%3A%2F%2Fdenkenmusic.com%2Fe6898be4b997e3828ae382b5e382a4e382bae381aee5b08fe38195e381842e8b6b3e6ada9e8a18ce383ade3839ce38383e38388e38292e887aae4bd9ce38197-6%2F) ##完成 @[twitter](https://twitter.com/ketunorobio/status/1539220917389168640)