


M5Atom と温度センサーで自動でサーキュレーターを回してみた
1. 目的
冬暖房をつけたあと立ち上がると
顔は温かいのに足は寒いことがよくあります。
改善するには床にあるサーキュレーターを天井に向けて動かして
空気を循環させるしかないんだけど
電源を入れるのは面倒だしよく忘れる。
なので天井で温度を測り床の温度計に送信
床は床で温度を測り温度差が3℃以上あったらリレーでAC電源を制御してサーキュレーターを自動で動かしてみたいと思う。
2. ハードウェア
温度計が簡単に使えて通信機能を持ち合わせているということで
- 通信&リレー制御にM5Atom 天井用と床用 計2個
https://www.switch-science.com/catalog/6262/ - 温度計としてENV II 天井用と床用 計2個
https://www.switch-science.com/catalog/6344/ - ・リレーはM5Stack用ミニリレーユニット
https://www.switch-science.com/catalog/4054/ - その他
100Vのコンセントとプラグ&ケーブル
ATOM電源供給用の5VのACアダプタ
それらを収納するためのTAKACHIのケース - 家にあったサーキュレーター
リレーで制御できるようにハードスイッチで電源ON/OFFできるもの
かつ、電源は常にONにしておく
3. 接続
天井のATOMはGROVEでENV IIを接続して適当な電源から USB Type-Cで供給して終わり
床のATOMはGROVEでミニリレーユニットを接続
別途21ピン、25ピンをI2CにしてENV IIを接続
100Vのプラグから伸びたケーブルはそのままACアダプタへ接続しつつ
1本はそのまま箱の外へ、もう一本はミニリレーユニットを経由して同じく箱の外へ
天井と床のM5Atomの通信はESP NOWを使ってみたがEPS NOWとネットに接続が同時にできなかった為、
そこは起動時に選択するようにした。
起動時にボタンが押された状態だった場合は
計測データをambientへ送信するネットワークモード
押されなかった場合は温度差でリレーを操作するローカルモードとした
4.実際のソース
天井のM5ATOM用
#include "M5Atom.h"
#include <esp_now.h>
#include <WiFi.h>
#include <Adafruit_BMP280.h>
#include <Adafruit_SHT31.h>
#include "Ambient.h"
Adafruit_SHT31 sht3x;
Adafruit_BMP280 bme;
#include "Ambient.h"
float tmp = 0.0;
float hum = 0.0;
float pressure = 0.0;
#define ssid "*******"
#define password "********"
unsigned int channelId = *****; // AmbientのチャネルID
const char* writeKey = "*********"; // ライトキー
WiFiClient client;
Ambient ambient;
int surveyMode = 0; // 0:Local 1:Network
// ESP Now 送信先のMACアドレス
uint8_t slaveMAC[] = {0xFF, 0xFF, 0xFF, 0xFF, 0xFF, 0xFF};//STA Mode MAC Addr
void OnDataSent(const uint8_t *mac_addr, esp_now_send_status_t status) {
Serial.println(status == ESP_NOW_SEND_SUCCESS ? "Success" : "Fail");
}
void setup() {
M5.begin(true, false, true);
delay(1000);
M5.dis.drawpix(0, 0xFFFFFF); // White
delay(3000);
Wire.begin(26, 32);
// ENV2センサーの初期化
while (!bme.begin(0x76)) {
Serial.println("BMP280 init fail");
M5.dis.drawpix(0, 0x00FF00); // RED
}
while (!sht3x.begin(0x44)) {
Serial.println("SHT3x init fail");
M5.dis.drawpix(0, 0x00FF00); // RED
}
Serial.println(F("ENV Unit(SHT30 and BMP280) test..."));
// ボタンを押された状態で起動した場合はネットにつなぎ
// 計測データを上げる
M5.update();
if (M5.Btn.isPressed())
{
// モード設定:ネットワーク
surveyMode = 1;
M5.dis.drawpix(0, 0x0000FF); // Blue
Serial.println("Network Mode");
WiFi.mode(WIFI_STA);
WiFi.begin(ssid, password);
for (int i = 0; WiFi.status() != WL_CONNECTED; i++) { // 接続できるまで
if (i >= 60) esp_restart(); // 60秒つながらない場合はリブート
delay(1000);
Serial.print(".");
}
// 自分のIPアドレスを表示
Serial.println("");
Serial.println("WiFi connected");
Serial.println("IP address: ");
Serial.println(WiFi.localIP());
// チャネルIDとライトキーを指定してAmbientの初期化
ambient.begin(channelId, writeKey, &client);
}
else
{
// モード設定:ローカル
surveyMode = 0;
M5.dis.drawpix(0, 0xFF0000); // Green
Serial.println("Local Mode");
// Wifi設定をStationモードに設定
WiFi.mode(WIFI_STA);
// ESP Now の初期化
if (esp_now_init() != ESP_OK) {
Serial.println("Error initializing ESP-NOW");
return;
}
// データ送信設定
esp_now_register_send_cb(OnDataSent);
esp_now_peer_info_t peerInfo;
memcpy(peerInfo.peer_addr, slaveMAC, 6);
peerInfo.channel = 0;
peerInfo.encrypt = false;
if (esp_now_add_peer(&peerInfo) != ESP_OK) {
Serial.println("Failed to add peer");
return;
}
}
}
// 0,1:気圧x10
// 2:気温
// 3:湿度
uint8_t evn_data[5];
uint8_t state = 0;
void loop() {
// 気圧、気温、湿度の計測
pressure = bme.readPressure() / 100;
tmp = sht3x.readTemperature();
hum = sht3x.readHumidity();
if (surveyMode == 0)
{
// 送信用にデータを変換
evn_data[0] = (uint8_t)((int(pressure * 10) & 0xFF00) >> 8);
evn_data[1] = (uint8_t)((int(pressure * 10) & 0x00FF));
evn_data[2] = (uint8_t)tmp;
evn_data[3] = (uint8_t)hum;
Serial.printf("Temperatura: %2.2f*C Humedad: %0.2f%% Pressure: %0.2fPa\r\n", tmp, hum, pressure);
// ボタン状態読込
M5.update();
// データ送信
esp_now_send(slaveMAC, evn_data, 5);
// Bufferを初期化
for (int i = 0; i < 4; i++)
evn_data[i] = 0xFF;
delay(1000 * 60 * 5); // 5分おきに計測&データ送信
}
else
{
ambient.set(1, String(tmp).c_str());
ambient.set(3, String(hum).c_str());
ambient.send();
Serial.println("Ambient Send");
delay(1000 * 60 * 5); // 5分おきに計測&データ送信
}
}床のM5ATOM用(リレー制御)
#include "M5Atom.h"
#include <esp_now.h>
#include <WiFi.h>
#include <Adafruit_BMP280.h>
#include <Adafruit_SHT31.h>
#include "Ambient.h"
Adafruit_SHT31 sht3x;
Adafruit_BMP280 bme;
#include "Ambient.h"
uint8_t buf[5] = {0xFF, 0xFF, 0xFF, 0xFF, 0x00};
float highTmp = 0.0; // 天井の気温
float highHum = 0.0; // 天井の湿度
float highPressure = 0.0; // 天井の気圧
float lowTmp = 0.0; // 下の気温
float lowHum = 0.0; // 下の湿度
float lowPressure = 0.0; // 下の気圧
// RELAYをGLOBE
#define RELAY_PIN 26
#define DUMMY_PIN 32
#define ssid "*******"
#define password "********"
unsigned int channelId = *****; // AmbientのチャネルID
const char* writeKey = "*********"; // ライトキー
WiFiClient client;
Ambient ambient;
int surveyMode = 0; // 0:Local 1:Network
void OnDataRecv(const uint8_t * mac, const uint8_t *recvData, int len) {
memcpy(&buf[0], recvData, len);
}
void setup() {
M5.begin(true, false, true);
delay(1000);
M5.dis.drawpix(0, 0xFFFFFF); // White
delay(3000);
Wire.begin(25, 21);
// ENV2センサーの初期化
while (!bme.begin(0x76)) {
Serial.println("BMP280 init fail");
M5.dis.drawpix(0, 0x00FF00); // RED
}
while (!sht3x.begin(0x44)) {
Serial.println("SHT3x init fail");
M5.dis.drawpix(0, 0x00FF00); // RED
}
Serial.println(F("ENV Unit(SHT30 and BMP280) test..."));
// ボタンを押された状態で起動した場合はネットにつなぎ
// 計測データを上げる
M5.update();
if (M5.Btn.isPressed())
{
// モード設定:ネットワーク
surveyMode = 1;
M5.dis.drawpix(0, 0x0000FF); // Blue
Serial.println("Network Mode");
WiFi.mode(WIFI_STA);
WiFi.begin(ssid, password);
for (int i = 0; WiFi.status() != WL_CONNECTED; i++) { // 接続できるまで
if (i >= 60) esp_restart(); // 60秒つながらない場合はリブート
delay(1000);
Serial.print(".");
}
// 自分のIPアドレスを表示
Serial.println("");
Serial.println("WiFi connected");
Serial.println("IP address: ");
Serial.println(WiFi.localIP());
// チャネルIDとライトキーを指定してAmbientの初期化
ambient.begin(channelId, writeKey, &client);
}
else
{
// モード設定:ローカル
surveyMode = 0;
M5.dis.drawpix(0, 0xFF0000); // Green
Serial.println("Local Mode");
// WiFi設定をStationモードに設定
WiFi.mode(WIFI_STA);
// ESP Now の初期化
if (esp_now_init() != ESP_OK) {
Serial.println("Error initializing ESP-NOW");
return;
}
// 自身のMACアドレスを表示
Serial.print("softAP MAC Address:");
Serial.println(WiFi.softAPmacAddress());
uint8_t stationMac[6];
esp_read_mac(stationMac, ESP_MAC_WIFI_STA);
Serial.printf("Station Mac Address = {0x%02X, 0x%02X, 0x%02X, 0x%02X, 0x%02X, 0x%02X}\r\n", stationMac[0], stationMac[1], stationMac[2], stationMac[3], stationMac[4], stationMac[5]);
// データ受信時の関数登録
esp_now_register_recv_cb(OnDataRecv);
// RELAY用設定
dacWrite(DUMMY_PIN, 0); //disable the speak noise
pinMode(RELAY_PIN, OUTPUT);
}
}
void loop(void) {
// 気圧、気温、湿度の計測
lowPressure = bme.readPressure() / 100;
lowTmp = sht3x.readTemperature();
lowHum = sht3x.readHumidity();
if (buf[0] != 0xFF && buf[1] != 0xFF && buf[2] != 0xFF && buf[3] != 0xFF )
{
highPressure = (float)((buf[0] << 8 ) | buf[1]) / 10;
highTmp = (float)buf[2];
highHum = (float)buf[3];
Serial.printf("Hight Temperatura: %2.2f*C Humedad: %0.2f%% Pressure: %0.2fPa\r\n", highTmp, highHum, highPressure);
}
Serial.printf("Low Temperatura: %2.2f*C Humedad: %0.2f%% Pressure: %0.2fPa\r\n", lowTmp, lowHum, lowPressure);
Serial.println("");
if (surveyMode == 0)
{
// 天井の気温を取得していて
// 床よりも天井が3℃以上高い場合はリレーをON
if (highTmp != 0xFF && highTmp > lowTmp + 3)
digitalWrite(RELAY_PIN, HIGH);
else
digitalWrite(RELAY_PIN, LOW);
// Bufferを初期化
for (int i = 0; i < 4; i++)
buf[i] = 0xFF;
lowPressure = 0xFF;
lowTmp = 0xFF;
lowHum = 0xFF;
delay(1000 * 60 * 5); // 5分おきに計測&データ送信
}
else
{
ambient.set(2, String(lowTmp).c_str());
ambient.set(4, String(lowHum).c_str());
ambient.send();
Serial.println("Ambient Send");
delay(1000 * 60 * 5); // 5分おきに計測&データ送信
}
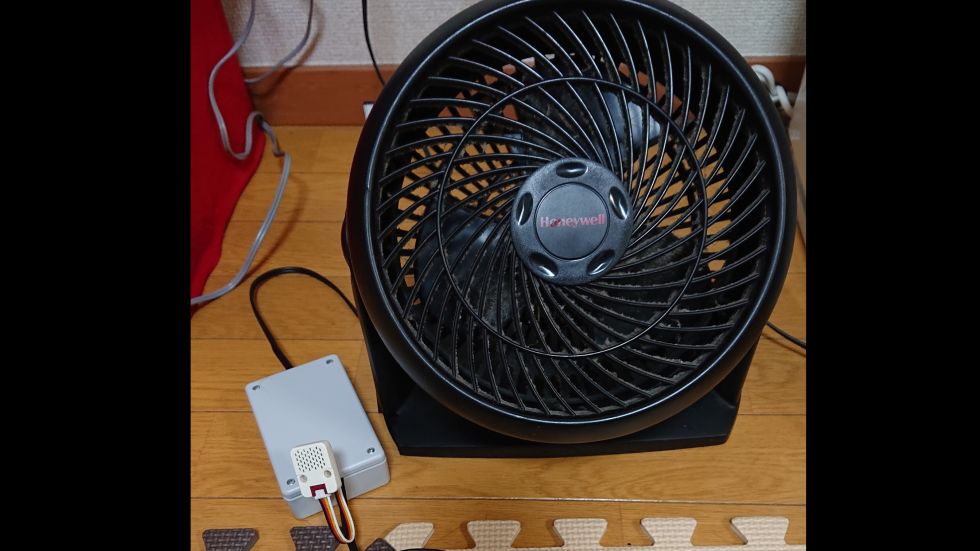
}5. 実際の写真
6. まとめ
ambientへの送信とサーキュレーターの制御を同時にできなかったのが
ちょっともやっとしますがひとまずやりたいことはできたので良かった。
ちなみにambientではこんな感じに見えています。
思ってた以上に温度差が大きいことがわかったのでこれからも環境改善を進めていきたい。。。


-
fenri
さんが
2021/02/28
に
編集
をしました。
(メッセージ: 初版)
-
fenri
さんが
2021/02/28
に
編集
をしました。
-
fenri
さんが
2021/02/28
に
編集
をしました。
-
fenri
さんが
2021/02/28
に
編集
をしました。
-
fenri
さんが
2021/02/28
に
編集
をしました。
-
fenri
さんが
2021/02/28
に
編集
をしました。
-
fenri
さんが
2021/02/28
に
編集
をしました。
-
fenri
さんが
2021/02/28
に
編集
をしました。
-
fenri
さんが
2021/02/28
に
編集
をしました。
ログインしてコメントを投稿する