akitam が 2021年05月19日10時59分09秒 に編集
初版
タイトルの変更
今日の機嫌 ダイオウグソクムシ
タグの変更
GiantIsopod
obnizBoard1Y
RaspberryPiPICO
Neopixel
LEDオブジェ
メイン画像の変更
記事種類の変更
製作品
本文の変更
# ダイオウグソクムシを感情発光するオブジェにしてみました。 感情に応じて発光するオブジェです。 ## [動画] [ダイオウグソクムシオブジェ] @[youtube](https://www.youtube.com/watch?v=jy8xrDhX7nI) ## [感情と色] 感情と発光色の関係を定義し, web上のボタンより設定します。 (オブジェを居間に飾ってあれば, 怒って自分の部屋にいる時に居間にいる人に自分の気持ちを伝えます。) **感情と発光色** |感情番号|感情|発光色|意味| |:---:|:---:|:---:|:---| | 1 | Excited | orange | 興奮 | | 2 | Tender | purple |優しさ| | 3 | Scared | yellow | 恐怖 | | 4 | Angry | red | 怒り | | 5 | Sad | blue | 悲しみ | | 6 | Happy | green | 喜び | | 7 | off | (off)| (off) | 感情番号はWebボタン押下時に出力するobnizの出力ポート番号 (ポートの出力をRaspberryPi PICOに入力し発光制御をします。) ## [表現例] 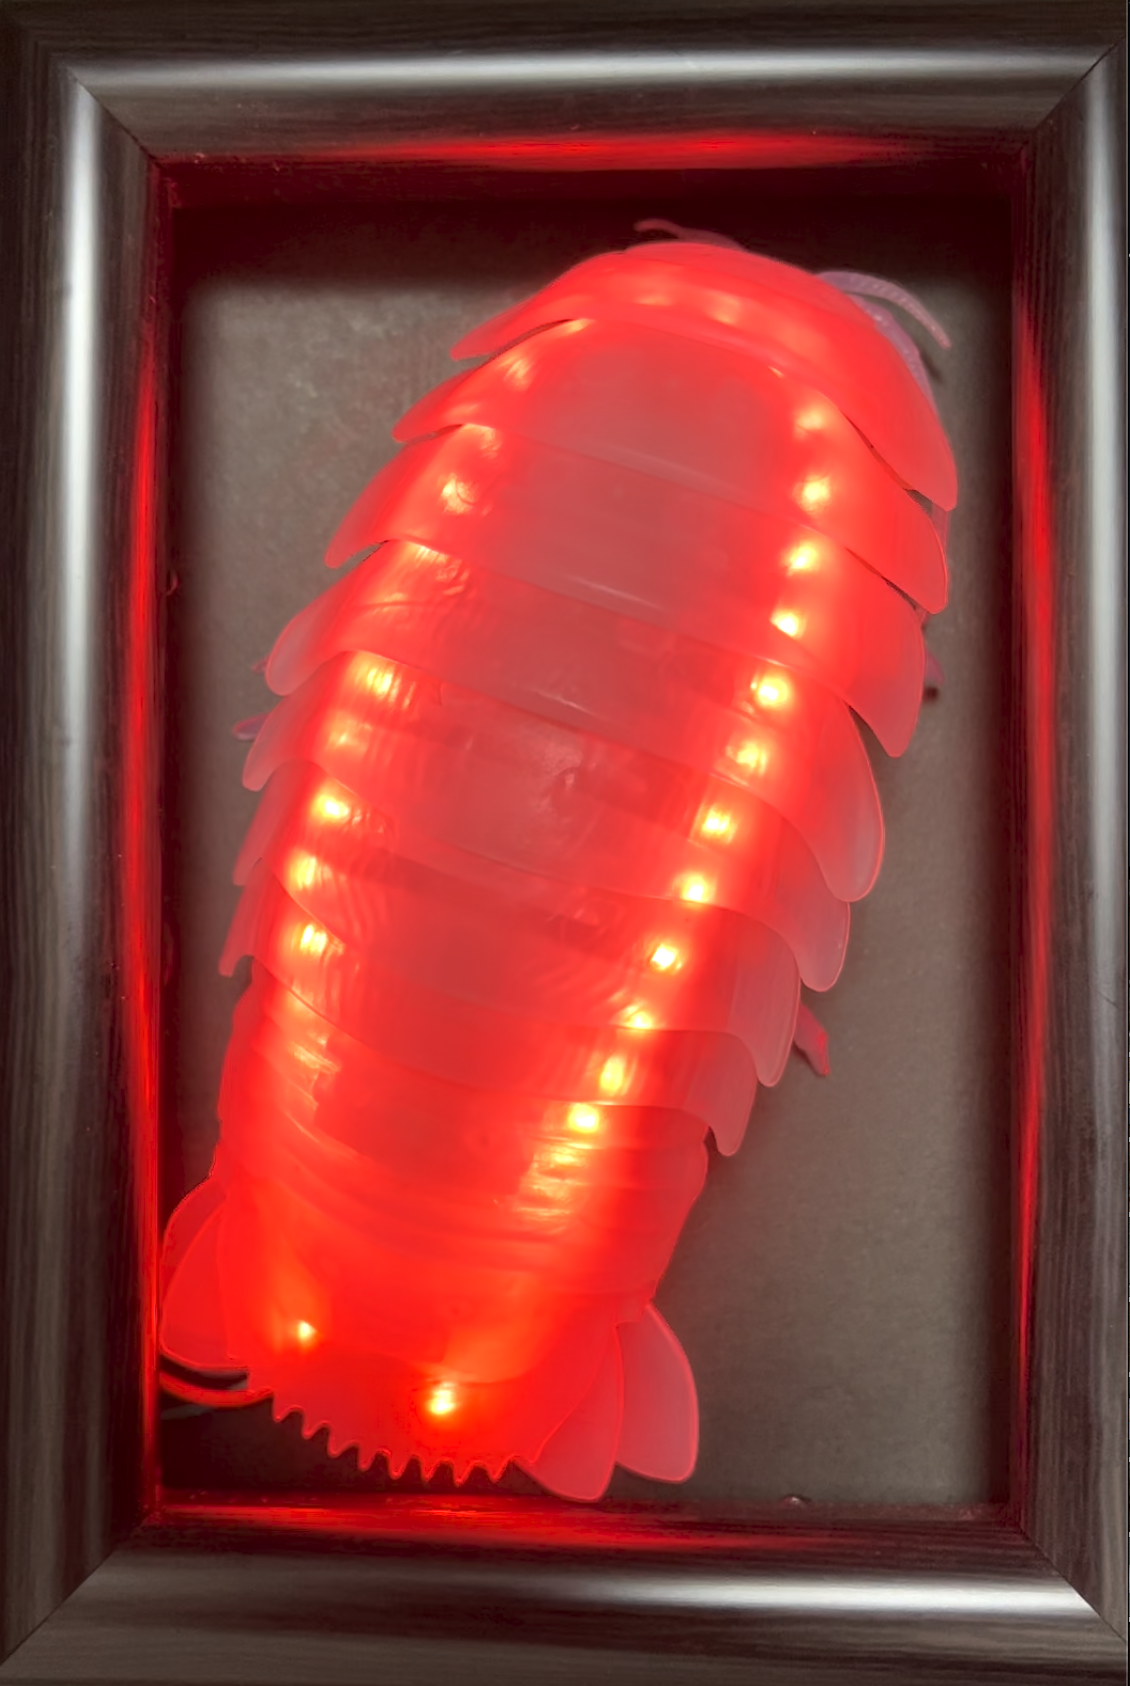 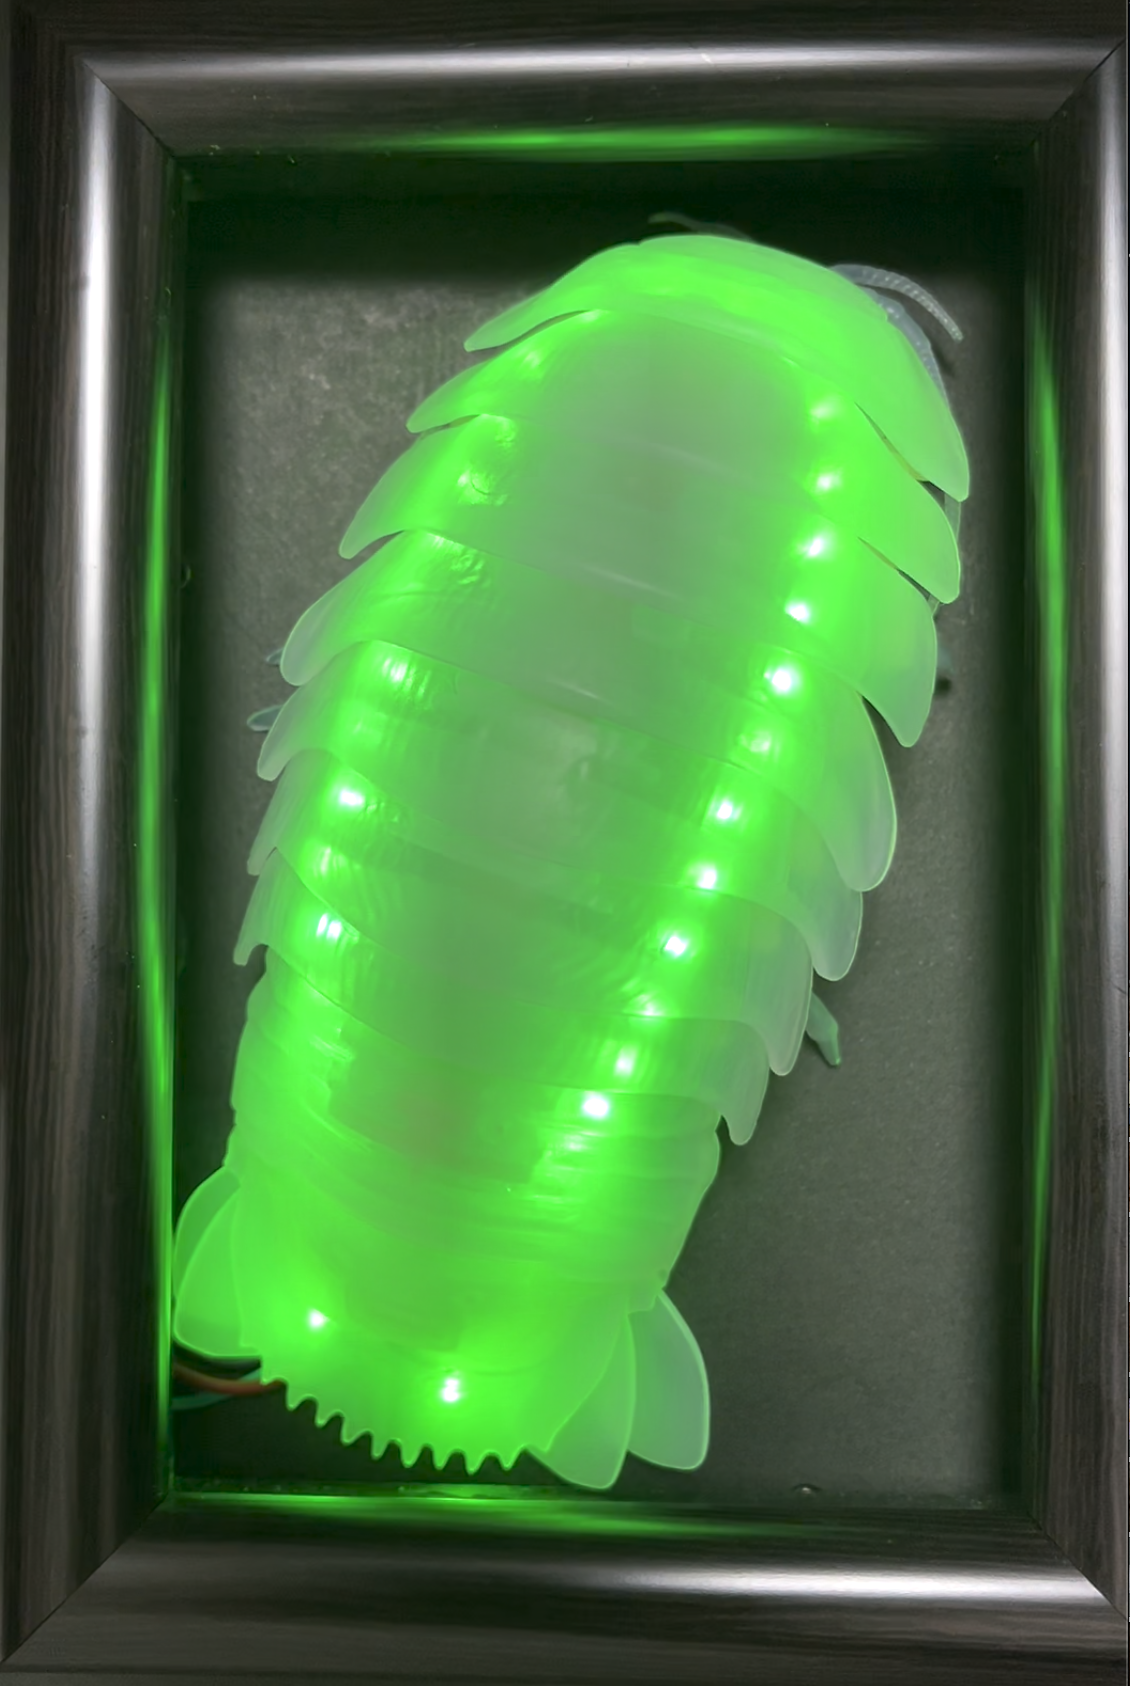 ## **[部品]** |番号|部品名|その他| |:---|:---:|:---| |1|obniz Board 1Y|| |2|RaspberryPi Pico|| |3|ダイオウグソクムシ乳白色|ガチャ:(出現率1/3.2?)| |4|RGB1515LEDStrip|41燈分を切って使う|| |5|写真用フレーム|サイズに注意| |6|紙類|| |7|配線材料|| ## **[部品画像(一部)]** 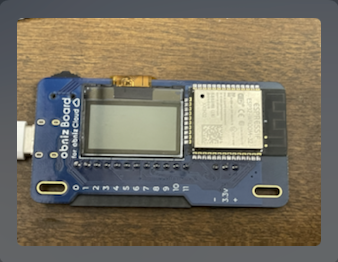 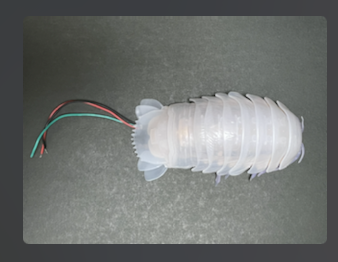 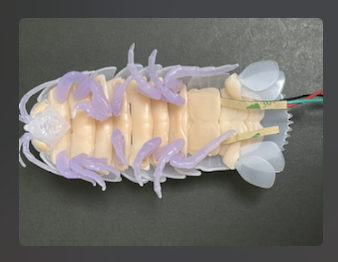  ## **[回路(構成)]** システム構成と簡易配線図 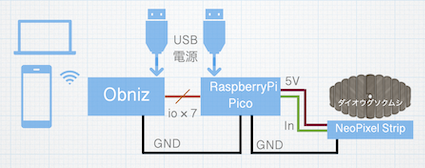 ## **[作り方]** (1) ダイオウグソクムシ(乳白色を手に入れる) (2) LEDStripを仕込む(頭と尻尾の部分が外れるので41燈分のStrip(はみ出た分は切り取る)を尻尾の一節前の隙間から差し込み, 頭部分で反対側に通す。頭部と尻尾をはめなおす) (3) obnizとRaspberryPi Picoを繋ぐ obniz io0 を RaspberryPi PICOのGNDに obniz io1-io7をRaspberryPi PICOのGP11-GP17に接続する (4) RaspberryPi PICOにLEDStripを接続する。 LEDStripの黒をPICOのGND(38番pin)に LEDStripの赤をPICOのVSUB(40番pin)に LEDStripの緑をPICOのGP0(1番pin)に 接続する。 ## **[ソースコード]** 注意点: 電源電圧を間違えると壊れる可能性があります。 特にNeoPixelの接続を間違えないように(壊れます>>壊しました😭) ``` <html> <head> <meta charset="utf-8" /> <meta name="viewport" content="width=device-width, initial-scale=1" /> <link rel="stylesheet" href="https://stackpath.bootstrapcdn.com/bootstrap/4.3.1/css/bootstrap.min.css" /> <script src="https://code.jquery.com/jquery-3.2.1.min.js"></script> <script src="https://unpkg.com/obniz@3.x/obniz.js" crossorigin="anonymous" ></script> </head> <body> <div id="obniz-debug"></div> <div class="container"> <div class="text-center"> <h3>Control LED from Browser</h3> <button class="btn btn-primary" id="on1">Excited</button> <button class="btn btn-primary" id="on2">Tender</button> <button class="btn btn-primary" id="on3">Scared</button> <button class="btn btn-primary" id="on4">Angry</button> <button class="btn btn-primary" id="on5">Sad</button> <button class="btn btn-primary" id="on6">Happy</button> <button class="btn btn-primary" id="on7">OFF</button> </div> </div> <script> //type in your obniz ID var obniz = new Obniz("OBNIZ_ID_HERE"); //during obniz connection obniz.onconnect = async function() { //wire LED to obniz //io0: anode //io1: cathode obniz.io0.pull("3v"); obniz.io0.output(false); obniz.io1.pull("3v"); obniz.io2.pull("3v"); obniz.io3.pull("3v"); obniz.io4.pull("3v"); obniz.io5.pull("3v"); obniz.io6.pull("3v"); obniz.io7.pull("3v"); //if the "Excited" button is clicked $("#on1").click(function(); obniz.display.clear(); obniz.display.print("Excited"); obniz.io1.output(true); obniz.wait(500); // led ON for 0.5sec. obniz.io1.output(false); }); //if the "Tender" button is clicked $("#on2").click(function() { obniz.display.clear(); obniz.display.print("Tender"); obniz.io2.output(true); obniz.wait(500); // led ON for 0.5sec. obniz.io2.output(false); }); //if the "Scared" button is clicked $("#on3").click(function() { obniz.display.clear(); obniz.display.print("Scared"); obniz.io3.output(true); obniz.wait(500); // led ON for 0.5sec. obniz.io3.output(false); }); //if the "Angry" button is clicked $("#on4").click(function() { obniz.display.clear(); obniz.display.print("Angry"); obniz.io4.output(true); obniz.wait(500); // led ON for 0.5sec. obniz.io4.output(false); }); //if the "Sad" button is clicked $("#on5").click(function() { obniz.display.clear(); obniz.display.print("Sad"); obniz.io5.output(true); obniz.wait(500); // led ON for 0.5sec. obniz.io5.output(false); led5.off(); }); //if the "Happy" button is clicked $("#on6").click(function() { obniz.display.clear(); obniz.display.print("Happy"); obniz.io6.output(true); obniz.wait(500); // led ON for 0.5sec. obniz.io6.output(false); }); //if the "OFF" button is clicked $("#on7").click(function() { obniz.display.clear(); obniz.display.print("Excited"); obniz.io7.output(true); obniz.wait(500); // led ON for 0.5sec. obniz.io7.output(false); }); }; </script> </body> </html> ``` (RaspberryPi PICO) ``` import array, utime from machine import Pin import rp2 from rp2 import PIO, StateMachine, asm_pio # Configure the number of WS2812 LEDs. NUM_LEDS = 7 @asm_pio(sideset_init=PIO.OUT_LOW, out_shiftdir=PIO.SHIFT_LEFT, autopull=True, pull_thresh=24) def ws2812(): T1 = 2 T2 = 5 T3 = 3 label("bitloop") out(x, 1) .side(0) [T3 - 1] jmp(not_x, "do_zero") .side(1) [T1 - 1] jmp("bitloop") .side(1) [T2 - 1] label("do_zero") nop() .side(0) [T2 - 1] # Create the StateMachine with the ws2812 program, outputting on Pin(0). sm = StateMachine(0, ws2812, freq=8000000, sideset_base=Pin(0)) # Start the StateMachine, it will wait for data on its FIFO. sm.active(1) button = machine.Pin(11, machine.Pin.IN, machine.Pin.PULL_DOWN) button = machine.Pin(12, machine.Pin.IN, machine.Pin.PULL_DOWN) button = machine.Pin(13, machine.Pin.IN, machine.Pin.PULL_DOWN) button = machine.Pin(14, machine.Pin.IN, machine.Pin.PULL_DOWN) button = machine.Pin(15, machine.Pin.IN, machine.Pin.PULL_DOWN) button = machine.Pin(16, machine.Pin.IN, machine.Pin.PULL_DOWN) button = machine.Pin(17, machine.Pin.IN, machine.Pin.PULL_DOWN) # Display a pattern on the LEDs via an array of LED RGB values. ar = array.array("I", [0 for _ in range(NUM_LEDS)]) while True: if button.value() == 1: print("Excited") for j in range(0, 150): for i in range(NUM_LEDS): ar[i] = (j<<16) + ((j/2)<<8) sm.put(ar,8) utime.sleep_ms(10) for j in range(0, 150): for i in range(NUM_LEDS): ar[i] = ((149-j)<<16) + ((149-j)/2<<8) sm.put(ar,8) utime.sleep_ms(15) if button.value() == 2: print("Tender") for j in range(0, 150): for i in range(NUM_LEDS): ar[i] = (j<<8) + j sm.put(ar,8) utime.sleep_ms(10) for j in range(0, 150): for i in range(NUM_LEDS): ar[i] = ((149-j)<<8) + (149-j) sm.put(ar,8) utime.sleep_ms(15) if button.value() == 3: print("Scared") for j in range(0, 150): for i in range(NUM_LEDS): ar[i] = (j<<16) + (j<<8) sm.put(ar,8) utime.sleep_ms(10) for j in range(0, 150): for i in range(NUM_LEDS): ar[i] = ((149-j)<<16) + ((149-j)<<8) sm.put(ar,8) utime.sleep_ms(15) if button.value() == 4: print("Angry") for j in range(0, 150): for i in range(NUM_LEDS): ar[i] = j<<8 sm.put(ar,8) utime.sleep_ms(10) for j in range(0, 150): for i in range(NUM_LEDS): ar[i] = (149-j)<<8 sm.put(ar,8) utime.sleep_ms(5) if button.value() == 5: print("Sad") for j in range(0, 150): for i in range(NUM_LEDS): ar[i] = j sm.put(ar,8) utime.sleep_ms(10) for j in range(0, 150): for i in range(NUM_LEDS): ar[i] = 149-j sm.put(ar,8) utime.sleep_ms(5) if button.value() == 6: print("Happy") for j in range(0, 150): for i in range(NUM_LEDS): ar[i] = j<<16 sm.put(ar,8) utime.sleep_ms(5) for j in range(0, 150): for i in range(NUM_LEDS): ar[i] = (149 - j)<<16 sm.put(ar,8) utime.sleep_ms(10) if button.value() == 7: print("white") for j in range(0, 150): for i in range(NUM_LEDS): ar[i] = (j<<16) + (j<<8) + j sm.put(ar,8) utime.sleep_ms(10) for j in range(0, 150): for i in range(NUM_LEDS): ar[i] = ((149-j)<<16) + ((149-j)<<8) + (149-j) sm.put(ar,8) utime.sleep_ms(15) ```