 製作品
製作品  1305
1305マクロパッド基板を作る/Arduinoシールド基板の設計
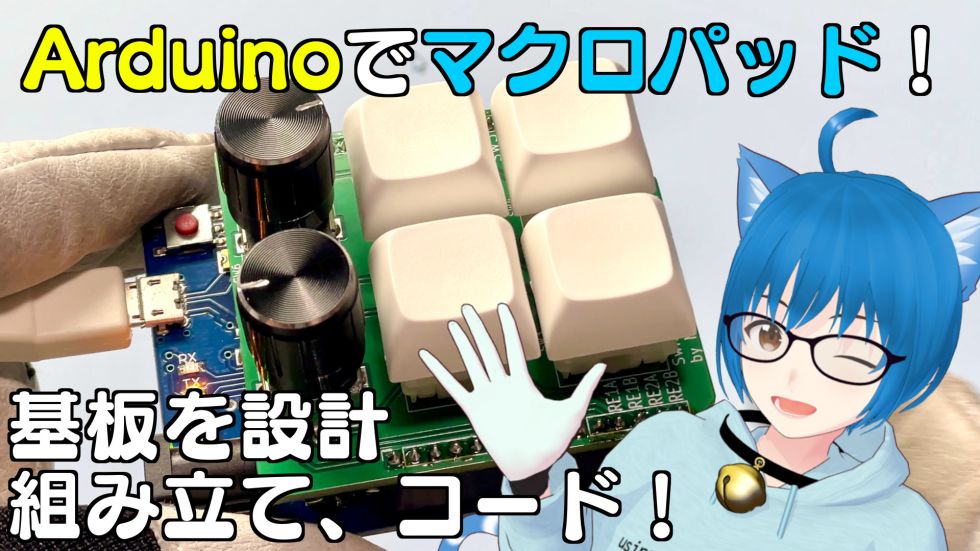
Arduino UNOサイズでマクロパッドが作りたくなったので、シールド基板を設計しました。Arduino LeonardoとSuzuduino UNO (自作のCH32Vボード) でコードを書きます。
自作キーボードの文脈でのマクロパッドだとArduino Pro Microを利用するケースが多いと思いますが、個人的に最近Arduino UNOのフォームファクターにはまっているので、あえてのUNOシールド基板での製作にトライです。
この記事は動画の補足記事です。三峰スズはものづくりや電子工作を楽しむVTuberとして活動しています。
ぜひ動画のほうも見てね!
コード全体はGitHubにも置いてあります。
https://github.com/verylowfreq/switchnobshield_samples
基板の設計
スイッチが4つ、ロータリーエンコーダーが2つ(押し込み操作あり)を接続するだけなので、回路としてはシンプルです。
ピン割り当ては本家Arduinoだけを考えるならば制約はないのですが、Suzuduino UNO / Suzuno32RVでの利用を想定して、複雑な事情を抱えるピンを避けた結果、このような割り当てになっています。
基板はArduino UNOシールドサイズです。さほど広い面積ではないので、スイッチやノブ同士の隙間があまり確保できませんでした。
スイッチはCherry MX互換、ロータリーエンコーダーはEC11互換です。よく使われるものですね。
この規模のはんだづけは気楽にできていいですね。まったりと無心にはんだづけしたいときにも好適かもしれません。はんだづけの様子はぜひ動画にて!
コード例
Arduino Leonardo (本家Arduino系)
Arduino UNOサイズのボードでUSB機能を持っているものは、Arduino LeonardoやArduino UNO R4があります。これらにはUSBキーボード・マウスとして振舞うための "Keyboard" / "Mouse" ライブラリがあるので、かんたんに実装できます。
ロータリーエンコーダーもライブラリがありますが割り込みを利用しないものを選定し、Suzuduino UNOでも利用できるようにしました。
// RotaryEncoder by Matthias Hertel
#include <RotaryEncoder.h>
#include <Keyboard.h>

constexpr int PIN_SWITCH[6] = { 4,5,6,7,10,11 };

RotaryEncoder encoder1(A2, A3, RotaryEncoder::LatchMode::FOUR3);
RotaryEncoder encoder2(A4, A5, RotaryEncoder::LatchMode::FOUR3);

void setup() {
  for (int i = 0; i < 6; i++) {
    pinMode(PIN_SWITCH[i], INPUT_PULLUP);
  }

  Keyboard.begin();
}

void loop() {
  encoder1.tick();
  encoder2.tick();

  int dir1 = (int)encoder1.getDirection();
  if (dir1 > 0) {
    Keyboard.press('l');
    Keyboard.release('l');
  } else if (dir1 < 0) {
    Keyboard.press('r');
    Keyboard.release('r');
  }
  int dir2 = (int)encoder2.getDirection();
  if (dir2 > 0) {
    Keyboard.press('L');
    Keyboard.release('L');
  } else if (dir2 < 0) {
    Keyboard.press('R');
    Keyboard.release('R');
  }

  if (digitalRead(PIN_SWITCH[0]) == LOW) {
    Keyboard.press('1');
  } else {
    Keyboard.release('1');
  }
  if (digitalRead(PIN_SWITCH[1]) == LOW) {
    Keyboard.press('2');
  } else {
    Keyboard.release('2');
  }
  if (digitalRead(PIN_SWITCH[2]) == LOW) {
    Keyboard.press('3');
  } else {
    Keyboard.release('3');
  }
  if (digitalRead(PIN_SWITCH[3]) == LOW) {
    Keyboard.press('4');
  } else {
    Keyboard.release('4');
  }
  if (digitalRead(PIN_SWITCH[4]) == LOW) {
    Keyboard.press('5');
  } else {
    Keyboard.release('5');
  }
  if (digitalRead(PIN_SWITCH[5]) == LOW) {
    Keyboard.press('6');
  } else {
    Keyboard.release('6');
  }
}
Suzuduino UNO / Suzuno32RV (WCH CH32V CH32V203)
CH32VにはArduino環境で利用できるUSB機能のライブラリがまだありません。そのため、WCH提供のサンプルコードをもとに改変していきます。
このコードでは送信するHIDレポートを直接書き換えることで、入力を設定しています。
コード全体はGitHubで公開しています
constexpr int PIN_LED_BUILTIN = PA5;
constexpr int PIN_BTN_0 = PA15;
constexpr int PIN_BTN_1 = PB3;
constexpr int PIN_BTN_2 = PB4;
constexpr int PIN_BTN_3 = PB5;
constexpr int PIN_BTN_4 = PA4;
constexpr int PIN_BTN_5 = PA7;
constexpr int PIN_RE1A = PA2;
constexpr int PIN_RE1B = PA3;
constexpr int PIN_RE2A = PB0;
constexpr int PIN_RE2B= PB1;

// RotaryEncoder by Matthias Hertel
#include <RotaryEncoder.h>

#include "src/USB-Driver/inc/usb_lib.h"
#include "src/CONFIG/usb_desc.h"
#include "src/CONFIG/usb_pwr.h"
#include "src/CONFIG/usb_prop.h"
#include "src/CONFIG/hw_config.h"

// WORKAROUND: These function declaration exists in hw_config.h but no effect.
extern "C" {
    void Set_USBConfig(void);
    void USB_Interrupts_Config(void);
    uint8_t USBD_ENDPx_DataUp( uint8_t endp, uint8_t *pbuf, uint16_t len );
    void MCU_Sleep_Wakeup_Operate(void);
}

RotaryEncoder re1(PIN_RE1A, PIN_RE1B, RotaryEncoder::LatchMode::FOUR3);
RotaryEncoder re2(PIN_RE2A, PIN_RE2B, RotaryEncoder::LatchMode::FOUR3);


void setup() {
    Serial.begin(115200);
    Serial.println("Initializing...");
    Serial.println("USB-HID composite, Keyboard and Consumer control");
    Serial.printf("SystemCoreClock=%d\n", SystemCoreClock);

    Set_USBConfig();
    USB_Init();
    USB_Interrupts_Config();

    Serial.println("Ready.");
}

void led_blink(unsigned int interval_ms) {
    static unsigned long timer = 0;
    static bool led_on = false;

    if (timer == 0) {
        pinMode(PIN_LED_BUILTIN, OUTPUT);
    }

    if (millis() - timer > interval_ms) {
        timer = millis();

        digitalWrite(PIN_LED_BUILTIN, led_on ? LOW : HIGH);
        led_on = !led_on;
    }
}


// Keyboard's LED state (updated on USB callbacks)
volatile uint8_t KB_LED_Cur_Status;

uint8_t usbd_kbd_report[8];
uint8_t USBD_KBD_REPORT_BYTES = sizeof(usbd_kbd_report) / sizeof(usbd_kbd_report[0]);

void usbd_kbd_update(void) {
    static unsigned long timer = 0;

    if (timer == 0) {
        pinMode(PIN_BTN_0, INPUT_PULLUP);
        pinMode(PIN_BTN_1, INPUT_PULLUP);
        pinMode(PIN_BTN_2, INPUT_PULLUP);
        pinMode(PIN_BTN_3, INPUT_PULLUP);
    }

    if (millis() - timer >= 10) {
        timer = millis();

        bool btn_w = digitalRead(PIN_BTN_0) == LOW;
        bool btn_a = digitalRead(PIN_BTN_1) == LOW;
        bool btn_s = digitalRead(PIN_BTN_2) == LOW;
        bool btn_d = digitalRead(PIN_BTN_3) == LOW;

        if (btn_w) {
            usbd_kbd_report[3] = 0x1a;
        }
        if (btn_a) {
            usbd_kbd_report[4] = 0x04;
        }
        if (btn_s) {
            usbd_kbd_report[5] = 0x16;
        }
        if (btn_d) {
            usbd_kbd_report[6] = 0x07;
        }

        bool success = USBD_ENDPx_DataUp(1, usbd_kbd_report, USBD_KBD_REPORT_BYTES);
        if (success) {
          memset(usbd_kbd_report, 0x00, USBD_KBD_REPORT_BYTES);
        }
    }
}

/// HID Report for Mouse
/// Layout:
///   - Buttons: bitfield [ 0,0,0,0,0, Button3, Button2, Button1 ]
///   - Cursor X: signed 1 byte integer
///   - Cursor Y: signed 1 byte integer
///   - Wheel vertical: signed 1 byte integer
///   - Wheel horizontal: signed 1 byte integer
uint8_t usbd_mouse_report[5];
uint8_t USBD_MOUSE_REPORT_BYTES = sizeof(usbd_mouse_report) / sizeof(usbd_mouse_report[0]);

void usbd_mouse_update(void) {
    static unsigned long timer = 0;
    static long prevPosition = 0;

    if (timer == 0) {
        memset(usbd_mouse_report, 0x00, USBD_MOUSE_REPORT_BYTES);
    }

    unsigned long current_time = millis();
    if (timer - current_time >= 10) {
        timer = current_time;

        bool btn_left = re1.getPosition() - prevPosition > 0;
        bool btn_right = re1.getPosition() - prevPosition < 0;
        prevPosition = re1.getPosition();

        if (btn_left) {
            usbd_mouse_report[4] = (uint8_t)-1;
        } else if (btn_right) {
            usbd_mouse_report[4] = 1;
        }

        bool success = USBD_ENDPx_DataUp(2, usbd_mouse_report, USBD_MOUSE_REPORT_BYTES);
        if (success) {
            memset(usbd_mouse_report, 0x00, USBD_MOUSE_REPORT_BYTES);
        }
    }
}

uint8_t usbd_cc_report[1];
uint8_t USBD_CC_REPORT_BYTES = sizeof(usbd_cc_report) / sizeof(usbd_cc_report[0]);

void usbd_cc_update(void) {
    static unsigned long timer = 0;
    static long prevPosition = 0;
    static bool muteButtonSent = false;

    if (timer == 0) {
        pinMode(PIN_BTN_5, INPUT_PULLUP);
        memset(usbd_cc_report, 0x00, USBD_CC_REPORT_BYTES);
    }

    if (millis() - timer >= 50) {
        timer = millis();
        bool btn_down = (re2.getPosition() - prevPosition) < 0;
        bool btn_up = (re2.getPosition() - prevPosition) > 0;
        prevPosition = re2.getPosition();
        bool btn_mute = false;
        if (digitalRead(PIN_BTN_5) == LOW) {
          if (!muteButtonSent) {
            btn_mute = true;
            muteButtonSent = true;
          }
        } else {
          muteButtonSent = false;
        }

        if (btn_mute) {
            usbd_cc_report[0] = 0x01;
        } else if (btn_down) {
            usbd_cc_report[0] = 0x04;
        } else if (btn_up) {
            usbd_cc_report[0] = 0x08;
        } else {
            usbd_cc_report[0] = 0;
        }

        bool success = USBD_ENDPx_DataUp(3, usbd_cc_report, USBD_CC_REPORT_BYTES);
        if (success) {
          memset(usbd_cc_report, 0x00, USBD_CC_REPORT_BYTES);
        }
    }
}


void loop() {

    if( bDeviceState == CONFIGURED )
    {
        led_blink(500);

        re1.tick();
        re2.tick();

        usbd_kbd_update();
        usbd_mouse_update();
        usbd_cc_update();

    } else {
        led_blink(1000);
    }
}


/** MCUをスリープ状態にする。復帰後の再初期化をする。
*/
void MCU_Sleep_Wakeup_Operate(void) {
    Serial.printf( "Enter to Sleep\r\n" );
    __disable_irq();

    PWR_EnterSTOPMode(PWR_Regulator_LowPower,PWR_STOPEntry_WFE);

    SystemInit();
    SystemCoreClockUpdate();
    Set_USBConfig();

    __enable_irq( );
    Serial.printf( "Wake\r\n" );
}
雑記
USBデバイスを作るときに大切なこと:
USB機能を停止し、ファームウェア書き込み待機状態にできる方法を確保しておきましょう。Arduino Leonardoではリセットボタン2回押しで、書き込み待機になります。Suzuduino UNO / Suzuno32RV (CH32V)では、BOOTボタンを押しながらリセットで書き込み待機です。もし書き込み待機モードがないボードの場合は、特定のスイッチを押しながらリセットでUSB機能停止、などを仕込んでおくと便利です。
あるいは、動作テスト用のパソコンと開発・書き込み用のパソコンを分けるというのもアリですね。
基板むき出しでは取り扱いがこわいので、ケースを作りたいです。ただシールド基板側にネジ穴や固定のとっかかりがないので、どう固定するかはちょっと悩みそうです。
スイッチとノブはピンヘッダで支えているだけなので、長期的な耐久性は期待できません。あくまでも「かんたんに作るための基板」ということで。その点でも、シールド基板にネジ穴は用意したほうがよかったですね。
CH32VのUSBライブラリが欲しいです。記事執筆時点でTinyUSBの移植が進んでいるようなので、そちらにも期待ですが、Arduino環境から気軽に利用できるものもほしいです。(いずれ自分で書くことになると思います)
投稿者の人気記事


-
verylowfreq
さんが
2024/06/16
に
編集
をしました。
(メッセージ: 初版)
-
verylowfreq
さんが
2024/06/16
に
編集
をしました。
-
verylowfreq
さんが
2024/06/16
に
編集
をしました。
-
verylowfreq
さんが
2024/06/17
に
編集
をしました。
-
verylowfreq
さんが
2024/06/17
に
編集
をしました。
-
verylowfreq
さんが
2024/06/17
に
編集
をしました。
ログインしてコメントを投稿する