


つくるもの
4つのフルカラーLEDで時刻を表示してくれます
普通の時計に比べたメリット
- 部屋の電気が消えていても見やすい
- 暗くて視力が悪くても色は見えるので,夜中の時刻を知りたいときに便利
- 抵抗カラーコードを覚える練習にもなる
抵抗カラーコード表
| 数字 | 色 |
|---|---|
| 0 | 黒 |
| 1 | 茶 |
| 2 | 赤 |
| 3 | 橙 |
| 4 | 黄 |
| 5 | 緑 |
| 6 | 青 |
| 7 | 紫 |
| 8 | 灰 |
| 9 | 白 |
回路
使用する部品
- ESP32 dev board:https://amzn.to/3whqh6f
- WS2812B 4つ:https://amzn.to/3UHAzG6
- 抵抗 470Ω
- 適当な線材(ユニバーサル基板,UEWなど)
今回はESP32とWS2812B を用いて製作しています.
マイコンのボードはたくさん種類がありますが,その中でもESP32,WROOM02,M5 StackなどはWi-Fiを介してインターネットに手軽に接続することができます.
インターネットに接続できるとインターネット経由で時刻を取得できるのが大きなメリットです.時刻を自動的に調整する方法としては電波時計の電波を使う方法,GPSを取得する方法,FMラジオもありますが,これらの電波は自宅内では入りづらいことがあります.自宅での利用を考えると,一番安定して同期できる方法がインターネットを経由する方法になりました.(専用モジュールを買わなくてもいいので安価に製作できるメリットもあります)
フルカラーLEDにWS2812B を利用した理由は配線が少なく,手軽に扱えるためです.普通のフルカラーLEDはLEDから赤,青,緑,GNDの四本がでていて,それぞれのピンにPWM信号を加えて光らせます.今回の時計は時間2桁と分2桁の4桁分で4つのLEDを使用します.となると,12本のPWM出力と配線が必要になります.ESP32は12本のPWM出力があるので大丈夫ですが,12本の配線は大変です.そこで,プラスマイナスの電源と信号線の1本だけで点灯できるWS2812B を使用しました.信号線で信号を送ることでそれぞれのLEDを個別に1670万色に光らせることができます(R,G,Bそれぞれ255段階で調整可能).
また,WS2812B を採用することによってM5 Stickでも動かすことができるかもしれないメリットもあります.(まだ持っていないので検証していないです)
配線
配線はESP32とLEDテープの間を5V,GND,信号線を接続するだけです.信号線の間には470Ωの抵抗を挿入しています.
| EPS32 | LEDテープ |
|---|---|
| Vin | +5V |
| 11 | DI |
| GND | GND |
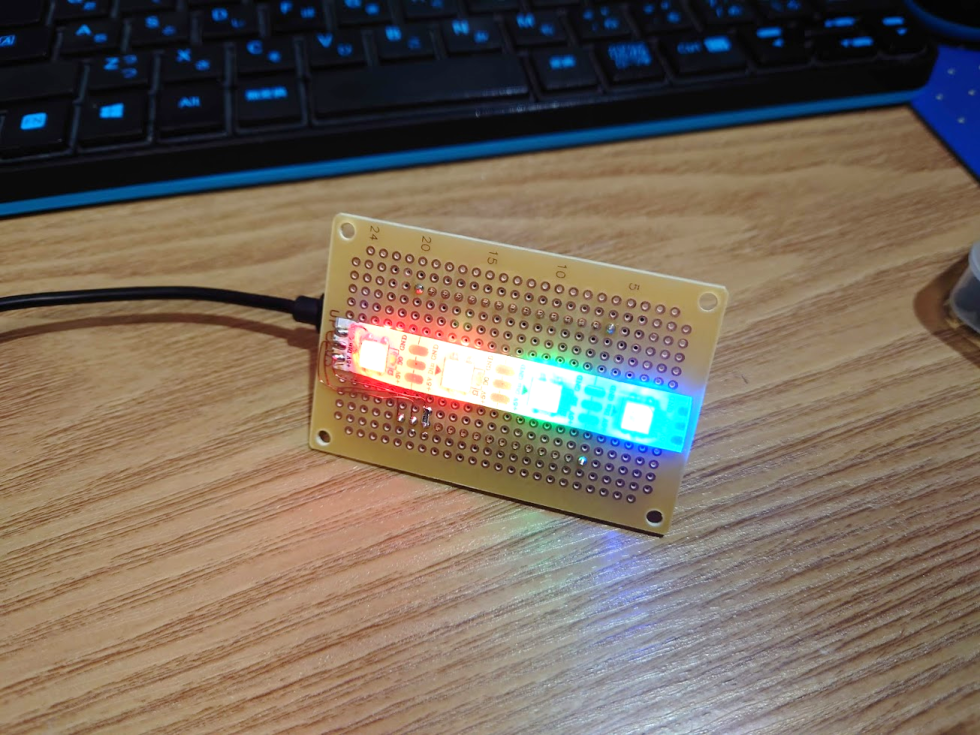
ユニバーサル基板への実装
ユニバーサル基板にはんだ付けして取り付けました.
抵抗は2012Mのチップ抵抗を使ってLEDと同じ面に取り付けています.(写真の赤矢印のところ)
利用方法
Adafruit NeoPixcelのライブラリをインストールします.https://github.com/adafruit/Adafruit_NeoPixel
ESP32の開発環境を構築します.https://rikoubou.hatenablog.com/entry/2019/06/19/161443
ソースコードの頭にあるSSIDとPWを入力します.
あとは,インターネットから時刻を取得してLEDが点灯します.
プログラム
ソースコードはNTPサーバから時刻を取得するプログラム,毎秒カウントするプログラム,LEDテープを制御するプログラムから構成されます.NTPサーバから時刻を取得する部分はArduinoのサンプルプログラムをもとに製作しました.
コードは長いので最後に記述します.
初期化:void setup()
- Wi-Fiまわりの初期化
- NTPサーバから時刻を取得
- 割り込み処理を実行(1秒に一回TimerCounter()を実行して,1秒毎に時間をインクリメントします)
- NeoPixcelの初期化
毎秒の処理:void TimerCounter()
- 時刻をインクリメント
- LEDを表示する関数を実行
1時間ごとの処理:メインループ内のif(epoch%3600 == 0) getNTP();
- NTPサーバから時刻を取得(内部のカウンターでは時刻にずれが生じるため定期的に同期させる.毎秒NTPサーバから時刻を取得するとDoS攻撃とみなされる恐れがあるため,1時間に一回にしています)
LEDの点灯処理:void time2led(int hour, int minute){
- 明るさの定義(抵抗のカラーコードになるようにRGBのバランスと強さを定義します)
- 時分はそれぞれ2桁で表されるので4つの数字に分割
- Neopixcelを消去
- それぞれの時間に対応するようにNeoPixcelを光らせる
- NeoPixcelにデータ送信
動作確認・動作例
USBケーブルを電源に接続するとWi-Fiに接続し,NTPサーバから時刻を取得したあと点灯します.
もし,点灯しない場合はESP32をPCに接続し,Arduinoのシリアル通信を使うことで原因の切り分けができます.よくあるのが,Wi-FiのSSID,Passwordを間違えていた,ルータでNTPサーバへのアクセスをブロックしていた,LEDを接続するポートがミスっていたなどです.もし,Wi-Fiの調子が悪いならテザリングを使ってみるといいかもしれません.
ソースコード
ソースコードはGitHubからもダウンロードできます.
コード
/*
Udp NTP Client
Get the time from a Network Time Protocol (NTP) time server
Demonstrates use of UDP sendPacket and ReceivePacket
For more on NTP time servers and the messages needed to communicate with them,
see http://en.wikipedia.org/wiki/Network_Time_Protocol
created 4 Sep 2010
by Michael Margolis
modified 9 Apr 2012
by Tom Igoe
updated for the ESP8266 12 Apr 2015
by Ivan Grokhotkov
This code is in the public domain.
*/
#include <WiFi.h>
#include <WiFiUdp.h>
#include <Ticker.h>
#include <Adafruit_NeoPixel.h>
char ssid[] = "SSID"; // your network SSID (name)
char pass[] = "passpass"; // your network password
unsigned long epoch=0;
unsigned int localPort = 2390; // local port to listen for UDP packets
/* Don't hardwire the IP address or we won't get the benefits of the pool.
* Lookup the IP address for the host name instead */
//IPAddress timeServer(129, 6, 15, 28); // time.nist.gov NTP server
IPAddress timeServerIP; // time.nist.gov NTP server address
const char* ntpServerName = "time.nist.gov";
const int NTP_PACKET_SIZE = 48; // NTP time stamp is in the first 48 bytes of the message
byte packetBuffer[ NTP_PACKET_SIZE]; //buffer to hold incoming and outgoing packets
// A UDP instance to let us send and receive packets over UDP
WiFiUDP udp;
Ticker ticker;
int alarm_hour = 0 ;
int alarm_min = 0;
// LED init
#define pinPixels 13 // pin number of LED
#define numPixels 4 // number of neopixcel LEDs
Adafruit_NeoPixel pixels(numPixels, pinPixels, NEO_GRB + NEO_KHZ800);
void time2led(int hour, int minute){
int colorCode[10][3] = {{0,0,0}, // 0 Black
{175,25,0}, // 1 Brown
{255,0,0}, // 2 Red
{225,25,0}, // 3 Orange
{225,100,0}, // 4 Yellow
{0,255,0}, // 5 Green
{0,0,255}, // 6 Blue
{125,0,125}, // 7 Purple
{10,10,10}, // 8 Gray
{255,255,255}, // 9 white
};
int timedigit[4] ={0,0,0,0};
Serial.print("hour:");
Serial.print(hour);
Serial.print("minute:");
Serial.println(minute);
timedigit[0] = (hour/10)%10;
timedigit[1] = hour%10;
timedigit[2] = (minute/10)%10;
timedigit[3] = minute%10;
pixels.clear();
for(int i=0;i<4;i++){
int j = timedigit[i];
Serial.print("j:");
Serial.print(j);
Serial.print(", i:");
Serial.println(i);
pixels.setPixelColor(i,pixels.Color(colorCode[j][0],colorCode[j][1],colorCode[j][2]));
}
pixels.show();
}
void TimerCounter() { // 1秒ごとに実行される.1秒毎に時刻をインクリメントする.
epoch ++;
Serial.write("UnixTime:");
Serial.println(epoch);
//Serial.println((epoch+32400)%86400);
// print the hour, minute and second:
Serial.print("The JST time is "); // UTC is the time at Greenwich Meridian (GMT)
Serial.print(((epoch % 86400L) / 3600 +9)%24); // print the hour (86400 equals secs per day)
Serial.print(':');
if ( ((epoch % 3600) / 60) < 10 ) {
// In the first 10 minutes of each hour, we'll want a leading '0'
Serial.print('0');
}
Serial.print((epoch % 3600) / 60); // print the minute (3600 equals secs per minute)
Serial.print(':');
if ( (epoch % 60) < 10 ) {
// In the first 10 seconds of each minute, we'll want a leading '0'
Serial.print('0');
}
Serial.println(epoch % 60); // print the second
int hour = ((epoch % 86400L) / 3600 +9)%24; // JSTにするために+9時間している
int minute = (epoch % 3600) / 60;
time2led(hour, minute);
}
void setup()
{
Serial.begin(115200);
Serial.println();
Serial.println();
pinMode(0,INPUT);
pinMode(16,OUTPUT);
pinMode(4,OUTPUT);
pinMode(5,OUTPUT);
digitalWrite(16,LOW);
digitalWrite(4,LOW);
digitalWrite(5,LOW);
// We start by connecting to a WiFi network
Serial.print("Connecting to ");
Serial.println(ssid);
WiFi.begin(ssid, pass);
while (WiFi.status() != WL_CONNECTED) {
delay(500);
Serial.print(".");
}
Serial.println("");
Serial.println("WiFi connected");
Serial.println("IP address: ");
Serial.println(WiFi.localIP());
Serial.println("Starting UDP");
udp.begin(localPort);
getNTP();
ticker.attach(1, TimerCounter);
pixels.begin();
}
void loop()
{
if(epoch%3600 == 0) getNTP();
delay(1000);
}
// send an NTP request to the time server at the given address
unsigned long sendNTPpacket(IPAddress& address)
{
Serial.println("sending NTP packet...");
// set all bytes in the buffer to 0
memset(packetBuffer, 0, NTP_PACKET_SIZE);
// Initialize values needed to form NTP request
// (see URL above for details on the packets)
packetBuffer[0] = 0b11100011; // LI, Version, Mode
packetBuffer[1] = 0; // Stratum, or type of clock
packetBuffer[2] = 6; // Polling Interval
packetBuffer[3] = 0xEC; // Peer Clock Precision
// 8 bytes of zero for Root Delay & Root Dispersion
packetBuffer[12] = 49;
packetBuffer[13] = 0x4E;
packetBuffer[14] = 49;
packetBuffer[15] = 52;
// all NTP fields have been given values, now
// you can send a packet requesting a timestamp:
udp.beginPacket(address, 123); //NTP requests are to port 123
udp.write(packetBuffer, NTP_PACKET_SIZE);
udp.endPacket();
}
void getNTP(){
//get a random server from the pool
WiFi.hostByName(ntpServerName, timeServerIP);
sendNTPpacket(timeServerIP); // send an NTP packet to a time server
// wait to see if a reply is available
delay(1000);
int cb = udp.parsePacket();
if (!cb) {
Serial.println("no packet yet");
}
else {
Serial.print("packet received, length=");
Serial.println(cb);
// We've received a packet, read the data from it
udp.read(packetBuffer, NTP_PACKET_SIZE); // read the packet into the buffer
//the timestamp starts at byte 40 of the received packet and is four bytes,
// or two words, long. First, esxtract the two words:
unsigned long highWord = word(packetBuffer[40], packetBuffer[41]);
unsigned long lowWord = word(packetBuffer[42], packetBuffer[43]);
// combine the four bytes (two words) into a long integer
// this is NTP time (seconds since Jan 1 1900):
unsigned long secsSince1900 = highWord << 16 | lowWord;
Serial.print("Seconds since Jan 1 1900 = " );
Serial.println(secsSince1900);
// now convert NTP time into everyday time:
Serial.print("Unix time = ");
// Unix time starts on Jan 1 1970. In seconds, that's 2208988800:
const unsigned long seventyYears = 2208988800UL;
// subtract seventy years:
epoch = secsSince1900 - seventyYears;
// print Unix time:
Serial.println(epoch);
// print the hour, minute and second:
Serial.print("The UTC time is "); // UTC is the time at Greenwich Meridian (GMT)
Serial.print((epoch % 86400L) / 3600); // print the hour (86400 equals secs per day)
Serial.print(':');
if ( ((epoch % 3600) / 60) < 10 ) {
// In the first 10 minutes of each hour, we'll want a leading '0'
Serial.print('0');
}
Serial.print((epoch % 3600) / 60); // print the minute (3600 equals secs per minute)
Serial.print(':');
if ( (epoch % 60) < 10 ) {
// In the first 10 seconds of each minute, we'll want a leading '0'
Serial.print('0');
}
Serial.println(epoch % 60); // print the second
}
// wait ten seconds before asking for the time again
delay(10000);
}投稿者の人気記事


-
romes_cyc
さんが
2021/02/28
に
編集
をしました。
(メッセージ: 初版)
-
romes_cyc
さんが
2021/02/28
に
編集
をしました。
(メッセージ: 部品リストの追加)
-
romes_cyc
さんが
2021/02/28
に
編集
をしました。
-
romes_cyc
さんが
2021/12/07
に
編集
をしました。
-
romes_cyc
さんが
2024/05/04
に
編集
をしました。
ログインしてコメントを投稿する