

スマホで操作するラジコン戦車
Wi-Fi接続でスマホを使って操作できるラジコンを作りました。
材料
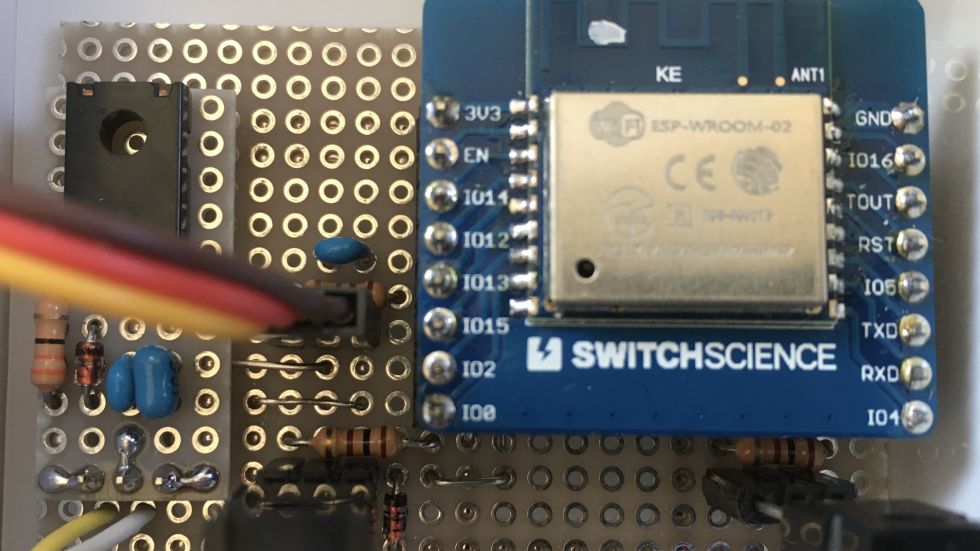
1. ESP-WROOM-02 x1
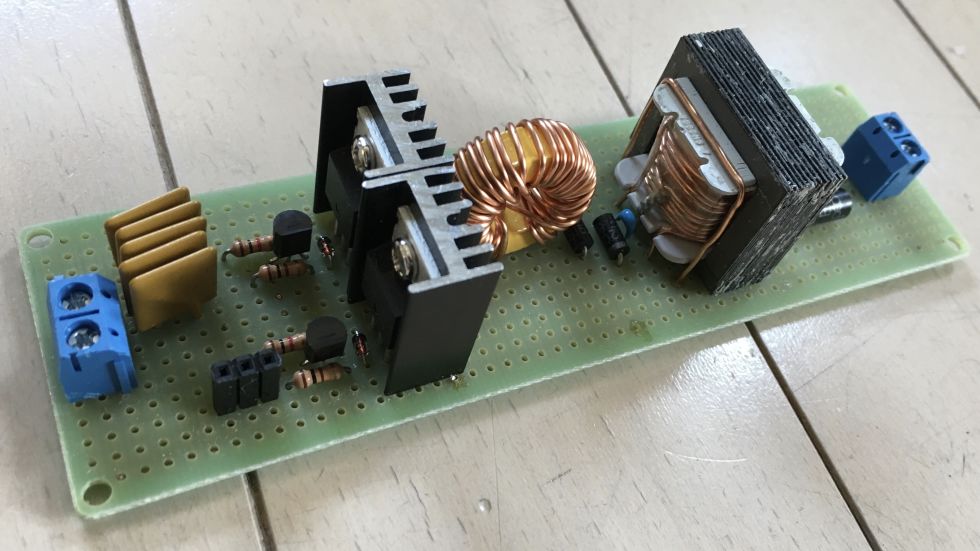
2. 3.3V1A出力のレギュレータ x1
3. 積層セラミックコンデンサー10uF x2
4. 抵抗10kΩ x2
5. 抵抗1kΩ x3
6. 小信号用ダイオード1N4148 x2
7. トランジスタ2SC3422 x2
8. サーボSG90 x1
9. タミヤ ツインモーターギヤボックス x1
回路図
プログラム
ESP-WROOM-02の制御用プログラム
#include <ESP8266WiFi.h>
#include <WiFiClient.h>
#include <ESP8266WebServer.h>
ESP8266WebServer server(80);
#define Right 12
#define Left 4
#define IRled 5
#define servo 13
#define servo_freq 50
#define servo_range 160
#define servo_center 25
#define servo_left 39
#define servo_right 11
int valueR, valueL ;
#define POWER_SW 14
const char *ssid = "My_SSID";
const char *pass = "My_password";
#include "index_html2.h"
void handleNotFound() {
String message = "File Not Found\n\n"
+ server.uri() + " "
+ ((server.method() == HTTP_GET) ? "GET" : "POST")
+ "\nArguments: " + server.args() + "\n";
for (int i = 0; i < server.args(); i++)
message += " " + server.argName(i) + ": " + server.arg(i) + "\n";
server.send(404, "text/plain", message);
}
int NoDat = 0, timeOut = 0;
int Val_C = 0; // Horn
#ifdef POWER_SW
void powerCnt(int sw) {
pinMode(POWER_SW, OUTPUT);
if (sw) {
digitalWrite(POWER_SW, HIGH);
return;
}
for ( ; ; ) {
digitalWrite(POWER_SW, LOW);
noInterrupts();
}
}
#else
#define powerCnt(n)
#endif
void handleRC() {
NoDat = 0;
for (int i = 0; i < server.args(); i++) {
int Val_i = server.arg(i).toInt();
Serial.print(server.argName(i) + "=" + server.arg(i) + ", ");
switch (server.argName(i)[0]) {
case 'C': if(Val_i == 5){
analogWrite(servo, servo_center) ;
}else if(Val_i == 6){
analogWrite(servo, servo_left) ;
}else if(Val_i == 7){
analogWrite(servo, servo_right) ;
}
break ;
case 'R': valueR = Val_i ;
break ;
case 'L': valueL = Val_i ;
break ;
}
if((valueR > 0)&&(valueL > 0)){
if(valueR < (valueL-10)){
digitalWrite(Right, LOW) ;
digitalWrite(Left, HIGH) ;
}else if(valueL < (valueR-10)){
digitalWrite(Right, HIGH) ;
digitalWrite(Left, LOW) ;
}else if((valueR == 0)&&(valueL == 0)){
digitalWrite(Right, LOW) ;
digitalWrite(Left, LOW) ;
}else{
digitalWrite(Right, HIGH) ;
digitalWrite(Left, HIGH) ;
}
}else{
digitalWrite(Right, LOW) ;
digitalWrite(Left, LOW) ;
}
}
server.send(200, "text/plain", "\r\n\r\n\r\n");
}
void setup(void) {
Serial.begin(115200);
analogWriteFreq(servo_freq) ;
analogWriteRange(servo_range) ;
pinMode(Right, OUTPUT) ;
pinMode(Left, OUTPUT) ;
pinMode(servo, OUTPUT) ;
digitalWrite(Right, LOW) ;
digitalWrite(Left, LOW) ;
analogWrite(servo, servo_center) ;
WiFi.softAP(ssid, pass);
IPAddress myIP = WiFi.softAPIP();
server.on("/", { server.send(200, "text/html", index_html); });
server.on("/rc", handleRC);
server.onNotFound(handleNotFound);
server.begin();
}
void loop(void) {
server.handleClient();
delay(10);
}
スマホに表示する画面のプログラム
const String index_html = "
<!DOCTYPE html> \n
<html lang='ja'> \n
<head> \n
<meta charset='UTF-8'> \n
<meta name='viewport' content='width=320, initial-scale=1.0, user-scalable=no'> \n
<title>Car Controller(JoyPad)</title> \n
<style type='text/css'><!-- \n
.div_CT { width:312px; text-align:center; } \n
.btn_LX { width:100px; height:36px; text-align:center; padding:8px; border-radius:7px; background-color:#87cefa; } \n
.btn_fire { width:250px; height:36px; text-align:center; padding:8px; border-radius:7px; background-color:#ff6347; } \n
--></style> \n
</head> \n
<body> \n
<div id='poss' class='div_CT'>--</div> \n
<canvas id='canvas' width=312 height=312></canvas> \n
<div class='div_CT'> \n
<input id='ex_R' type=button class='btn_LX' onclick='Btn(6)' value='砲塔左'>
<input id='ex_S' type=button class='btn_LX' onclick='Btn(5)' value='砲塔中央'>
<input id='ex_S' type=button class='btn_LX' onclick='Btn(7)' value='砲塔右'>
<input id='ex_S' type=button class='btn_fire' onclick='Btn(8)' value='射撃'>
</div> \n
<div id='send' class='div_CT'></div> \n
<script type='text/javascript'> \n
var poss = document.getElementById('poss'); \n
var send = document.getElementById('send'); \n
var canvas = document.getElementById('canvas'); \n
var context = canvas.getContext('2d'); \n
var sx = 9999, sy; \n
var PI2 = (2 * Math.PI); \n
var JPcr = (canvas.width / 2); \n
var JPcx = JPcy = JPcr; \n
var JPrr = 80; \n
var cmd = 0, FLv = 0, CLv = 0, Rv = 0, Lv = 0; \n
var xhr = new XMLHttpRequest(), reqSend = 0, reqRet = 0, idleCnt = 0; \n
xhr.onreadystatechange = HttpRes; \n
function HttpRes() { \n
if (xhr.readyState == 4 && xhr.status == 200) reqRet = 0; \n
} \n
function HttpReq(v) { \n
xhr.open('GET', '/rc?' + v); \n
xhr.send(null); \n
reqRet = 1; \n
} \n
function Btn(n) { \n
cmd = n ; \n
reqSend++; \n
} \n
canvas.addEventListener('touchend', function(e) { \n
posg(0, 0); \n
Rv = Lv = 0; \n
reqSend = 3; \n
}, false); \n
canvas.addEventListener('touchmove', function(e) { \n
e.preventDefault(); \n
var xx = Math.floor(e.touches[0].pageX - canvas.offsetLeft); \n
var yy = Math.floor(e.touches[0].pageY - canvas.offsetTop); \n
context.beginPath(); \n
context.arc(JPcx, JPcy, JPrr, 0, PI2, true); \n
context.closePath(); \n
if (!context.isPointInPath(xx, yy)) { \n
var ratio = Math.sqrt(Math.pow(JPrr, 2) / (Math.pow(Math.abs(xx -= JPcx), 2) + Math.pow(Math.abs(yy -= JPcy), 2))); \n
xx = (Math.floor((xx * ratio) + JPcx)); \n
yy = (Math.floor((yy * ratio) + JPcy)); \n
} \n
posg((xx -= JPcx), (yy -= JPcy)); \n
var mpower = Math.round(Math.sqrt(Math.pow(Math.abs(xx), 2) + Math.pow(Math.abs(yy), 2))); \n
if ((yy > -16) && (yy < 16)) { \n
Rv = ((xx < 0) ? mpower : -mpower); \n
Lv = ((xx > 0) ? mpower : -mpower); \n
} else { \n
mpower = Math.floor((mpower < 16) ? 0 : ((yy > 0) ? (0 - mpower) : mpower)); \n
Rv = Math.floor((xx < 0) ? mpower : (mpower - (mpower * Math.abs(xx) / JPrr))); \n
Lv = Math.floor((xx > 0) ? mpower : (mpower - (mpower * Math.abs(xx) / JPrr))); \n
} \n
reqSend++; \n
}, false); \n
function posg(x, y) { \n
if (sx == 9999) { \n
context.strokeStyle = 'blue'; \n
context.fillStyle = '#CED8F6'; \n
context.lineWidth = 1; \n
context.beginPath(); \n
context.arc(JPcx, JPcy, (JPcr - 1), 0, PI2, true); \n
context.fill(); \n
context.stroke(); \n
} else { \n
context.fillStyle = '#CED8F6'; \n
context.beginPath(); \n
context.arc((sx + JPcx), (sy + JPcy), 72, 0, PI2, true); \n
context.fill(); \n
} \n
context.strokeStyle = 'red'; \n
context.fillStyle = 'pink'; \n
context.lineWidth = 2; \n
context.beginPath(); \n
context.arc((x + JPcx), (y + JPcy), 70, 0, PI2, true); \n
context.stroke(); \n
context.fill(); \n
poss.innerHTML = ((x == 0 && y == 0) ? '--' : ('X : ' + x + ', Y : ' + y)); \n
sy = y; \n
sx = x; \n
} \n
var timer = window.setInterval(function() { \n
var vals = 'C=' + cmd + '&L=' + Lv + '&R=' + Rv; \n
send.innerHTML = vals; \n
if (reqSend) { \n
cmd = 0; \n
reqSend--; \n
idleCnt = 0; \n
} \n
if (++idleCnt < ((20 * 1000) / 50)) { \n
HttpReq(vals); \n
} \n
}, 50); \n
posg(0, 0); \n
</script> \n
</body> \n
</html>\n";
作り方
Arduino IDEでESP-WROOM-02にプログラム
を書き込んで、基板に回路を作ったら制御基
板は完成です。
基板などが上手く入れば車体の形は自由なの
で好きな形にしてください。
操作方法
1. ラジコンの電源を入れて、スマホでSSIDと
パスワードを入力し接続します。
2. スマホのブラウザで「192.168.4.1」を入
力し検索すると上の画像のように操作画
面が表示されます。
3. 赤い円を動かすとその向きに応じて直進、
右折、左折の動作をします。
4. 円形のコントローラーの下にあるボタンを
押すと左、中央、右に砲塔を動かす事がで
きます。
投稿者の人気記事


-
nichicon
さんが
2020/12/28
に
編集
をしました。
(メッセージ: 初版)
-
nichicon
さんが
2020/12/28
に
編集
をしました。
-
nichicon
さんが
2020/12/28
に
編集
をしました。
-
nichicon
さんが
2020/12/28
に
編集
をしました。
-
nichicon
さんが
2020/12/28
に
編集
をしました。
-
nichicon
さんが
2020/12/28
に
編集
をしました。
-
nichicon
さんが
2020/12/28
に
編集
をしました。
-
nichicon
さんが
2020/12/28
に
編集
をしました。
-
nichicon
さんが
2021/02/22
に
編集
をしました。
-
nichicon
さんが
2021/02/22
に
編集
をしました。
-
nichicon
さんが
2021/02/22
に
編集
をしました。
-
nichicon
さんが
2021/02/22
に
編集
をしました。
-
nichicon
さんが
2021/02/22
に
編集
をしました。
-
nichicon
さんが
2021/02/27
に
編集
をしました。
-
nichicon
さんが
2021/12/09
に
編集
をしました。
ログインしてコメントを投稿する