 製作品
製作品  1286
1286Spresenseで服装検出し、気温に適切な服装か判別する
概要
Spresenseの画像分類により、服装を認識し、気温情報から今日の気温に適切な服装かどうか判別するシステムを作成しました。
玄関前に置けば、出かける前に適切な服装かどうか知らせることができます。
画像分類にはDNNRTを用いており、気温情報はpythonでWebAPIを用いて取得しています。
使用したもの
- Spresense - 1個
- Spresense拡張ボード - 1個
- SpresenseHDRカメラボード - 1個
- Spresnse Mic&LCD KITのLCD ILI9341 - 1個
- microSDカード - 1個
- ジャンパワイヤ
- PC
システム構成
システムの概観は下の図のようになっています。
Spresenseと拡張ボード、カメラボードの固定用のプリンタパーツには、以下URLのモデルを使わせていただいております。
https://www.hackster.io/dyad/10n2-smart-student-driver-assistant-88787b
カメラの撮影画像と服装を認識した結果を常にディスプレイに表示させ、気温情報をUSBで接続したPCを経由して取得します。
服装認識
データセット
Neural Network Consoleを用いて画像分類モデルを作成しました。
データセットは、FashionMNISTのクラスを参考に以下の4クラスについて、それぞれ、カメラボードで連続撮影することで収集してます。
- None
- T-shirt
- Pullover
- Coat
認識モデルの作成
Neural Network Consoleの構造自動探索機能を用いて学習を行ったところ、評価データにおける正解率は98.74%となっていました。
今回はデータセットの数や種類が少ないため、服装について過学習している可能性はありますが、データセットの数やクラスを増やせば、いろいろな服装に対して対応可能だと考えられます。
画像収集と服装の認識のプログラムは、下記URLを参考に実装しました。
https://github.com/TE-YoshinoriOota/Spresense-LowPower-EdgeAI/tree/main/Chap07
連続でNone以外のクラスを認識するとPCにserial通信し、気温データを取得します。
ここで、認識する度に気温データを取得することで日をまたいでも、気温情報の更新が可能となっています。
気温情報の取得
気温情報の取得はPC側でpythonで実装します。
Spresenseとのシリアル通信のためにpythonのpyseralというライブラリを用いています。
Spresenseからのシリアル入力を検出すると、気温情報を取得し、Spresenseに気温データを送信します。
気温情報の取得には、以下URLのWebAPIを使わせていただいています。
https://weather.tsukumijima.net/
結果の可視化
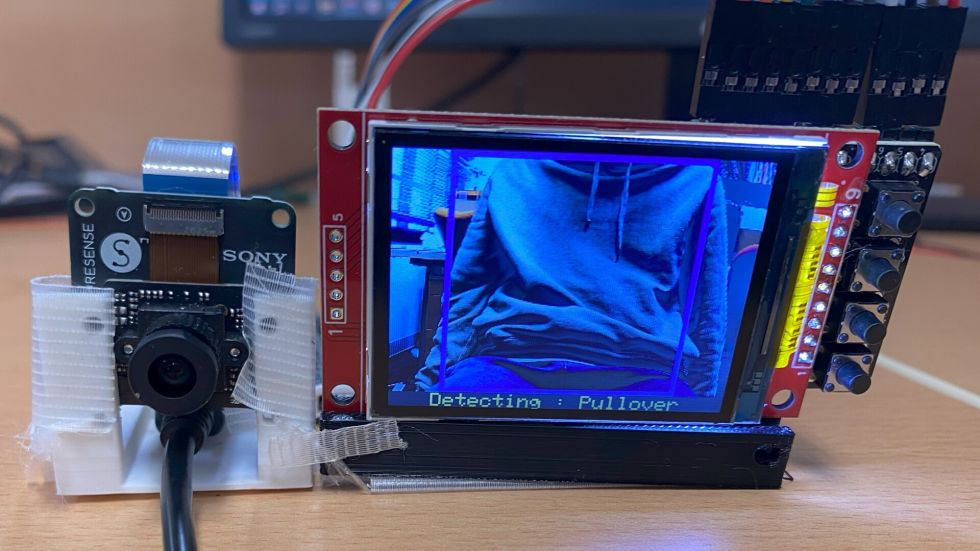
服装と気温による適切かどうかの判断結果は、トリミングした枠の色として、LCDに表示されます。
実行してすぐでは、枠の色は黒で表示され、判断結果によって、以下のように枠の色が変化します。
| 服装が気温に合っているか | 枠の色 |
|---|---|
| 暑い | 赤 |
| 適切 | 緑 |
| 寒い | 青 |
処理の様子
撮影日の平均気温は5°だったため,Pulloverを認識すると枠の色が青になり,Coatを認識すると枠の色が緑になります。
まとめ
SpresenseのDNNRTとWebAPIを用いて、今日の気温に適切な服装かどうか判別するシステムを作成しました。
今回は天気情報の取得をpythonに頼ったのですが、今後は、WiFiやLPWAとdeepsleepを組み合わせて、Spresense単独で動く省電力なシステムを実装したいと思います。
ソースコード
服装認識のプログラム
#include <Camera.h>
#include <DNNRT.h>
#include <SDHCI.h>
#include <Adafruit_ILI9341.h>
#include <BmpImage.h>
#define TFT_DC 9
#define TFT_CS 10
#define OFFSET_X (48)
#define OFFSET_Y (0)
#define CLIP_WIDTH (224)
#define CLIP_HEIGHT (224)
#define DNN_WIDTH (28)
#define DNN_HEIGHT (28)
#define N 4
SDClass SD;
DNNRT dnnrt;
BmpImage bmp;
DNNVariable input(DNN_WIDTH*DNN_HEIGHT);
Adafruit_ILI9341 display = Adafruit_ILI9341(TFT_CS, TFT_DC);
const String label[N] = {"None","T-shirt","Pullover","Coat"};
String gStrResult;
int filling_color = ILI9341_BLACK;
int same_count = 0
int prev_class = -1;
int temperature;
// 1:T-shirtと2:Pulloverの境界値
const int threshold1_2 = 20;
// 2:Pulloverと3:Coatの境界値
const int threshold2_3 = 10;
// cameraのstreamingのコールバック関数
void CamCB(CamImage img) {
if (!img.isAvailable()) {
Serial.println("Image is not available. Try again");
return;
}
// カメラ画像の切り抜きと縮小
CamImage small;
CamErr err = img.clipAndResizeImageByHW(small
, OFFSET_X, OFFSET_Y
, OFFSET_X + CLIP_WIDTH -1
, OFFSET_Y + CLIP_HEIGHT -1
, DNN_WIDTH, DNN_HEIGHT);
// 認識用モノクロ画像を設定
uint16_t* imgbuf = (uint16_t*)small.getImgBuff();
float *dnnbuf = input.data();
for (int n = 0; n < DNN_HEIGHT*DNN_WIDTH; ++n) {
dnnbuf[n] = (float)(((imgbuf[n] & 0xf000) >> 8)
| ((imgbuf[n] & 0x00f0) >> 4))/255.;
}
// 推論の実行
dnnrt.inputVariable(input, 0);
dnnrt.forward();
// 認識結果
DNNVariable output = dnnrt.outputVariable(0);
// 確率最大のクラス
int cloth = output.maxIndex();
gStrResult = "Detecting : " + label[cloth];
// 認識結果が連続で同じ場合にシリアル通信で送信(誤検出防止)
if(cloth == prev_class && cloth != 0){
same_count++;
}else{
same_count = 0;
}
if(same_count > 20){
// pythonにserial送信
Serial.println(cloth);
same_count = 0;
// python側の送信処理が終わるまで待つ
delay(2000);
//気温の呼び出し
temperature = Serial.readString().toInt();
//結果の表示
if(cloth==1){
if(temperature >= threshold1_2){
filling_color = ILI9341_GREEN;
}
else{
filling_color = ILI9341_BLUE;
}
}
else if(cloth==2){
if(temperature >= threshold1_2){
filling_color = ILI9341_RED;
}
else if(temperature >= threshold2_3){
filling_color = ILI9341_GREEN;
}
else{
filling_color = ILI9341_BLUE;
}
}
else if(cloth==3){
if(temperature >= threshold2_3){
filling_color = ILI9341_RED;
}
else{
filling_color = ILI9341_GREEN;
}
}
else{
}
}
prev_class = cloth;
img.convertPixFormat(CAM_IMAGE_PIX_FMT_RGB565);
uint16_t* imgBuf = (uint16_t*)img.getImgBuff();
drawBox(imgBuf, OFFSET_X, OFFSET_Y, CLIP_WIDTH, CLIP_HEIGHT, 5, filling_color);
display.drawRGBBitmap(0, 0, (uint16_t*)imgBuf, 320, 224);
putStringOnLcd(gStrResult, ILI9341_YELLOW);
}
void setup() {
Serial.begin(115200);
while (!Serial);
while (!SD.begin()) {
Serial.println("Insert SD");
}
int ret = 0;
File nnbfile = SD.open("model.nnb");
ret = dnnrt.begin(nnbfile);
if (ret < 0) {
return;
}
display.begin();
display.setRotation(1);
theCamera.begin();
theCamera.startStreaming(true, CamCB);
}
void loop() { }ディスプレイの関数
// ディスプレイの縦横の大きさ
#define DISPLAY_WIDTH (320)
#define DISPLAY_HEIGHT (240)
// 液晶ディスプレイの下部に文字列を表示する
void putStringOnLcd(String str, int color) {
int len = str.length();
display.fillRect(0,224, 320, 240, ILI9341_BLACK);
display.setTextSize(2);
int sx = 160 - len/2*12;
if (sx < 0) sx = 0;
display.setCursor(sx, 225);
display.setTextColor(color);
display.println(str);
}
// 液晶ディスプレイに四角形を描画する
void drawBox(uint16_t* imgBuf, int offset_x, int offset_y, int width, int height, int thickness, int color) {
/* Draw target line */
for (int x = offset_x; x < offset_x+width; ++x) {
for (int n = 0; n < thickness; ++n) {
*(imgBuf + DISPLAY_WIDTH*(offset_y+n) + x) = color;
*(imgBuf + DISPLAY_WIDTH*(offset_y+height-1-n) + x) = color;
}
}
for (int y = offset_y; y < offset_y+height; ++y) {
for (int n = 0; n < thickness; ++n) {
*(imgBuf + DISPLAY_WIDTH*y + offset_x+n) = color;
*(imgBuf + DISPLAY_WIDTH*y + offset_x + width-1-n) = color;
}
}
}データセット収集プログラム
#include <Camera.h>
#include <Adafruit_ILI9341.h>
#include <SDHCI.h>
#include <BmpImage.h>
#define TFT_DC 9
#define TFT_CS 10
#define OFFSET_X (48)
#define OFFSET_Y (0)
#define CLIP_WIDTH (224)
#define CLIP_HEIGHT (224)
#define DNN_WIDTH (28)
#define DNN_HEIGHT (28)
Adafruit_ILI9341 display = Adafruit_ILI9341(TFT_CS, TFT_DC);
SDClass SD;
BmpImage bmp;
char fname[16];
// 画像データの保存用関数
void saveGrayBmpImage(int width, int height, uint8_t* grayImg)
{
static int g_counter = 0; // ファイル名につける追番
sprintf(fname, "%03d.bmp", g_counter);
// すでに画像ファイルがあったら削除
if (SD.exists(fname)) SD.remove(fname);
// ファイルを書き込みモードでオープン
File bmpFile = SD.open(fname, FILE_WRITE);
if (!bmpFile) {
Serial.println("Fail to create file: " + String(fname));
while(1);
}
// ビットマップ画像を生成
bmp.begin(BmpImage::BMP_IMAGE_GRAY8, DNN_WIDTH, DNN_HEIGHT, grayImg);
// ビットマップを書き込み
bmpFile.write(bmp.getBmpBuff(), bmp.getBmpSize());
bmpFile.close();
bmp.end();
++g_counter;
// ファイル名を表示
Serial.println("Saved an image as " + String(fname));
}
void CamCB(CamImage img) {
if (!img.isAvailable()) {
Serial.println("Image is not available. Try again");
return;
}
// カメラ画像の切り抜きと縮小
CamImage small;
CamErr err = img.clipAndResizeImageByHW(small
, OFFSET_X, OFFSET_Y
, OFFSET_X + CLIP_WIDTH -1
, OFFSET_Y + CLIP_HEIGHT -1
, DNN_WIDTH, DNN_HEIGHT);
if (!small.isAvailable()){
putStringOnLcd("Clip and Reize Error:" + String(err), ILI9341_RED);
return;
}
// 推論処理に変えて学習データ記録ルーチンに置き換え
// 学習用データのモノクロ画像を生成
uint16_t* imgbuf = (uint16_t*)small.getImgBuff();
uint8_t grayImg[DNN_WIDTH*DNN_HEIGHT];
for (int n = 0; n < DNN_WIDTH*DNN_HEIGHT; ++n) {
grayImg[n] = (uint8_t)(((imgbuf[n] & 0xf000) >> 8)
| ((imgbuf[n] & 0x00f0) >> 4));
}
// 学習データを保存
saveGrayBmpImage(DNN_WIDTH, DNN_HEIGHT, grayImg);
// ファイル名をディスプレイ表示
putStringOnLcd(String(fname), ILI9341_GREEN);
// 処理結果のディスプレイ表示
img.convertPixFormat(CAM_IMAGE_PIX_FMT_RGB565);
uint16_t* imgBuf = (uint16_t*)img.getImgBuff();
drawBox(imgBuf, OFFSET_X, OFFSET_Y, CLIP_WIDTH, CLIP_HEIGHT, 5, ILI9341_RED);
drawGrayImg(imgBuf, grayImg);
display.drawRGBBitmap(0, 0, (uint16_t *)img.getImgBuff(), 320, 224);
delay(10);
}
void setup() {
Serial.begin(115200);
display.begin();
theCamera.begin();
display.setRotation(3);
theCamera.startStreaming(true, CamCB);
while (!SD.begin()) {
putStringOnLcd("Insert SD card", ILI9341_RED);
}
putStringOnLcd("ready to save", ILI9341_GREEN);
}
void loop() { }気温情報の取得(python)
import serial
import time
import requests
from datetime import datetime
city_code = "130010" #稚内のcityコード:011000 東京のcityコード:130010 那覇のcityコード:471010
url = "https://weather.tsukumijima.net/api/forecast/city/" + city_code
def get_temperature():
try:
response = requests.get(url)
response.raise_for_status()
except requests.exceptions.RequestException as e:
print("Error:{}".format(e))
return -100
else:
weather_json = response.json()
# 2番目の要素 0:今日 1:明日 2:明後日
max_temp = weather_json['forecasts'][0]['temperature']['max']['celsius']
# 今日の最低気温は取得できないので、明日の最低気温を取得
min_temp = weather_json['forecasts'][1]['temperature']['min']['celsius']
print("最高気温 {} 最低気温 {}".format(max_temp, min_temp))
return str((int(max_temp) + int(min_temp)) // 2) # 平均気温を整数値の文字列で返す
def main():
port = "COM5" # ポート番号
baudrate = 115200 # ボーレート
a = 1
try:
# シリアルポートを開く
ser = serial.Serial(port, baudrate,timeout=0.8) # timeoutは受信したときの待ち時間
while True:
# シリアルを受信するとAPIから気温を取得し、シリアル送信
if ser.in_waiting > 0: # 受信バッファにデータがある場合
data = ser.readline().decode().strip()
print(f"Received: {data}") # 1:T-shirt 2:PullOver 3:Coat
ser.write(get_temperature().encode('ascii'))
except serial.SerialException as e:
print(f"Serial Exception: {e}")
finally:
# シリアルポートを閉じる
if ser.is_open:
ser.close()
print("Serial port closed")
if __name__ == "__main__":
main()下記URLにも認識用のnnbファイルを含めてソースコードを載せています
https://github.com/fibonacci0112358/Clothing-recognition-on-spresense

-
fibonacci0112358
さんが
2024/01/30
に
編集
をしました。
(メッセージ: 初版)
-
fibonacci0112358
さんが
2024/02/29
に
編集
をしました。
ログインしてコメントを投稿する