概要
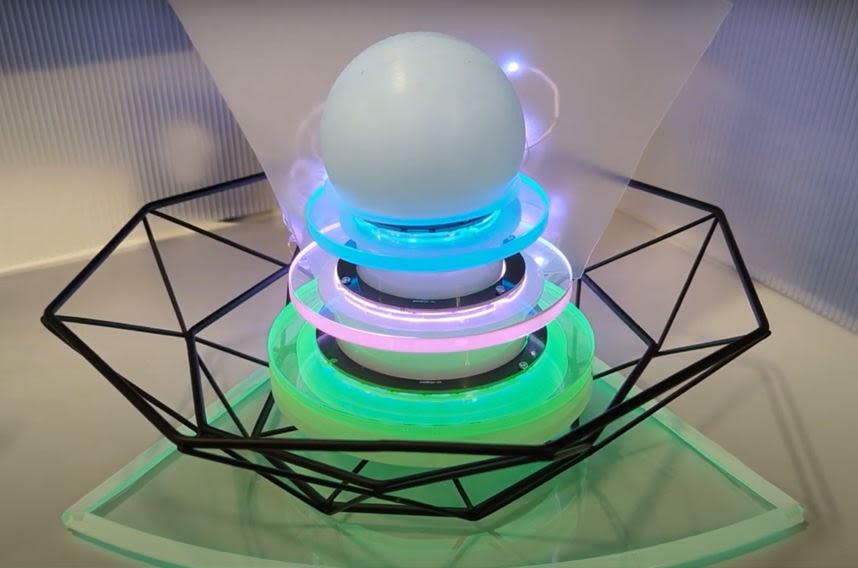
Tech Seeker ハッカソンにて作成したゆるアバター(https://protopedia.net/prototype/3946)
で使用したハードウェアです。
Kintone上に保存されるパラメータ(感情パラメータ)をLTE-Mで読み込み、それに応じた音声とLED(Neopixel)の光り方を提供します。
使用部品
- Spresenseメインボード ×2
- Spresense 拡張ボード ×1
- Spresense LTE拡張ボード ×1
- LTE-M SIMカード(さくらインターネット)
- SDカード
- Neo Pixel : LEDワイヤー 50素子 (LEDY13-2812WR-20AU)×1
WS2812BフルカラーLEDモジュール円形 12素子タイプ(LEDM226-12B12)×1
WS2812BフルカラーLEDモジュール円形 16素子タイプ(LEDM226-12B16)×1
WS2812BフルカラーLEDモジュール円形 24素子タイプ(LEDM226-12B24)×1
構成
Spresenseメインボード+LTE拡張ボードをメインの制御(LTE-Mとオーディオ)として、Spresenseメインボード+拡張ボードをサブの制御(主にNeoPixelの制御)として使用します。また、メイン側でサブコアを使い、SPI信号を使ったNeopixel点灯制御も行っています。
やっていること
メイン側(Spresense+LTE拡張ボード)
LTE-Mを使ってKintoneサーバにアクセスし、パラメータを読みます。そのパラメータに応じて、SDカードに記録している、パラメータごとの音声データを再生します。
また、GPIOを利用して、もう1台のSpresenseと同期を取り、音声再生開始とLED点灯開始を同時に行います。
ヘッダ部
オーディオを使用する準備とLTE(SSL証明書)を使用する準備とマルチコアのための設定を行っています。サンプルプログラムの関数をそのまま使用している部分は省略しています。
メイン_header
// libraries
#include <ArduinoHttpClient.h>
#include <RTC.h>
#include <SDHCI.h>
#include <LTE.h>
#include <Arduino_JSON.h>
#include <MP.h>
// Audio set
#include <SDHCI.h>
#include <Audio.h>
SDClass theSD;
AudioClass *theAudio;
File myFile;
bool ErrEnd = false;
int pattern_read = 0;
int pattern_now = 0;
struct MyPacket {
volatile int status; /* 0:ready, 1:busy */
int pattern;
};
MyPacket packet;
// APN name
#define APP_LTE_APN "sakura" // replace your APN
#define APP_LTE_USER_NAME "" // replace with your username
#define APP_LTE_PASSWORD "" // replace with your password
// APN IP type
#define APP_LTE_IP_TYPE (LTE_NET_IPTYPE_V4V6) // IP : IPv4v6
// APN authentication type
#define APP_LTE_AUTH_TYPE (LTE_NET_AUTHTYPE_CHAP) // Authentication : CHAP
#define APP_LTE_RAT (LTE_NET_RAT_CATM) // RAT : LTE-M (LTE Cat-M1)
char server[] = "<userID>.com";
char getPath[] = "/k/V1/records.json";
int port = 443; // port 443 is the default for HTTPS
#define ROOTCA_FILE "CERTS/USERTrust_RSA_Certification_Authority.der" // Define the path to a file containing CA
// certificates that are trusted.
// initialize the library instance
LTE lteAccess;
LTETLSClient tlsClient;
HttpClient client = HttpClient(tlsClient, server, port);Setup関数
GPIO接続準備、LTE接続準備、マルチコアの準備を行っています。
メイン_setup関数
void setup()
{
char apn[LTE_NET_APN_MAXLEN] = APP_LTE_APN;
LTENetworkAuthType authtype = APP_LTE_AUTH_TYPE;
char user_name[LTE_NET_USER_MAXLEN] = APP_LTE_USER_NAME;
char password[LTE_NET_PASSWORD_MAXLEN] = APP_LTE_PASSWORD;
pinMode(6, OUTPUT); //GPIO_5と6で状態を伝える
pinMode(5, OUTPUT); //GPIO_5と6で状態を伝える
pinMode(2, INPUT_PULLUP); //GPIO_2を入力に
digitalWrite(6, HIGH);
digitalWrite(5, HIGH);
memset(&packet, 0, sizeof(packet));
Serial.begin(115200);
while (!Serial) {
; // wait for serial port to connect. Needed for native USB port only
}
/* Launch SubCore1 */
int ret = 0;
ret = MP.begin(1);
if (ret < 0) {
printf("MP.begin error = %d\n", ret);
}
Serial.println("Starting secure HTTP client.");
/* Set if Access Point Name is empty */
if (strlen(APP_LTE_APN) == 0) {
Serial.println("This sketch doesn't have a APN information.");
readApnInformation(apn, &authtype, user_name, password);
}
Serial.println("=========== APN information ===========");
Serial.print("Access Point Name : ");
Serial.println(apn);
Serial.print("Authentication Type: ");
Serial.println(authtype == LTE_NET_AUTHTYPE_CHAP ? "CHAP" :
authtype == LTE_NET_AUTHTYPE_NONE ? "NONE" : "PAP");
if (authtype != LTE_NET_AUTHTYPE_NONE) {
Serial.print("User Name : ");
Serial.println(user_name);
Serial.print("Password : ");
Serial.println(password);
}
/* Initialize SD */
while (!theSD.begin()) {
; /* wait until SD card is mounted. */
}
while (true) {
/* Power on the modem and Enable the radio function. */
if (lteAccess.begin() != LTE_SEARCHING) {
Serial.println("Could not transition to LTE_SEARCHING.");
Serial.println("Please check the status of the LTE board.");
for (;;) {
sleep(1);
}
}
if (lteAccess.attach(APP_LTE_RAT,
apn,
user_name,
password,
authtype,
APP_LTE_IP_TYPE) == LTE_READY) {
Serial.println("attach succeeded.");
break;
}
Serial.println("An error has occurred. Shutdown and retry the network attach process after 1 second.");
lteAccess.shutdown();
sleep(1);
}
RTC.begin();
unsigned long currentTime;
while(0 == (currentTime = lteAccess.getTime())) {
sleep(1);
}
RtcTime rtc(currentTime);
printClock(rtc);
RTC.setTime(rtc);
}Loop関数
Kintoneサーバからパラメータ(happy/sad/anger)を読みます。読み込んだパラメータに合わせてGPIO5と6を設定、サブ側に送り、サブ側からGPIO_2に応答が返ってきたら、1秒待ってからパラメータに合わせた音声を再生します。
KintoneサーバにへのアクセスにはSSL認証を使ったLTE-M接続を行っています。
メイン_loop関数
void loop()
{
int8_t sndid = 100; /* user-defined msgid */
int ret;
GPIO_setting(pattern_read);
while (digitalRead(2) != 0){
delay (100);
}
Serial.println("GPIO_Response OK");
delay (1000);
digitalWrite(6, HIGH);
digitalWrite(5, HIGH);
packet.pattern = pattern_read;
Serial.print("Send: ");
Serial.println(packet.pattern);
ret = MP.Send(sndid, &packet, 1);
if (ret < 0) {
printf("MP.Send error = %d\n", ret);
}else{
printf("MP.Send May be OK");
}
soundplay(pattern_read);
}
// Set certifications via a file on the SD card before connecting to the server
File rootCertsFile = theSD.open(ROOTCA_FILE, FILE_READ);
tlsClient.setCACert(rootCertsFile, rootCertsFile.available());
rootCertsFile.close();
// HTTP GET method
Serial.println("making GET request");
client.beginRequest();
client.get("https://<userID>.com/k/v1/record.json?app=5&id=1");
client.sendHeader("X-Cybozu-API-Token", "<APItoken>");
client.endRequest();
// read the status code and body of the response
int statusCode = client.responseStatusCode();
String response = client.responseBody();
// read the status code and body of the response
JSONVar Object1;
Object1 = JSON.parse(response); //JSON foromat
Serial.print("Status code: ");
Serial.println(statusCode);
pattern_read = atoi(Object1["record"]["pattern"]["value"]);
Serial.print("Read pattern No = ");
Serial.println(pattern_read);
if (pattern_read != pattern_now ){
GPIO_setting(pattern_read);
packet.pattern = pattern_read;
Serial.print("Send: ");
Serial.println(packet.pattern);
ret = MP.Send(sndid, &packet, 1);
if (ret < 0) {
printf("MP.Send error = %d\n", ret);
}else{
printf("MP.Send May be OK");
}
soundplay(pattern_read);
pattern_now = pattern_read;
}
else{
Serial.println("Sound Skip");
}
sleep(10);
}GPIO_setting関数
Kintoneで受信したパラメータからGPIO出力を決定します
メイン_GPIO_setting関数
void GPIO_setting(int pattern){
switch (pattern){
case 0:
Serial.println("happy_GPIO");
digitalWrite(6, LOW);
digitalWrite(5, LOW);
break;
case 1:
Serial.println("sad_GPIO");
digitalWrite(6, LOW);
digitalWrite(5, HIGH);
break;
case 2:
Serial.println("anger_GPIO");
digitalWrite(6, HIGH);
digitalWrite(5, LOW);
break;
}
Serial.println("GPIO_Response wait");
while (digitalRead(2) != 0){
delay (100);
}
Serial.println("GPIO_Response OK");
delay (1000);
digitalWrite(6, HIGH);
digitalWrite(5, HIGH);
}Soundplay関数
パラメータに応じたSDカードの音声ファイルを呼び出し、再生します。
メイン_GPIO_setting関数
void soundplay(int pattern){
//SET UP//
/* Initialize SD */
while (!theSD.begin())
{
/* wait until SD card is mounted. */
Serial.println("Insert SD card.");
}
// start audio system
theAudio = AudioClass::getInstance();
theAudio->begin(audio_attention_cb);
puts("initialization Audio Library");
/* Set clock mode to normal */
theAudio->setRenderingClockMode(AS_CLKMODE_NORMAL);
theAudio->setPlayerMode(AS_SETPLAYER_OUTPUTDEVICE_SPHP, AS_SP_DRV_MODE_LINEOUT);
err_t err = theAudio->initPlayer(AudioClass::Player0, AS_CODECTYPE_MP3, "/mnt/sd0/BIN", AS_SAMPLINGRATE_AUTO, AS_CHANNEL_STEREO);
/* Verify player initialize */
if (err != AUDIOLIB_ECODE_OK)
{
printf("Player0 initialize error\n");
exit(1);
}
/* Open file placed on SD card */
switch (pattern){
case 0:
Serial.println("happy");
myFile = theSD.open("happy.mp3");
break;
case 1:
Serial.println("sad");
myFile = theSD.open("sad.mp3");
break;
case 2:
Serial.println("anger");
myFile = theSD.open("anger.mp3");
break;
}
/* Verify file open */
if (!myFile)
{
printf("File open error\n");
exit(1);
}
printf("Open! 0x%08lx\n", (uint32_t)myFile);
/* Send first frames to be decoded */
err = theAudio->writeFrames(AudioClass::Player0, myFile);
if ((err != AUDIOLIB_ECODE_OK) && (err != AUDIOLIB_ECODE_FILEEND))
{
printf("File Read Error! =%d\n",err);
myFile.close();
exit(1);
}
puts("Play!");
/* Main volume set to -16.0 dB */
theAudio->setVolume(-80);
theAudio->startPlayer(AudioClass::Player0);
/**
* @brief Play stream
*
* Send new frames to decode in a loop until file ends
*/
while(1){
puts("loop!!");
/* Send new frames to decode in a loop until file ends */
int err_0 = theAudio->writeFrames(AudioClass::Player0, myFile);
/* Tell when player file ends */
if (err_0 == AUDIOLIB_ECODE_FILEEND)
{
printf("Main player File End!\n");
}
/* Show error code from player and stop */
if (err_0)
{
printf("Main player error code: %d\n", err_0);
stop_player();
break;
}
if (ErrEnd)
{
printf("Error End\n");
stop_player();
break;
}
usleep(40000);
/* Don't go further and continue play */
return;
}
Serial.println("Loopend");
}stop_player関数
再生を止めます
メインstop_player関数
void stop_player(){
theAudio->stopPlayer(AudioClass::Player0);
myFile.close();
theAudio->setReadyMode();
theAudio->end();
}メイン側サブコア
NeoPixelLED10個をSPIを使って点灯させます。SPIのTX信号のみを使い、Neopixelの信号で「1」のときは0xFEを、「0」の時は0xC0を出力させ、これを連続させて実現しています。(Neopixelの1ビットに対し、1バイトの通信量を使用していることになります)
メイン_サブコア
/* include the SPI library */
#include <SPI.h>
#include <MP.h>
const uint8_t RGB_PARAM = 24;
const uint8_t LED_count = 9;
const uint8_t elements = RGB_PARAM * LED_count; //24*52
uint8_t* data = (uint8_t*)malloc(elements);
uint8_t* p = data;
typedef struct Color {
uint32_t R;
uint32_t G;
uint32_t B;
} LED_color;
struct MyPacket {
volatile int status; /* 0:ready, 1:busy */
int pattern;
};
LED_color setcolor = {0,64,0};
int getpattern;
#if (SUBCORE != 1)
#error "Core selection is wrong!!"
#endif
void setup() {
/* put your setup code here, to run once: */
/* start the serial port */
Serial.begin(115200);
MP.begin();
MP.RecvTimeout(MP_RECV_POLLING);
/* Start the SPI library */
SPI3.begin();
/* Configure the SPI port */
SPI3.beginTransaction(SPISettings(6500000, MSBFIRST, SPI_MODE1));
// LED reset
uint32_t pixelcolor = 0;
uint8_t* p = data;
for (uint8_t j = 0; j < LED_count; ++j){
for (uint8_t i = 0; i < RGB_PARAM; ++i){
*p++ = pixelcolor & 0x800000 >> i ? 0xFE : 0xC0;
}
}
SPI3.transfer(data,elements);
SPI3.transfer(0x00);
SPI3.transfer(0x00);
sleep(1);
getpattern = 0;
LED_SPI(setcolor.R,setcolor.G,setcolor.B);
}
void loop() {
/* put your main code here, to run repeatedly: */
/* Set data element values to an increasing series */
uint32_t rcvdata;
int8_t msgid;
int8_t rcvid;
int ret;
MyPacket *packet;
ret = MP.Recv(&rcvid, &packet);
if (ret > 0) {
Serial.print ("receive Data : ");
Serial.println(packet->pattern);
getpattern = packet->pattern;
switch (getpattern){
case 0:
Serial.println("happy_LED_SET");
LED_SPI(0,63,0);
setcolor = {0,63,0};
break;
case 1:
Serial.println("sad_LED_SET");
LED_SPI(0,0,63);
setcolor = {0,0,63};
break;
case 2:
Serial.println("anger_LED_SET");
LED_SPI(63,0,0);
setcolor = {63,0,0};
break;
}
}
delay(500);
}
void LED_SPI(int LED_R,int LED_G,int LED_B){
LED_color littcolor = {LED_R,LED_G,LED_B} ;
uint32_t pixelcolor = (littcolor.G << 16) | (littcolor.R << 8) | littcolor.B;
uint8_t* p = data;
for (uint8_t j = 0; j < LED_count; ++j){
for (uint8_t i = 0; i < RGB_PARAM; ++i){
*p++ = pixelcolor & 0x800000 >> i ? 0xFE : 0xC0;
}
}
SPI3.transfer(data,elements);
}サブ側(Spresense+拡張ボード)
メイン側のGPIOを受けて、NeoPixelを点灯させます。
NeoPixelの点灯にはAdafruit_NeoPixel_Spresenseライブラリを使用しています。
*具体的な点灯制御は割愛、TOP_RESET()だけ掲載します
サブ
#include <math.h>
#include <Adafruit_NeoPixel_Spresense.h>
#ifdef __AVR__
#include <avr/power.h> // Required for 16 MHz Adafruit Trinket
#endif
// Which pin on the Arduino is connected to the NeoPixels?
// On a Trinket or Gemma we suggest changing this to 1:
#define LED_PIN 3
// How many NeoPixels are attached to the Arduino?
#define LED_COUNT 102
// Declare our NeoPixel strip object:
Adafruit_NeoPixel_Spresense strip(LED_COUNT, LED_PIN);
struct LED_SET{
int R;
int G;
int B;
};
struct LED_SET LED_past;
int pattern = 0;
// setup() function -- runs once at startup --------------------------------
void setup() {
// initialize the pushbutton pin as an input:
int ret = 0;
pinMode(5, INPUT_PULLUP); //GPIO_5をスイッチ入力に
pinMode(6, INPUT_PULLUP); //GPIO_6をスイッチ入力に
pinMode(2, OUTPUT); //GPIO_2を出力に
Serial.begin(115200);
// These lines are specifically to support the Adafruit Trinket 5V 16 MHz.
// Any other board, you can remove this part (but no harm leaving it):
#if defined(__AVR_ATtiny85__) && (F_CPU == 16000000)
clock_prescale_set(clock_div_1);
#endif
strip.begin(); // INITIALIZE NeoPixel strip object (REQUIRED)
strip.show(); // Turn OFF all pixels ASAP
strip.setBrightness(255); // Set BRIGHTNESS to about 1/5 (max = 255)
delay(1000);
LED_past = {0,0,0};
}
void loop() {
digitalWrite(2, LOW);
if (digitalRead(5) == 0 && digitalRead(6)== 1){
Serial.println (digitalRead(5));
pattern = 2;
}
if(digitalRead(5) == 1 && digitalRead(6) == 0){
Serial.println (digitalRead(6));
pattern = 1;
}
if(digitalRead(5) == 0 && digitalRead(6) == 0){
pattern = 0;
}
delay (200);
digitalWrite(2, HIGH);
switch (pattern){
case 0:
LED_Pattern_A();
break;
case 1:
LED_Pattern_B();
break;
case 2:
LED_Pattern_C();
break;
}
}
void LED_patternA(void){
TOP_RESET();
//点灯制御1(割愛)//
}
void LED_patternB(void){
TOP_RESET();
//点灯制御2(割愛)//
}
void LED_patternC(void){
TOP_RESET();
//点灯制御3(割愛)//
}TOP_RESET関数
繋がっている102(50+12+16+24)個のLEDの全てをマッピングし、それぞれの色をstrip.setPixelColor(i, color)で指定して、strip.show()で点灯させます。一度制御するとその状態を維持します。
TOP_RESET()
void TOP_RESET(){
struct LED_SET target1_LED;
struct LED_SET target2_LED;
struct LED_SET target3_LED;
target1_LED = {0,48,48};
target2_LED = {64,32,32};
target3_LED = {0,64,0};
uint32_t color_0 = 0;
uint32_t color_1 = strip.Color(target1_LED.R,target1_LED.G,target1_LED.B);
uint32_t color_2 = strip.Color(target2_LED.R,target2_LED.G,target2_LED.B);
uint32_t color_3 = strip.Color(target3_LED.R,target3_LED.G,target3_LED.B);
for (int i=0; i<50; i++ ){
strip.setPixelColor(i, color_0);
}
for (int i=50; i<62; i++ ){
strip.setPixelColor(i, color_1);
}
for (int i=62; i<76; i++ ){
strip.setPixelColor(i, color_2);
}
for (int i=76; i<102; i++ ){
strip.setPixelColor(i, color_3);
}
strip.show();
}投稿者の人気記事


-
S-Shimizu
さんが
2024/01/28
に
編集
をしました。
(メッセージ: 初版)
-
S-Shimizu
さんが
2024/01/30
に
編集
をしました。
-
S-Shimizu
さんが
2024/01/30
に
編集
をしました。
-
S-Shimizu
さんが
2024/01/30
に
編集
をしました。
-
S-Shimizu
さんが
2024/01/31
に
編集
をしました。
ログインしてコメントを投稿する