

2022年 SPRESENSE™ 活用コンテスト作品です。
作品概要
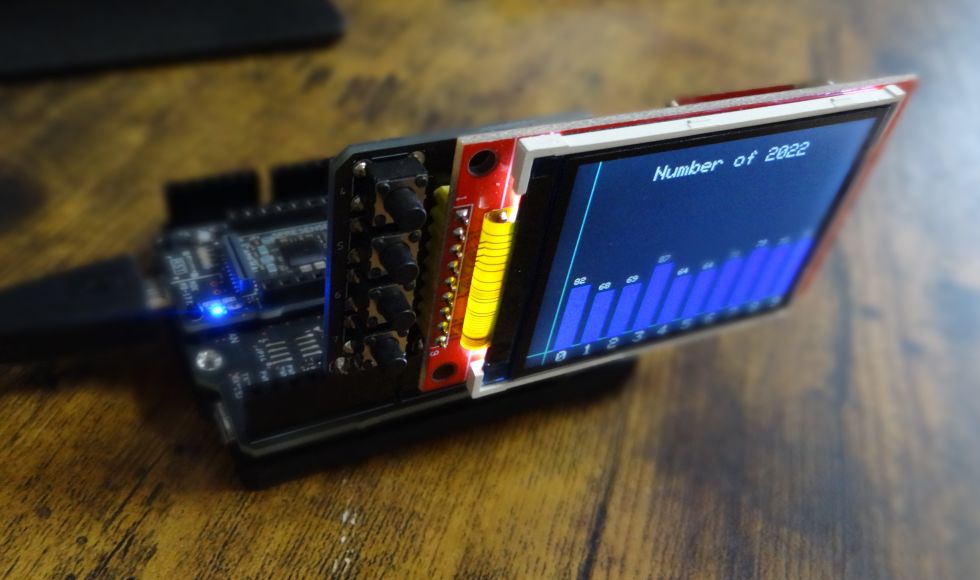
Numbers4 の当選番号に出現する数字を年別にグラフ表示します。
データは、事前に別途収集&集計したものをSDカードに書き込んでいます。
使い方
D04 ボタン:前年データを表示
D05 ボタン:翌年データを表示
D06 ボタン:グラフの色変更(18色逆送り)
D07 ボタン:グラフの色変更(18色順送り)
デモ動画
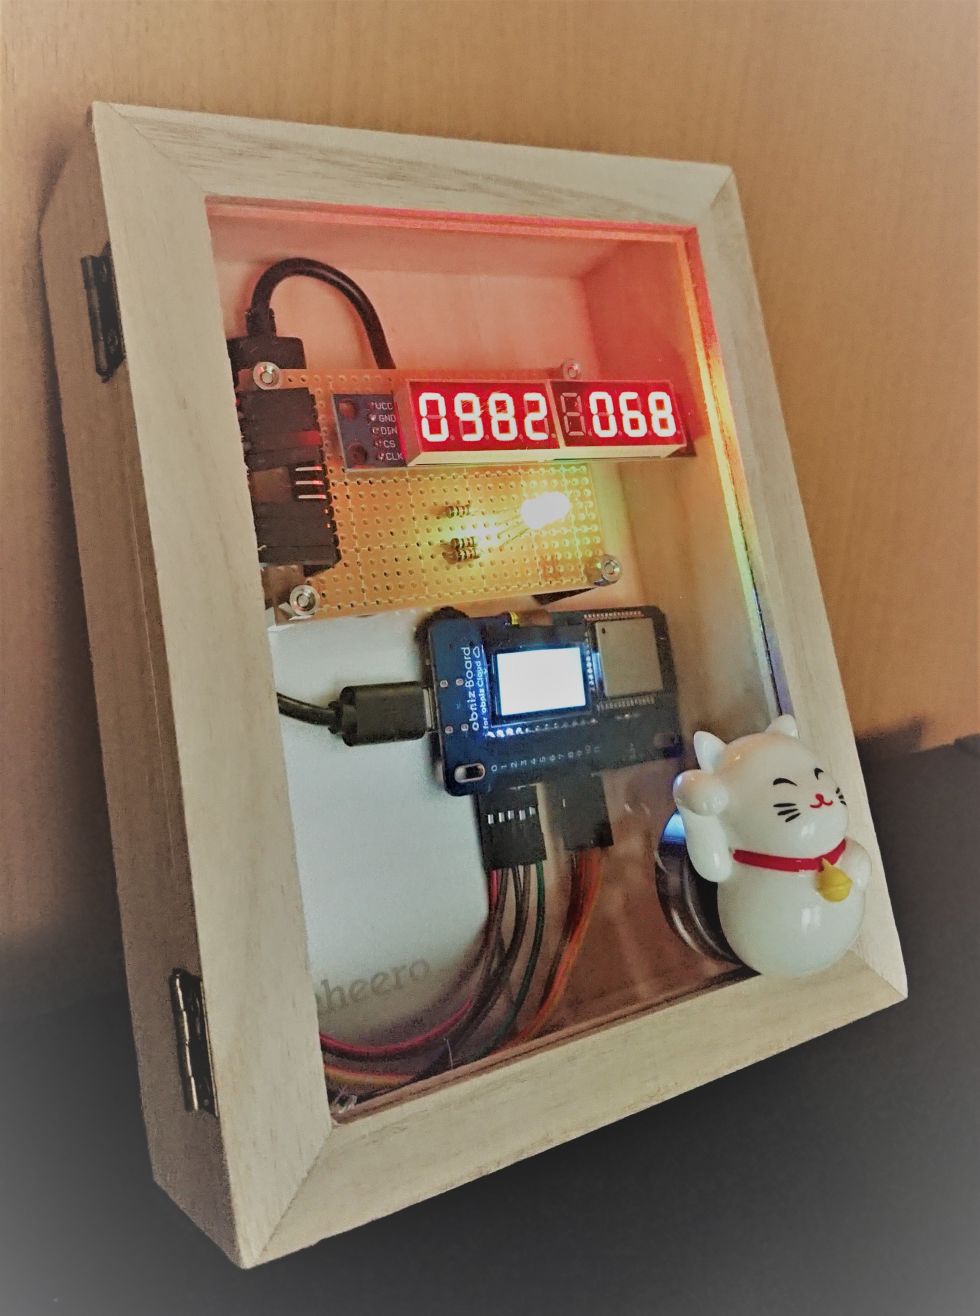
部品
| 部品名 | 説明 |
|---|---|
| Spresense メインボード(※提供品) | |
| Spresense 拡張ボード | |
| Mic&LCD KIT for SPRESENSE(※LCDのみ使用) | |
| SDカード |
設計図(組み立て方法)
※公式マニュアルより抜粋
ソースコード
#include <Arduino.h>

// SDカード
#include <SDHCI.h>
#include <File.h>
SDClass SD;  /**< SDClass object */
File myFile; /**< File object */
const String csvFile = "num4.csv";

// TFT液晶
#include <SPI.h>
#include <Adafruit_GFX.h>
#include <Adafruit_ILI9341.h>
#define TFT_DC 9
#define TFT_CS -1
#define TFT_RST 8
Adafruit_ILI9341 tft = Adafruit_ILI9341(&SPI, TFT_DC, TFT_CS, TFT_RST);

// LED
const int buttonPinYearMinus  = 04;  // 年変更(前年)Pin
const int buttonPinYearPlus   = 05;  // 年変更(翌年)Pin
const int buttonPinColorMinus = 06;  // 色変更(降順)Pin
const int buttonPinColorPlus  = 07;  // 色変更(昇順)Pin
int buttonStateYearMinus;            // 年変更(前年)ON/OFF
int buttonStateYearPlus;             // 年変更(翌年)ON/OFF
int buttonStateColorMinus;           // 色変更(降順)ON/OFF
int buttonStateColorPlus;            // 色変更(昇順)ON/OFF

// グラフ(データ取得)
char num4_data[30];                  // 文字列格納用
String num4_array[30][10][3];        // データ格納用3次元配列(年,数字,出現数)
String num4_work;                    // データ編集用ワーク
String num4_work_substring;          // データ編集用ワーク
int len;                             // データ編集用ワーク
int j;                               // データ編集用添字

// グラフ(データ描画)
int num4_work_num[10];               // データ格納用配列(出現数)
int i;                               // データ編集用文字切り出し用添字
int ai;                              // データ編集用配列用添字(年)
int aj;                              // データ編集用配列用添字(数字)
int ak;                              // データ編集用配列用添字(出現数)
int yyyy = 2022;                     // データ表示用変数(取得年)
int yyyy_min = 0;                    // データ表示用変数(取得年)最小値
int yyyy_max;                        // データ表示用変数(取得年)最大値

uint16_t bar_color[18] =             // 棒グラフの色
{
   ILI9341_NAVY                      // 0
  ,ILI9341_DARKGREEN                 // 1
  ,ILI9341_DARKCYAN                  // 2
  ,ILI9341_MAROON                    // 3
  ,ILI9341_PURPLE                    // 4
  ,ILI9341_OLIVE                     // 5
  ,ILI9341_LIGHTGREY                 // 6
  ,ILI9341_DARKGREY                  // 7
  ,ILI9341_BLUE                      // 8
  ,ILI9341_GREEN                     // 9
  ,ILI9341_CYAN                      // 10
  ,ILI9341_RED                       // 11
  ,ILI9341_MAGENTA                   // 12
  ,ILI9341_YELLOW                    // 13
  ,ILI9341_WHITE                     // 14
  ,ILI9341_ORANGE                    // 15
  ,ILI9341_GREENYELLOW               // 16
  ,ILI9341_PINK                      // 17
};
int bar_color_pos = 8;               // 棒グラフのデフォルト色数字

const uint16_t color_background  = ILI9341_BLACK;     // 画面の背景色
const uint16_t color_title       = ILI9341_WHITE;     // タイトルの文字色
const uint16_t color_line        = ILI9341_DARKCYAN;  // 線の色
const uint16_t color_xAxis_label = ILI9341_WHITE;     // X軸ラベルの文字色
const uint16_t color_data_label  = ILI9341_WHITE;     // データラベルの文字色
uint16_t color_bar;                                   // 棒グラフの色


////////////////////////////////////////////////////////
//  初期処理
////////////////////////////////////////////////////////
void setup() {

  // シリアル通信準備
  Serial.begin(115200);
  while (!Serial) {
    ; /* wait for serial port to connect. Needed for native USB port only */
  }

  // SDカード準備
  Serial.println("Insert SD card.");
  while (!SD.begin()) {
    ; /* wait until SD card is mounted. */
  }

  // TFT液晶準備
  tft.begin(40000000);

  // タクトスイッチ Pinモード初期化
  pinMode(buttonPinYearMinus  , INPUT_PULLUP);  // 年変更(前年)Pin
  pinMode(buttonPinYearPlus   , INPUT_PULLUP);  // 年変更(翌年)Pin
  pinMode(buttonPinColorMinus , INPUT_PULLUP);  // 色変更(降順)Pin
  pinMode(buttonPinColorPlus  , INPUT_PULLUP);  // 色変更(昇順)Pin

  // LED Pinモード初期化
  pinMode(LED0, OUTPUT);  // 年変更(前年)Pin
  pinMode(LED1, OUTPUT);  // 年変更(翌年)Pin
  pinMode(LED2, OUTPUT);  // 年変更(降順)Pin
  pinMode(LED3, OUTPUT);  // 年変更(昇順)Pin

  // SDカードよりデータ読み込み
  myFile = SD.open(csvFile);
  Serial.print("Open CSV FileName = ");
  Serial.println(csvFile);
  if (myFile) {

    // カウンタ初期化
    i = 0;
    ai = 0;  // データ編集用配列用添字(年)
    aj = 0;  // データ編集用配列用添字(数字)
    ak = 0;  // データ編集用配列用添字(出現数)

    while (myFile.available()) {

      num4_data[i] = myFile.read();
      if (num4_data[i] == ',' || num4_data[i] == '\n') {  // カンマか改行がくるまで読み込む

          // 年、数字、出現数の値を切り出し
          num4_work = num4_data;
          len = num4_work.length();
          num4_work_substring = "";
          num4_work_substring = num4_work.substring(0,len-1);

          // 年、数字、出現数の値を3次元配列に格納
          if (ak<3) {
            num4_array[ai][aj][ak] = num4_work_substring;
            if (yyyy_min==0) {
              yyyy_min = num4_work_substring.toInt();  // データ編集用配列用添字(年)最小値
            }
            if (ak==0) {
              yyyy_max = num4_work_substring.toInt();  // データ編集用配列用添字(年)最大値
            }
            ak++;
            if (ak==3) {
              ak = 0;
              aj++;
              if (aj==10) {
                aj = 0;
                ai++;
              }
            }
          }

          // 変数のクリア
          for( j = 0; j < 30; j++ ){num4_data[j]='\0';}
          i = 0;

      }
      else {
        i++;
      }
    }
    myFile.close();

  } else {

    // CSVファイルが存在しなかった時はエラー
    Serial.print("CSV File Open Error.");
  }

  // オープニング画面表示後にグラフ表示
  openingScreen();
  delay(300);
  bar(yyyy,bar_color_pos);

}


////////////////////////////////////////////////////////
//  ループ処理
////////////////////////////////////////////////////////
void loop(void) {

  delay(100);

  ////////////////////////////////////////////////////////
  // 1つ目のボタン押下(前年を表示:最小はCSVファイル内最小年)
  ////////////////////////////////////////////////////////
  buttonStateYearMinus = digitalRead(buttonPinYearMinus);
  if (buttonStateYearMinus == LOW) {
    digitalWrite(LED0, HIGH);                     // LED01点灯
    yyyy--;                                       // 表示年をマイナス
//    if (yyyy < 1994) {yyyy = 1994;}
    if (yyyy < yyyy_min) {yyyy = yyyy_min;}
    bar(yyyy,bar_color_pos);                      // グラフ再表示
  } else {
    digitalWrite(LED0, LOW);                      // LED01消灯
  }

  ////////////////////////////////////////////////////////
  // 2つ目のボタン押下(翌年を表示:最大はCSVファイル内最大年)
  ////////////////////////////////////////////////////////
  buttonStateYearPlus = digitalRead(buttonPinYearPlus);
  if (buttonStateYearPlus == LOW) {
    digitalWrite(LED1, HIGH);                     // LED02点灯
    yyyy++;                                       // 表示年をプラス
    if (yyyy > yyyy_max) {yyyy = yyyy_max;}
    bar(yyyy,bar_color_pos);                      // グラフ再表示
  } else {
    digitalWrite(LED1, LOW);                      // LED02消灯
  }

  ////////////////////////////////////////////////////////
  // 3つ目のボタン押下(棒グラフの色を降順に変更)
  ////////////////////////////////////////////////////////
  buttonStateColorMinus = digitalRead(buttonPinColorMinus);
  if (buttonStateColorMinus == LOW) {
    digitalWrite(LED2, HIGH);                     // LED03点灯
    bar_color_pos--;
    if (bar_color_pos < 0) {bar_color_pos = 17;}  // 最小値を超えたらループ
    bar(yyyy,bar_color_pos);                      // グラフ再表示
  } else {
    digitalWrite(LED2, LOW);                      // LED03消灯
  }

  ////////////////////////////////////////////////////////
  // 4つ目のボタン押下(棒グラフの色を昇順に変更)
  ////////////////////////////////////////////////////////
  buttonStateColorPlus = digitalRead(buttonPinColorPlus);
  if (buttonStateColorPlus == LOW) {
    digitalWrite(LED3, HIGH);                     // LED04点灯
    bar_color_pos++;
    if (bar_color_pos > 17) {bar_color_pos = 0;}  // 最大値を超えたらループ
    bar(yyyy,bar_color_pos);                      // グラフ再表示
  } else {
    digitalWrite(LED3, LOW);                      // LED04消灯
  }

}


////////////////////////////////////////////////////////
//  グラフ表示(引数:年)
////////////////////////////////////////////////////////
unsigned bar(int p_yyyy,int p_color_pos) {

  ////////////////////////////////////////////////////////
  //  描画準備
  ////////////////////////////////////////////////////////
  // 引数で指定された年のデータ(出現数)を配列に格納
  for( ai = 0; ai < 30; ai++ ){
    if (num4_array[ai][0][0]==String(p_yyyy)){
      for( aj = 0; aj < 10; aj++ ){
        num4_work_num[aj] = num4_array[ai][aj][2].toInt();  // 出現数
      }
    }
  }

  // 引数で指定された色でグラフの色をセット
  color_bar = bar_color[p_color_pos];

  // 画面の大きさを取得
  tft.setRotation(3);           // 画面の回転
  int h = tft.width();          // 画面の縦幅(Y軸)
  int w = tft.height();         // 画面の横幅(X軸)

  // 描画用各種変数定義
  int iy0 = 20;                 // 0地点調整値(Y軸)
  int ix0 = 30;                 // 0地点調整値(X軸)
  int ky0 = w-iy0;              // 0地点(Y軸)
  int kx0 = h-ix0;              // 0地点(X軸)

  int label_tx = 0;             // Bar ラベル X軸起点
  int label_ty = w-15;          // Bar ラベル Y軸起点

  int xxx1 = kx0;               // Bar 棒グラフ X軸起点
  int yyy1 = ky0;               // Bar 棒グラフ Y軸起点
  int bar_height;               // Bar 棒グラフ 高さ
  int bar_width = -20;          // Bar 棒グラフ 幅

  int adjust_xAxis_label = 5;   // X軸ラベル位置調整
  int adjust_data_label  = -15; // データラベル位置調整
  int adjust_bar_pos_x   = -30; // 棒グラフ開始横位置調整

  int data_number;              // 表示データ 出現数字(0~9)
  int data_value;               // 表示データ 出現数


  ////////////////////////////////////////////////////////
  //  描画
  ////////////////////////////////////////////////////////
  // 画面の初期化
  tft.fillScreen(color_background);  // 画面の背景色
  tft.setRotation(3);                // 画面の回転


  // タイトルの表示
  tft.setTextColor(color_title);     // 文字色
  tft.setCursor(h/2-80,15);          // 文字位置
  tft.setTextSize(2);                // 文字の大きさ
  tft.print("Number of ");           // タイトル文字(固定文字)
  tft.println(p_yyyy);               // タイトル文字(可変文字)

  // X軸Y軸線の表示
  tft.drawLine(iy0,0,iy0,w,color_line);      // Y軸の描画
  tft.drawLine(0,w-iy0,h,w-iy0,color_line);  // X軸の描画

  // 棒グラフの描画
  xxx1=kx0;
  for(data_number=0; data_number<10; data_number++) {

    // 棒グラフの描画
    tft.setRotation(0);
    data_value=num4_work_num[data_number];
    bar_height = data_value * -1;
    tft.fillRect(yyy1, xxx1, bar_height, bar_width, color_bar);

    // X軸ラベル描画
    tft.setRotation(3);
    tft.setTextSize(2);
    label_tx+=30;
    tft.setCursor(label_tx + adjust_xAxis_label, label_ty);
    tft.println(data_number);

    // データラベル描画
    tft.setCursor(label_tx, label_ty + bar_height + adjust_data_label);
    tft.setTextSize(1);
    tft.println(data_value);

    delay(25);

    // 棒グラフ開始横位置調整
    xxx1+=adjust_bar_pos_x;

  }

  return;

}


////////////////////////////////////////////////////////
//  オープニング画面表示
////////////////////////////////////////////////////////
unsigned openingScreen() {

  // 画面の大きさを取得
  tft.setRotation(0);     // 画面の回転
  int ow = tft.width();   // 画面の縦幅
  int oh = tft.height();  // 画面の横幅

  // 線描画の表示
  tft.fillScreen(color_background);
  int oyy1 = 0;
  int oxx1 = ow;
  int oyy2 = 0;
  int oxx2 = ow;
  for(oyy1=oh; oyy1>0; oyy1-=8) {
    oxx2-=16;
    delay(50);
    tft.drawLine(oxx1, oyy1, oxx2, oyy2, color_line);
  };

  // タイトルの表示
  tft.setTextSize(2);
  tft.setRotation(3);
  tft.setCursor(5,50);
  tft.print("Number ");
  delay(500);  tft.print("of ");
  delay(500);  tft.print("Numbers4 ");
  delay(500);  tft.print("by ");
  delay(500);  tft.print("Year");
  delay(500);  tft.setRotation(0);
  delay(1000);

  return;
}
参考にしたもの
| 参考 | 補足 |
|---|---|
| SPRESENSEではじめるローパワーエッジAI(※懸賞当選品) | |
| 3.12. SDHCI ライブラリ | https://developer.sony.com/ja/develop/spresense/developer-tools/get-started-using-arduino-ide/developer-guide#sdhci_library |
| 3.6. File ライブラリ | https://developer.sony.com/ja/develop/spresense/developer-tools/get-started-using-arduino-ide/developer-guide#file_library |
| Spresense 5. LCDにグラフィックを表示する【ソニー公式】 | https://www.youtube.com/watch?v=3a2VrQBmCiU |
| Arduino 日本語リファレンス | http://www.musashinodenpa.com/arduino/ref/ |
感想
始めは SPRESENSE の使い方を覚えるために
『SPRESENSEではじめるローパワーエッジAI 』を読み進めながらハンズオンで学習をしました。
その後、GNSS で遊んでみましたが、なかなか上手くいきませんでした。
10機以上の衛星は捕捉できたものの、結局、緯度経度の取得はできないまま断念。
再チャレンジしたいと思います。
その後、本作品作りに入りました。
全て Arduino IDE のサンプルスケッチをベースにソースコードを書きました。
しかし、カスタマイズに想像以上に時間がかかってしまいました。
SDカードの使い方で1日、TFT液晶の使い方で2日、調整で1日。
台風でどこにも出かけられなかったので丁度良かったかも。
TFT液晶が最初表示されていたのに、ある時から表示されなくなってしまいました。
原因は、拡張ボードのジャンパーピンを 3.3V に変更していなかっただけだったのですが、
これに全然気づけなかった…。
どうして最初表示されていたのかは未だに謎ですが、
これが下手に影響してハード故障を疑ってしまい、
TFT液晶と拡張ボードを追加購入してしまいましたが当然解決せず。
数日と数千円を無駄にしてしまいました。
ここからの教訓としては「マニュアルを良く読む」です。
これ大事…
投稿者の人気記事

-
Goose
さんが
2022/09/20
に
編集
をしました。
(メッセージ: 初版)
-
Goose
さんが
2022/09/20
に
編集
をしました。
ログインしてコメントを投稿する