

Obniz IoTコンテスト2021
コロナの影響で大学の部活の部室を換気させる必要がある。
そこでしっかりとドアを開けた状態にして換気をしているのかを確認するためこのシステムを開発することにした。
また、部室の利用状況確認にもなったらいいと思う。
現在部室には入れないので家で動作確認を行った。
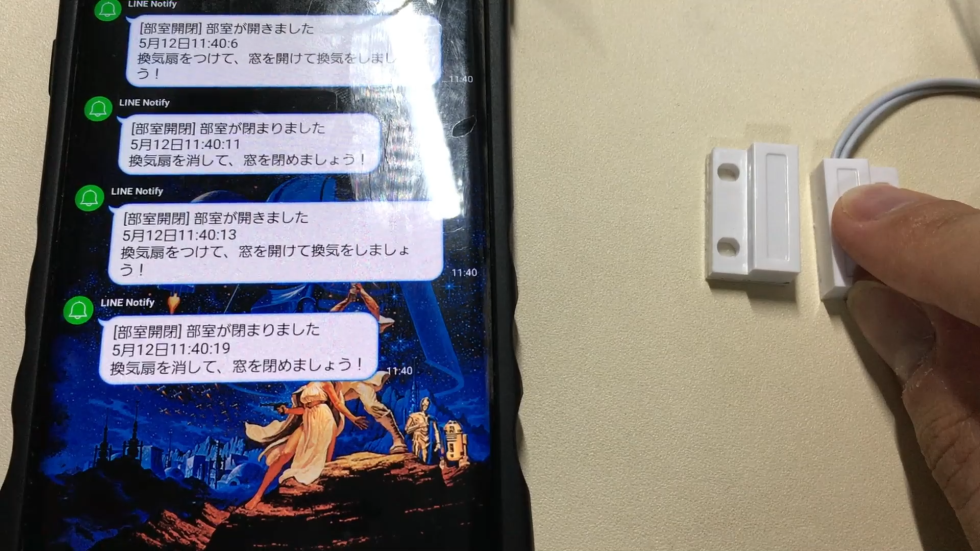
デモ動画
使い方
1.ドアにセンサーを設置する
2. line notifyの設定をする
3. Obnizに電源をつなげる
4. ラインに通知が来る
めっちゃかんたん!!
材料
| 部品名 | 個数 |
|---|---|
| Obniz board 1Y | 1 |
| ドア磁気センサ | 1 |
| LED(色は自由) | 1 |
| 抵抗 | 1 |
| ジャンプワイヤー | 数本 |
配線図
配線図ではObniz BoardになっているがObniz Board Y1でも動作する
obniz Node.jsの準備
公式ガイドを参考に導入しよう
https://obniz.com/ja/doc/guides/nodejs/how-to-run
以下がコマンド
コマンド
//初期化処理 npm init //インストール npm install obniz //JavaScriptを実行 node app.js
Line Notifyの取得
以下のサイトにログインしてから手順のとおりにすすめる
トークンをメモしておく
https://notify-bot.line.me/ja/
ソースコード
コードエディタなどで書こう。
・TOKENにline notifyのトークンを入力
app.js
'use strict';
//require
const Obniz = require('obniz');
const request = require('request');
const express = require('express');
//LINE Notify URL
const LINE_NOTIFY_URL = 'https://notify-api.line.me/api/notify';
//LINE Notify トークン
const TOKEN = 'ここにLINE Notify のトークン-';
//時間取得 月、日、時、分、秒
function get_time() {
var now = new Date();
var Month = now.getMonth() + 1;
var Dates = now.getDate();
var Hour = now.getHours();
var Min = now.getMinutes();
var Sec = now.getSeconds();
var times = Month + "月" + Dates + "日" + Hour + ":" + Min + ":" + Sec;
return times;
};
//時間取得 月、日、時、分、秒
function get_time2() {
var now = new Date();
var Month = now.getMonth() + 1;
var Dates = now.getDate();
var Hour = now.getHours();
var Min = now.getMinutes();
var Sec = now.getSeconds();
var times2 = Month + "/" + Dates + " " + Hour + ":" + Min + ":" + Sec;
return times2;
};
function getOpenMsg() {
//開いたときのMESSAGE
return '部室が開きました\n' + get_time() + "\n" + "換気扇をつけて、窓を開けて換気をしましょう!";
}
//閉じたときのMESSAGE
function getCloseMsg() {
return '部室が閉まりました\n' + get_time() + "\n" + "換気扇を消して、窓を閉めましょう!";
}
var HEADERS = {
'Content-Type': 'application/x-www-form-urlencoded',
'Authorization': 'Bearer ' + TOKEN
};
function getCloseOption() {
let OPEN_MESSAGE = getCloseMsg()
return {
url: LINE_NOTIFY_URL,
method: 'POST',
headers: HEADERS,
json: true,
form: { message: OPEN_MESSAGE }
}
}
function getOpenOption() {
let CLOSE_MESSAGE = getOpenMsg()
return {
url: LINE_NOTIFY_URL,
method: 'POST',
headers: HEADERS,
json: true,
form: { message: CLOSE_MESSAGE }
}
}
//ObnizID
var obniz = new Obniz("1325-2702");
const PORT = process.env.PORT || 5000;
const app = express();
app.get('/', (req, res) => res.send('START'));
//オンライン時
obniz.onconnect = async function () {
//ディスプレイクリア
obniz.display.clear();
//LED 0ピン1ピン
var led = obniz.wired("LED", { anode: 0, cathode: 1 });
//ドア磁気センサー2ピン3ピン
var button = obniz.wired("Button", { signal: 2, gnd: 3 });
//閉じたとき
button.onchange = function (pressed) {
if (pressed) {
console.error(get_time());
request(getCloseOption(), (error, request, body) => {
if (error) {
console.error(error);
return;
}
obniz.display.clear();
console.log(body);
//ディスプレイにCLOSE出力
obniz.display.print('CLOSE \n' + get_time2());
//LED OFF
led.off();
});
}
//開いたとき
else {
console.error(get_time());
request(getOpenOption(), (error, request, body) => {
if (error) {
console.error(error);
return;
}
obniz.display.clear();
console.log(body);
//ディスプレイにOPEN出力
obniz.display.print('OPEN \n' + get_time2());
//LED ON
led.on();
});
};
};
};
//オフライン時
obniz.onclose = async function () {
};
app.listen(process.env.PORT || 5000);
console.log(`Server running at ${PORT}`);Herokuへのデプロイ
app.jsを常時実装させるためHerokuへデプロイすることにした
heorkuをインストール後、以下のコマンドを順に打つ
コマンド
//herokuへのログイン heroku login //Herokuアプリ作成 heroku create [アプリ名] //Git初期化 git init
同じファイルディレクトリ内にProcfileを作る。以下を記述
web: node app.js引き続き以下のコマンドを順に打つ
コマンド
//git追加 git add . //Gitコミット git commit -m "initial commit" //Gitレポジトリ登録 heroku git:remote -a アプリ名 //Gitプッシュ git push heroku master
これでデプロイ完了!!常時実行される。

-
Carlos
さんが
2021/05/12
に
編集
をしました。
(メッセージ: 初版)
ログインしてコメントを投稿する