 製作品
製作品  Lチカ
Lチカ  2330
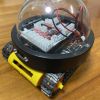
2330【SPRESENSE2023】LCD液晶基板ili9341でタッチパネルを使うよっ

はじめに
こんにちわっ
リナちゃん X@chrmlinux03 です
このページは SPRESENSE2023コンテストで作った部品を紹介するものです
最初に 開発まとめ をお読みいただければ幸いです
インターネットを検索するとタッチパネルの記事は沢山あります
だけど何故か SPRESENSE + タッチパネル ではヒットが出て来ません
そこで今後の持ってるけど使えなくってうずうずしている方々への
感謝を込めて全部公開
目指せタッチパネルマスター ٩(ˊᗜˋ*)و
用意するもの
| 部品名 | 販売先 | 価格 | 御提供品 |
|---|---|---|---|
| タッチパネル付き液晶(ili9341) | どこでも | 400~3,000円 | 〇 |
赤い基板の液晶なんで "ili9341 + Arduino" とかで検索すると大体出てくる
2.4インチ 2.8インチ ... とか色々あるけど
液晶制御用のICが ili9341 だと今回の作業で使えるし
他のICでもちょこっと検索するとやり方が出てくるのでこのページを応用して
液晶基板とタッチパネル
赤い液晶基板には液晶とタッチパネル別のICが載っていて
それらは SPI (Serial Peripheral Interface) と言う信号線で繋がっています
ざっくり言うと CS 以外の それぞれの線を繋ぎたいデバイスの信号と
制御する側の信号に合わせて接続して
もしも デバイスが2個以上あるのであれば CS 以外信号線は共通で
CS だけ別なGPIOに繋がれば良いって感じですかね?
配線
| SPRESENSE側 | 液晶基板側 |
|---|---|
| D13 | SCK と T_CLK |
| D12 | SDO(MISO) と T_DO |
| D11 | SDI(MOSI) と T_DI |
| D10 | CS |
| D9 | DC |
| D8 | RESET |
| D7 | T_CS |
| VCC | 5V か 3.3V |
| GND | GND |
出典
http://www.lcdwiki.com/2.4inch_SPI_Module_ILI9341_SKU:MSP2402
https://www.analog.com/jp/analog-dialogue/articles/introduction-to-spi-interface.html
液晶の制御
色々制御方法はありますが
今回は ESP32シリーズでお世話になっています lovyanGFX で制御を行います
spre.Graphics.hpp
#ifndef __GRAPHIC_HPP__
#define __GRAPHIC_HPP__
#define SPI4_SCLK (13)
#define SPI4_MISO (12)
#define SPI4_MOSI (11)
#define SPI4_CS (10)
#define SPI4_DC ( 9)
#define SPI4_RST ( 8)
#define SPI4_CS2 ( 7)
#define IO_SW4 ( 7)
#define IO_SW3 ( 6)
#define IO_SW2 ( 5)
#define IO_SW1 ( 4)
#define ROT0 (0)
#define ROT90 (1)
#define ROT180 (2)
#define ROT270 (3)
#define MEGA (1000 * 1000)
#define LGFX_AUTODETECT
#define LGFX_USE_V1
#include <LovyanGFX.hpp>
class LGFX : public lgfx::LGFX_Device
{
lgfx::Panel_ILI9341 _panel_instance;
lgfx::Bus_SPI _bus_instance;
public:
LGFX(void) {
{
auto cfg = _bus_instance.config();
cfg.spi_mode = 0;
cfg.spi_port = 4;
cfg.freq_write = (20 * MEGA);
cfg.freq_read = (16 * MEGA);
cfg.pin_dc = SPI4_DC;
_bus_instance.config(cfg);
_panel_instance.setBus(&_bus_instance);
}
{
auto cfg = _panel_instance.config();
cfg.pin_cs = SPI4_CS;
cfg.pin_rst = SPI4_RST;
cfg.pin_busy = -1;
cfg.panel_width = 240;
cfg.panel_height = 320;
cfg.bus_shared = true;
_panel_instance.config(cfg);
}
setPanel(&_panel_instance);
}
};
static LGFX lcd;
static LGFX_Sprite spr;
static bool useGraphics = false;
static uint16_t _w, _h;
int16_t setupGraphics(int16_t rot) {
lcd.init();
lcd.setRotation(rot);
spr.setColorDepth(16);
spr.createSprite(lcd.width(), lcd.height());
_w = spr.width(); _h = spr.height();
useGraphics = true;
return 0;
}
#endifポイント
ポイントは色々あるんですけど
uint16_t setupGraphics(int16_t rot) という関数で
lcd ... 画像描画用インスタンス
spr ... スプライト用インスタンス
_w ... スプライトの幅
_h ... スプライトの高さ
を最初に確保するのが楽で良い♪
タッチパネルの制御
lovyanGFX でもディージーチェーン(CS共通)でタッチパネルが制御できるはずなんですが
何か SPI の所で嵌ってしまいそうなので
今回は 赤い基板に載ってる制御IC XPT2046 に特化した内容でご説明
他のICでもちょこっと検索するとやり方が出てくるから
次の次元へ行きたい方は是非チャレンジを
tinyTouch.hpp
#ifndef __TOUCH_HPP__
#define __TOUCH_HPP__
#include <XPT2046_Touchscreen.h>
XPT2046_Touchscreen tch(SPI4_CS2);
static uint16_t _tx, _ty, _tz;
static uint16_t _tw, _th, _tr;
static uint16_t _thw, _thh;
static bool _swap = 0;
static bool useTouch = false;
#define HARDWARETOUCH_W (390)
#define HARDWARETOUCH_H (3900)
//int16_t isTouch(void) {
int16_t isTouch(int *tx, int *ty, int *tz) {
if (!tch.touched()) {
return 0;
}
TS_Point p = tch.getPoint();
_tz = p.z;
int txmin = 0;
int txmax = _tw;
if (_swap) {
txmin = _tw;
txmax = 0;
}
switch (_tr) {
case 0:
_tx = map(p.y, _thh, _thw, txmin, txmax);
_ty = map(p.x, _thw, _thh, 0, _th);
break;
case 1:
_tx = map(p.x, _thw, _thh, txmin, txmax);
_ty = map(p.y, _thw, _thh, 0, _th);
break;
case 2:
_tx = map(p.y, _thw, _thh, txmin, txmax);
_ty = map(p.x, _thh, _thw, 0, _th);
break;
case 3:
_tx = map(p.x, _thh, _thw, txmin, txmax);
_ty = map(p.y, _thh, _thw, 0, _th);
break;
}
*tx = _tx;
*ty = _ty;
*tz = _tz;
return 1;
}
void setupTouch(int16_t w, int16_t h, int16_t r, bool swap) {
_tw = w;
_th = h;
_tr = r;
_thw = HARDWARETOUCH_W;
_thh = HARDWARETOUCH_H;
_swap = swap;
tch.begin();
}
#endifポイント
これも ポイントは沢山あるんですけど液晶の方向(角度?)が変化しても
タッチパネルは物理座標(左上原点)を返して来るから
それは lovyanGFX を初期化するときに液晶の方向は ROT0..ROT270 で教えて置いた方が良い
これも色々な方法があるけど 今のところはこれでOK
ライブラリ等のダウンロード
Arduio Ide で 上記 2本の ライブラリをカレントフォルダに入れたら
色々入れて下さい~とかエラーが出るので
XPT2046_Touchscreen
LovyanGFX
この2本はダウンロードしてインストールすれば良いかも
なんとZ軸の筆圧が検知できる
タッチパネルには色々種類があって
抵抗被膜式
静電容量式
引用
https://connect.nissha.com/filmdevice/filmdevice_column/capacitive_touch_panel
とかある
抵抗被膜式って言うのは薄い透明な被膜が接点の上に張ってあって
そのどこかを押すと接点がONになる
だからZ軸上でどれくらい押されたのかが検知できる
それをコントローラICが読み取って SPI で伝えるって感じですかね?
今回のは病院の待合室で組んだよっ
応用例
このモジュール群は以下の製品で使われてますので是非ご参照くださいませ٩(ˊᗜˋ*)و
SoundSerenity(環境音が8Trackで美しく流れる箱)
LoRaPager(LoRaを使った簡易メッセンジャーBox)
回る目玉
#include <spreTools.hpp>
#include <spreGraphics.hpp>
#include <spreTouch.hpp>

float dialAngle = 0;
float dialVelocity = 0.0;
float friction = 0.98;
float flickMultiplier = 0.08;

void drawDial(LGFX_Sprite *spr, int cx, int cy, int dR, int needleWidth) {
  spr->fillArc(cx, cy, dR, dR - 8, 0, 360, TFT_WHITE);
  int icR = dR - 48;
  float icAng = radians(dialAngle);
  int icx = cx + int(cos(icAng) * icR);
  int icy = cy + int(sin(icAng) * icR);
  spr->fillCircle(icx, icy, 48, TFT_WHITE);
}

void drawGrid(LGFX_Sprite *spr) {
  int dot = 16;
  for (int x = 0; x < _w; x += dot) {
    for (int y = 0; y < _h; y += dot) {
      spr->drawPixel(x, y, TFT_BLUE);
    }
  }
  spr->drawRect(0, 0, _w, _h, TFT_BLUE);
}

void setup() {
  Serial.begin(115200);
  int8_t rotation = ROT0;
  bool tft24inch = true;
  setupGraphics(rotation);
  setupTouch(_w, _h, rotation, tft24inch);
}

void loop(void) {
  spr.startWrite();
  spr.clear(TFT_BLACK);
//  drawGrid(&spr);

  dialVelocity *= friction;
  dialAngle += dialVelocity;

  drawDial(&spr, _hw, _hh, _hw - 8, 6);

  int tx, ty, tz;
  if (isTouch(&tx, &ty, &tz)) {
    float touchAngle = atan2(ty - _hh, tx - _hw) * RAD_TO_DEG;
    float angleDiff = touchAngle - dialAngle;
    angleDiff = fmod(angleDiff + 180, 360) - 180;
    dialVelocity += flickMultiplier * angleDiff;
  }

  drawAst(&spr, 8, _h - 16);
  spr.pushSprite(&lcd, 0, 0);
  spr.endWrite();
}
残務と今後の考察
今回はたまたま ESP32 用に作ってあった基板を使ったので
工数がかなり短縮出来ましたけど
まぁ最初はブレッドボードでも良いかも
最終的にはこれが完全に乗る基板を作りたいです
ご参考
 B-Stem4CM01Display にタッチパネルの改造を行うよ
さいごに
なかなか厄介なタッチパネルですが
組込用のスイッチとしてはまだまだ健在です(安いから)
ご清聴ありがとうございました
このページは SPRESENSE2023コンテストで作った部品を紹介するものです
最初に 開発まとめ をお読みいただければ幸いです
投稿者の人気記事


-
chrmlinux03
さんが
2024/01/26
に
編集
をしました。
(メッセージ: 初版)
-
chrmlinux03
さんが
2024/01/26
に
編集
をしました。
(メッセージ: 配線追加)
-
chrmlinux03
さんが
2024/01/26
に
編集
をしました。
-
chrmlinux03
さんが
2024/01/31
に
編集
をしました。
(メッセージ: 動画掲載)
-
chrmlinux03
さんが
2024/02/29
に
編集
をしました。
ログインしてコメントを投稿する