


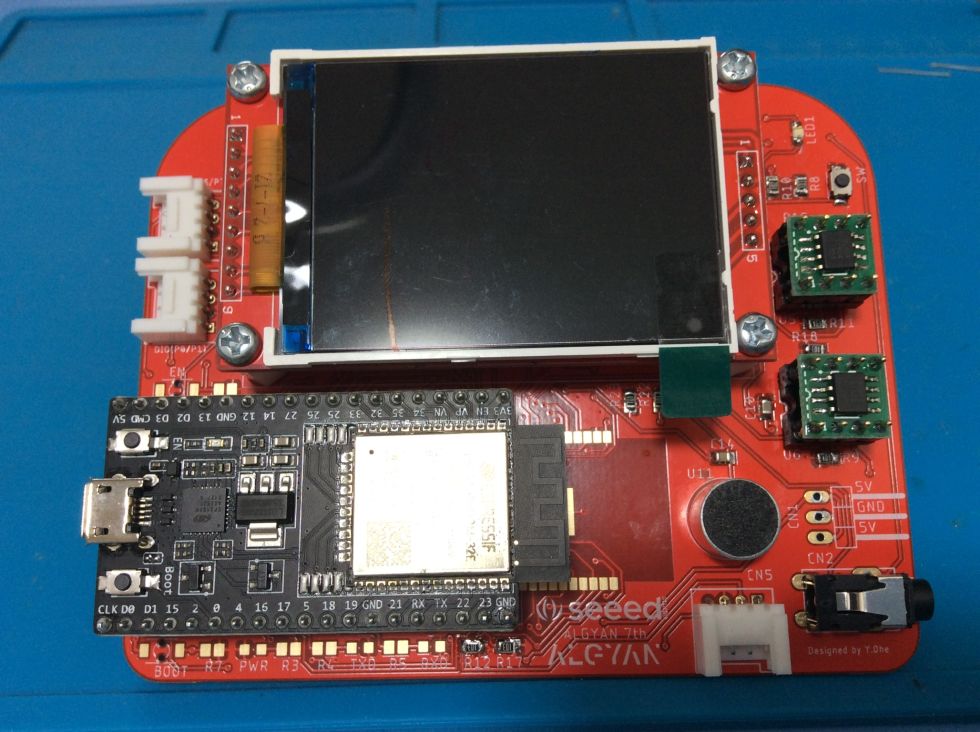
ALGYANの7周年プレゼント基板のハンダ付けが完成したので、作動テストを始めました。
この基板は沢山の機能が載っているので、プログラムの初心者にとって、一度のプログラムするのは難しいので、少しづつ確認を始めました。
はじめに定番のエルチカから、TFT LCDディスプレーの表示までを色々やってみました。
Arduino IDEのサンプルを使い、少し書き換えました。
パソコンにUSB接続をすると、ESP32の赤色LEDが点灯し、LVDディスプレーが明るくなります。
<もくじ>
①エルチカ
②LEDのアナログエルチカ
③WiFiでLEDをONーOFF
④TFTーLCDディスプレーを表
⑤終わりに
1. エルチカ
ボード上の右上にあるグリーンのLEDを点滅させました。
[ALGYAN 7th基板でエルチカの動画]
エルチカ
// ESP32 Div Keit ALGYAN 7th Boad LED Blink
int led1 = 26;
int tim = 200;
// the setup function runs once when you press reset or power the board
void setup() {
// initialize digital pin LED_BUILTIN as an output.
pinMode(led1, OUTPUT);
}
// the loop function runs over and over again forever
void loop() {
digitalWrite(led1, HIGH); // turn the LED on (HIGH is the voltage level)
delay(tim); // wait for a second
digitalWrite(led1, LOW);// turn the LED off by making the voltage LOW
delay(tim);
}2. LEDのアナログエルチカ
グリーンのLEDを、段々に暗くしたり、段々に明るくしたりする。
[LEDのアナログ点灯の動画]
アナログエルチカ
// use first channel of 16 channels (started from zero)
#define LEDC_CHANNEL_0 0
// use 13 bit precission for LEDC timer
#define LEDC_TIMER_13_BIT 13
// use 5000 Hz as a LEDC base frequency
#define LEDC_BASE_FREQ 5000
// fade LED PIN (replace with LED_BUILTIN constant for built-in LED)
#define LED_PIN 26
int brightness = 0; // how bright the LED is
int fadeAmount = 5; // how many points to fade the LED by
// Arduino like analogWrite
// value has to be between 0 and valueMax
void ledcAnalogWrite(uint8_t channel, uint32_t value, uint32_t valueMax = 255) {
// calculate duty, 8191 from 2 ^ 13 - 1
uint32_t duty = (8191 / valueMax) * min(value, valueMax);
// write duty to LEDC
ledcWrite(channel, duty);
}
void setup() {
// Setup timer and attach timer to a led pin
ledcSetup(LEDC_CHANNEL_0, LEDC_BASE_FREQ, LEDC_TIMER_13_BIT);
ledcAttachPin(LED_PIN, LEDC_CHANNEL_0);
}
void loop() {
// set the brightness on LEDC channel 0
ledcAnalogWrite(LEDC_CHANNEL_0, brightness);
// change the brightness for next time through the loop:
brightness = brightness + fadeAmount;
// reverse the direction of the fading at the ends of the fade:
if (brightness <= 0 || brightness >= 255) {
fadeAmount = -fadeAmount;
}
// wait for 50 milliseconds to see the dimming effect
delay(50);
}3. WiFiでLEDをONーOFF
WiFiを使って、スマホからLEDのON-OFFを制御する。
[WiFiでLEDをONーOFFの動画]
WiFiでLEDをONーOFF
/*
WiFi Web Server LED Blink
A simple web server that lets you blink an LED via the web.
This sketch will print the IP address of your WiFi Shield (once connected)
to the Serial monitor. From there, you can open that address in a web browser
to turn on and off the LED on pin 5.
If the IP address of your shield is yourAddress:
http://yourAddress/H turns the LED on
http://yourAddress/L turns it off
This example is written for a network using WPA encryption. For
WEP or WPA, change the Wifi.begin() call accordingly.
Circuit:
* WiFi shield attached
* LED attached to pin 26
created for arduino 25 Nov 2012
by Tom Igoe
ported for sparkfun esp32
31.01.2017 by Jan Hendrik Berlin
*/
#include <WiFi.h>
const char* ssid = "***********";
const char* password = "**********";
WiFiServer server(80);
void setup()
{
Serial.begin(115200);
pinMode(26, OUTPUT); // set the LED pin mode
delay(10);
// We start by connecting to a WiFi network
Serial.println();
Serial.println();
Serial.print("Connecting to ");
Serial.println(ssid);
WiFi.begin(ssid, password);
while (WiFi.status() != WL_CONNECTED) {
delay(500);
Serial.print(".");
}
Serial.println("");
Serial.println("WiFi connected.");
Serial.println("IP address: ");
Serial.println(WiFi.localIP());
server.begin();
}
int value = 0;
void loop(){
WiFiClient client = server.available(); // listen for incoming clients
if (client) { // if you get a client,
Serial.println("New Client."); // print a message out the serial port
String currentLine = ""; // make a String to hold incoming data from the client
while (client.connected()) { // loop while the client's connected
if (client.available()) { // if there's bytes to read from the client,
char c = client.read(); // read a byte, then
Serial.write(c); // print it out the serial monitor
if (c == '\n') { // if the byte is a newline character
// if the current line is blank, you got two newline characters in a row.
// that's the end of the client HTTP request, so send a response:
if (currentLine.length() == 0) {
// HTTP headers always start with a response code (e.g. HTTP/1.1 200 OK)
// and a content-type so the client knows what's coming, then a blank line:
client.println("HTTP/1.1 200 OK");
client.println("Content-type:text/html");
client.println();
// the content of the HTTP response follows the header:
client.print("Click <a href=\"/H\">here</a> to turn the LED on pin 26 on.<br>");
client.print("Click <a href=\"/L\">here</a> to turn the LED on pin 26 off.<br>");
// The HTTP response ends with another blank line:
client.println();
// break out of the while loop:
break;
} else { // if you got a newline, then clear currentLine:
currentLine = "";
}
} else if (c != '\r') { // if you got anything else but a carriage return character,
currentLine += c; // add it to the end of the currentLine
}
// Check to see if the client request was "GET /H" or "GET /L":
if (currentLine.endsWith("GET /H")) {
digitalWrite(26, HIGH); // GET /H turns the LED on
}
if (currentLine.endsWith("GET /L")) {
digitalWrite(26, LOW); // GET /L turns the LED off
}
}
}
// close the connection:
client.stop();
Serial.println("Client Disconnected.");
}
}4. TFTーLCDディスプレーを表示
2.2インチFTーLCDディスプレーにグラフィックや文字の表示をする。
[TFTーLCDディスプレーの表示の動画]
TFTーLCDディスプレーを表示
#include "SPI.h"
#include "Adafruit_GFX.h"
#include "Adafruit_ILI9341.h"
// For the Adafruit shield, these are the default.
#define TFT_DC 27
#define TFT_CS 5
// Use hardware SPI (on Uno, #13, #12, #11) and the above for CS/DC
Adafruit_ILI9341 tft = Adafruit_ILI9341(TFT_CS, TFT_DC);
// If using the breakout, change pins as desired
//Adafruit_ILI9341 tft = Adafruit_ILI9341(TFT_CS, TFT_DC, TFT_MOSI, TFT_CLK, TFT_RST, TFT_MISO);
void setup() {
Serial.begin(9600);
Serial.println("ILI9341 Test!");
tft.begin();
// read diagnostics (optional but can help debug problems)
uint8_t x = tft.readcommand8(ILI9341_RDMODE);
Serial.print("Display Power Mode: 0x"); Serial.println(x, HEX);
x = tft.readcommand8(ILI9341_RDMADCTL);
Serial.print("MADCTL Mode: 0x"); Serial.println(x, HEX);
x = tft.readcommand8(ILI9341_RDPIXFMT);
Serial.print("Pixel Format: 0x"); Serial.println(x, HEX);
x = tft.readcommand8(ILI9341_RDIMGFMT);
Serial.print("Image Format: 0x"); Serial.println(x, HEX);
x = tft.readcommand8(ILI9341_RDSELFDIAG);
Serial.print("Self Diagnostic: 0x"); Serial.println(x, HEX);
Serial.println(F("Benchmark Time (microseconds)"));
delay(10);
Serial.print(F("Screen fill "));
Serial.println(testFillScreen());
delay(500);
Serial.print(F("Text "));
Serial.println(testText());
delay(3000);
Serial.print(F("Lines "));
Serial.println(testLines(ILI9341_CYAN));
delay(500);
Serial.print(F("Horiz/Vert Lines "));
Serial.println(testFastLines(ILI9341_RED, ILI9341_BLUE));
delay(500);
Serial.print(F("Rectangles (outline) "));
Serial.println(testRects(ILI9341_GREEN));
delay(500);
Serial.print(F("Rectangles (filled) "));
Serial.println(testFilledRects(ILI9341_YELLOW, ILI9341_MAGENTA));
delay(500);
Serial.print(F("Circles (filled) "));
Serial.println(testFilledCircles(10, ILI9341_MAGENTA));
Serial.print(F("Circles (outline) "));
Serial.println(testCircles(10, ILI9341_WHITE));
delay(500);
Serial.print(F("Triangles (outline) "));
Serial.println(testTriangles());
delay(500);
Serial.print(F("Triangles (filled) "));
Serial.println(testFilledTriangles());
delay(500);
Serial.print(F("Rounded rects (outline) "));
Serial.println(testRoundRects());
delay(500);
Serial.print(F("Rounded rects (filled) "));
Serial.println(testFilledRoundRects());
delay(500);
Serial.println(F("Done!"));
}
void loop(void) {
for(uint8_t rotation=0; rotation<4; rotation++) {
tft.setRotation(rotation);
testText();
delay(1000);
}
}
unsigned long testFillScreen() {
unsigned long start = micros();
tft.fillScreen(ILI9341_BLACK);
yield();
tft.fillScreen(ILI9341_RED);
yield();
tft.fillScreen(ILI9341_GREEN);
yield();
tft.fillScreen(ILI9341_BLUE);
yield();
tft.fillScreen(ILI9341_BLACK);
yield();
return micros() - start;
}
unsigned long testText() {
tft.fillScreen(ILI9341_BLACK);
unsigned long start = micros();
tft.setCursor(0, 0);
tft.setTextColor(ILI9341_WHITE); tft.setTextSize(1);
tft.println("Hello World!");
tft.setTextColor(ILI9341_YELLOW); tft.setTextSize(2);
tft.println(1234.56);
tft.setTextColor(ILI9341_RED); tft.setTextSize(3);
tft.println(0xABCDEF, HEX);
tft.println();
tft.setTextColor(ILI9341_MAGENTA);
tft.setTextSize(6);
tft.println("ALGYAN");
tft.setTextSize(3);
tft.println();
tft.setTextColor(ILI9341_GREEN);
tft.setTextSize(3);
tft.println("TFT LCD TEST");
/* tft.setTextSize(1);
tft.println("my foonting turlingdromes.");
tft.println("And hooptiously drangle me");
tft.println("with crinkly bindlewurdles,");
tft.println("Or I will rend thee");
tft.println("in the gobberwarts");
tft.println("with my blurglecruncheon,");
tft.println("see if I don't!");
*/
return micros() - start;
}
unsigned long testLines(uint16_t color) {
unsigned long start, t;
int x1, y1, x2, y2,
w = tft.width(),
h = tft.height();
tft.fillScreen(ILI9341_BLACK);
yield();
x1 = y1 = 0;
y2 = h - 1;
start = micros();
for(x2=0; x2<w; x2+=6) tft.drawLine(x1, y1, x2, y2, color);
x2 = w - 1;
for(y2=0; y2<h; y2+=6) tft.drawLine(x1, y1, x2, y2, color);
t = micros() - start; // fillScreen doesn't count against timing
yield();
tft.fillScreen(ILI9341_BLACK);
yield();
x1 = w - 1;
y1 = 0;
y2 = h - 1;
start = micros();
for(x2=0; x2<w; x2+=6) tft.drawLine(x1, y1, x2, y2, color);
x2 = 0;
for(y2=0; y2<h; y2+=6) tft.drawLine(x1, y1, x2, y2, color);
t += micros() - start;
yield();
tft.fillScreen(ILI9341_BLACK);
yield();
x1 = 0;
y1 = h - 1;
y2 = 0;
start = micros();
for(x2=0; x2<w; x2+=6) tft.drawLine(x1, y1, x2, y2, color);
x2 = w - 1;
for(y2=0; y2<h; y2+=6) tft.drawLine(x1, y1, x2, y2, color);
t += micros() - start;
yield();
tft.fillScreen(ILI9341_BLACK);
yield();
x1 = w - 1;
y1 = h - 1;
y2 = 0;
start = micros();
for(x2=0; x2<w; x2+=6) tft.drawLine(x1, y1, x2, y2, color);
x2 = 0;
for(y2=0; y2<h; y2+=6) tft.drawLine(x1, y1, x2, y2, color);
yield();
return micros() - start;
}
unsigned long testFastLines(uint16_t color1, uint16_t color2) {
unsigned long start;
int x, y, w = tft.width(), h = tft.height();
tft.fillScreen(ILI9341_BLACK);
start = micros();
for(y=0; y<h; y+=5) tft.drawFastHLine(0, y, w, color1);
for(x=0; x<w; x+=5) tft.drawFastVLine(x, 0, h, color2);
return micros() - start;
}
unsigned long testRects(uint16_t color) {
unsigned long start;
int n, i, i2,
cx = tft.width() / 2,
cy = tft.height() / 2;
tft.fillScreen(ILI9341_BLACK);
n = min(tft.width(), tft.height());
start = micros();
for(i=2; i<n; i+=6) {
i2 = i / 2;
tft.drawRect(cx-i2, cy-i2, i, i, color);
}
return micros() - start;
}
unsigned long testFilledRects(uint16_t color1, uint16_t color2) {
unsigned long start, t = 0;
int n, i, i2,
cx = tft.width() / 2 - 1,
cy = tft.height() / 2 - 1;
tft.fillScreen(ILI9341_BLACK);
n = min(tft.width(), tft.height());
for(i=n; i>0; i-=6) {
i2 = i / 2;
start = micros();
tft.fillRect(cx-i2, cy-i2, i, i, color1);
t += micros() - start;
// Outlines are not included in timing results
tft.drawRect(cx-i2, cy-i2, i, i, color2);
yield();
}
return t;
}
unsigned long testFilledCircles(uint8_t radius, uint16_t color) {
unsigned long start;
int x, y, w = tft.width(), h = tft.height(), r2 = radius * 2;
tft.fillScreen(ILI9341_BLACK);
start = micros();
for(x=radius; x<w; x+=r2) {
for(y=radius; y<h; y+=r2) {
tft.fillCircle(x, y, radius, color);
}
}
return micros() - start;
}
unsigned long testCircles(uint8_t radius, uint16_t color) {
unsigned long start;
int x, y, r2 = radius * 2,
w = tft.width() + radius,
h = tft.height() + radius;
// Screen is not cleared for this one -- this is
// intentional and does not affect the reported time.
start = micros();
for(x=0; x<w; x+=r2) {
for(y=0; y<h; y+=r2) {
tft.drawCircle(x, y, radius, color);
}
}
return micros() - start;
}
unsigned long testTriangles() {
unsigned long start;
int n, i, cx = tft.width() / 2 - 1,
cy = tft.height() / 2 - 1;
tft.fillScreen(ILI9341_BLACK);
n = min(cx, cy);
start = micros();
for(i=0; i<n; i+=5) {
tft.drawTriangle(
cx , cy - i, // peak
cx - i, cy + i, // bottom left
cx + i, cy + i, // bottom right
tft.color565(i, i, i));
}
return micros() - start;
}
unsigned long testFilledTriangles() {
unsigned long start, t = 0;
int i, cx = tft.width() / 2 - 1,
cy = tft.height() / 2 - 1;
tft.fillScreen(ILI9341_BLACK);
start = micros();
for(i=min(cx,cy); i>10; i-=5) {
start = micros();
tft.fillTriangle(cx, cy - i, cx - i, cy + i, cx + i, cy + i,
tft.color565(0, i*10, i*10));
t += micros() - start;
tft.drawTriangle(cx, cy - i, cx - i, cy + i, cx + i, cy + i,
tft.color565(i*10, i*10, 0));
yield();
}
return t;
}
unsigned long testRoundRects() {
unsigned long start;
int w, i, i2,
cx = tft.width() / 2 - 1,
cy = tft.height() / 2 - 1;
tft.fillScreen(ILI9341_BLACK);
w = min(tft.width(), tft.height());
start = micros();
for(i=0; i<w; i+=6) {
i2 = i / 2;
tft.drawRoundRect(cx-i2, cy-i2, i, i, i/8, tft.color565(i, 0, 0));
}
return micros() - start;
}
unsigned long testFilledRoundRects() {
unsigned long start;
int i, i2,
cx = tft.width() / 2 - 1,
cy = tft.height() / 2 - 1;
tft.fillScreen(ILI9341_BLACK);
start = micros();
for(i=min(tft.width(), tft.height()); i>20; i-=6) {
i2 = i / 2;
tft.fillRoundRect(cx-i2, cy-i2, i, i, i/8, tft.color565(0, i, 0));
yield();
}
return micros() - start;
}5. 終わりに
取り敢えず、ALGYAN 7thプレゼント基板のテストをやるために、サンプルコードを一部変更して、エルチカ、アナログエルチカ、WiFiによるLEDのON-OFFの遠隔操作をやってみました。
これからは、FRAM、カメラ、マイクなど更に色々な機能を追加していきたいと思います。
投稿者の人気記事


-
nakkyi
さんが
2022/07/16
に
編集
をしました。
(メッセージ: 初版)
-
nakkyi
さんが
2022/07/16
に
編集
をしました。
Opening
 satoken
2022/08/18
satoken
2022/08/18  nakkyi
2022/08/20
nakkyi
2022/08/20 -
nakkyi
さんが
2022/08/20
に
編集
をしました。
ログインしてコメントを投稿する情報提供、感謝しています。とても参考になります。
ところで、「WiFiでLEDをON-OFF」のソースコードが「アナログエルチカ」と同じなので、もし宜しければ、「WiFiでLEDをON-OFF」のソースコードへ更新して頂けると、とても助かります。
satokenさん、メッセージありがとうございます。気が付かないで申し訳ありません。WiFiでLEDをON-OFF」のソースコードを入れ替えました。