

ESP-WROOM-02とDHT11で温度・湿度をMQTT送信するよ
概要:
MQTTというデータの送受信をする仕組みを使って
ESP-WROOM-02につけたDHT11が
測定した温度・湿度を送信します。
データはCSV形式で出力しています。
長期間使うので、ユニバーサル基板を使って作りました。
ArduinoIDEの設定:
ボードマネージャ追加URL
http://arduino.esp8266.com/stable/package_esp8266com_index.json選択したボード:
"ESP8266 Boards(3.0.2)"→” Generic ESP8266 Module”
ライブラリ:
MQTTで検索すると表示される"PubSubClient byNick O'Lary"と
DHT11で検索すると表示される"DHT sensor library by Adafruit"を
使いました。
部品表 その1測定部分:
ESP-WROOM-02 1
DHT11 1
10KΩ 5
470Ω1
スイッチサイエンスの変換基板1
部品表その2電源部分:
NJM2396 3.3V 1
PTC 0.5Aポリヒューズ 1
25V 33μF電解コンデンサ 1
25V0.1μFコンデンサ 1
回路図:
3.3Vの電源用意できれば、その2の回路図は不要です
電源が5Vや3.7Vの場合はその2の回路図を作って使います。
動作確認用の回路はついていないので、テスターなどを使って都度動作チェックします。
その1回路説明:
ESP-WROOM-02は電源ONでプログラム起動するには
GPIO0、RSTとENをプルアップします。
GPIO15はプルダウンします。
GPiO2はDHT11の読み込み用にも使うのでプルアップします。
※リセットはRSTをプルダウンするとリセットですが、無くても不自由しなかったので
つけていませんです。
RSTとIO16はディープスリープ用回路で470Ω抵抗をつかいます。
その2回路説明:
NJM2396の説明にあった回路通り作っています。
CTRLラインは有電圧になると2次側ONになります、ON/OFFスイッチ付けたい時は
ここにスイッチをつければ良いです。
動作確認用でLEDつけるなら、3.3V側に10kΩ抵抗位つけて取り付ければ
消費電流も少なくできます。
コンデンサはIC2次側が電解コンデンサになります。
プログラムの書き込み:
ハンダ付け前のESP-WROOM-02に直接プログラムを書き込める物が
世の中にありましたのでそれを使いました。
Aliexpressサイト内検索で"ESP-WROOM-02 Downloader"を検索語にすると
出てきます。
プログラム:
ESP-WROOM-02にDHT11つけてMQTT送信
#include <ESP8266WiFi.h> #include <PubSubClient.h> #include "DHT.h" #define MEASUREMENT_TIMEINTERVAL 10 // Seconds #define DHTPIN 2 // Pin which is connected to the DHT sensor. #define DHTTYPE DHT11 // DHT 11 DHT dht(DHTPIN, DHTTYPE); const char* wifi_ssid = "あなたのWiFiSSID"; const char* wifi_password = "あなたのWiFiパスワード"; const char* mqtt_server = "MQTTブローカーホスト名"; const int mqtt_port = 1883; const char* mqtt_user = "MQTTユーザー名"; const char* mqtt_password = "MQTTパスワード"; #define dht11_topic "sensor/dht11-1" //トピック名 // More information about the PubSubClient library // https://pubsubclient.knolleary.net/api.html // https://github.com/knolleary/pubsubclient WiFiClient espClient; PubSubClient client(espClient); void callback(char* topic, byte* payload, unsigned int length) { // handle message arrived } void setup() { Serial.begin(9600); dht.begin(); setup_wifi(); client.setServer(mqtt_server, mqtt_port); // The callback function is executed when some device publishes a message to a topic that your ESP8266 is subscribed to // client.setCallback(callback); } void setup_wifi() { delay(10); // We start by connecting to a WiFi network Serial.println("Connecting to "); Serial.println(wifi_ssid); WiFi.begin(wifi_ssid, wifi_password); while (WiFi.status() != WL_CONNECTED) { delay(500); Serial.println("Connecting to WiFi.."); } Serial.println("Connected to the WiFi network"); Serial.println("IP address: "); Serial.println(WiFi.localIP()); } // This functions reconnects your ESP8266 to your MQTT broker // Change the function below if you want to subscribe to more topics with your ESP8266 void reconnect() { // Loop until we're reconnected while (!client.connected()) { Serial.println("Attempting MQTT connection..."); if (client.connect("ESP8266Client",mqtt_user,mqtt_password)) { Serial.println("connected"); // Subscribe or resubscribe to a topic // In this example we do not subscribe to any topic // client.subscribe("your_topic_of_interest"); } else { Serial.print("failed with state "); Serial.println(client.state()); // Wait 5 seconds before retrying delay(5000); } } } void loop() { if (!client.connected()) { reconnect(); } if(!client.loop()) { client.connect("ESP8266Client"); } // Reading temperature or humidity takes about 250 milliseconds! // Sensor readings may also be up to 2 seconds 'old' (its a very slow sensor) float h = dht.readHumidity(); // Read temperature as Celsius (false) float t = dht.readTemperature(); // Check if any reads failed and exit early (to try again). if (isnan(h) || isnan(t)) { Serial.println("Failed to read from DHT sensor!"); return; } String data = ""+String(t)+","+String(h); Serial.println(data); client.publish(dht11_topic, data.c_str(), false); // Wait N seconds between measurements. delay(MEASUREMENT_TIMEINTERVAL * 1000); //データ送信前にディープスリープに入る事防止用 ESP.deepSleep(300 * 1000 * 1000 ); //ここを変更すれば測定間隔変更できる delay(1000); //ディープスリープする前に次のループに入るの防止用 }
測定時刻の事:
送信内容を簡単にしたかったんで、受信した時刻を記録しています。
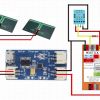
制作例:
スイッチサイエンスのシンプル版の変換基板を使った場合です。
変換基板の裏側にあるチップ抵抗は取り付けていません。
ちょっとした事:
微小電流でもOFFしないモバイルバッテリーでおよそ一週間作動してます。
投稿者の人気記事


-
Makato-kan
さんが
2022/02/12
に
編集
をしました。
(メッセージ: 初版)
-
Makato-kan
さんが
2022/02/12
に
編集
をしました。
-
Makato-kan
さんが
2022/02/13
に
編集
をしました。
(メッセージ: 電解コンデンサの位置を追記)
-
Makato-kan
さんが
2022/02/20
に
編集
をしました。
(メッセージ: タグを増やしました)
-
Makato-kan
さんが
2022/04/03
に
編集
をしました。
-
Makato-kan
さんが
2022/04/03
に
編集
をしました。
-
Makato-kan
さんが
2024/02/20
に
編集
をしました。
(メッセージ: ボーレートを変更した)
ログインしてコメントを投稿する