<もくじ>
- もくじ
- 始めに
- 準備した物
- 配線図
- コード
- 使い方
- 終わりに
<始めに>
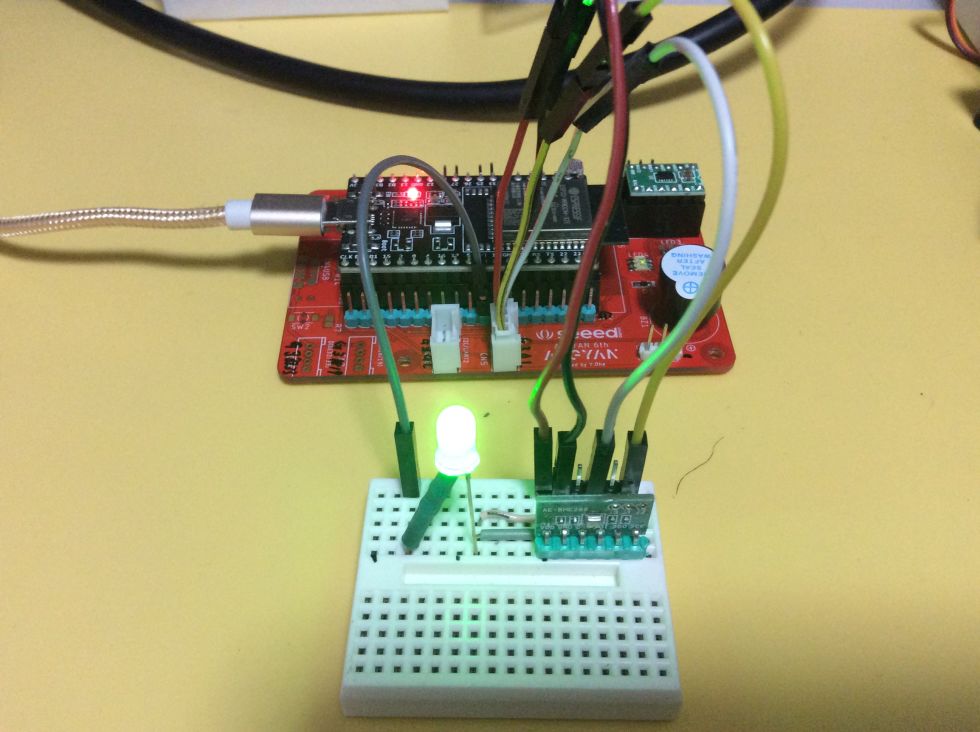
ALGYAN の6周年基板を使って使って、BME280のセンサーで気温、湿度、気圧を測定し、I2Cで接続し、Ambientでグラフ表示をしてみました。
<準備した物>
| ALGYAN6周年基板 | 1枚 |
|---|---|
| ブレッドボード | 1枚 |
| BME280センサー | 1個 |
| グリーンLED | 1個 |
| 抵抗330Ω | 1個 |
<配線図>
<コード>
Arugyan6thボード+BME280(気温、湿度、気圧)
// -----< Include >----
#include <Wire.h>
#include <WiFi.h>
#include <Adafruit_Sensor.h>
#include <Adafruit_BME280.h>
#include <Ambient.h>
// -----< Define >-----
#define PERIOD 300
#define SEALEVELPRESSURE_HPA (1013.25)
Adafruit_BME280 bme;
WiFiClient client;
Ambient ambient;
unsigned long delayTime;
float temp;
float pressure;
float humid;
const char* ssid = " "; //"WiFiの ssid";
const char* password= " "; //"WiFiの password";
unsigned int channelId = ; //AmbientのチャンネルId(数字)
const char* writeKey = " "; //"Ambienのライトキー "
const byte LED_GRN = 18; //LEDのIO端子
bool LED_FLG = true;
void setup() {
// put your setup code here, to run once:
Serial.begin(115200);
pinMode( LED_GRN, OUTPUT);
bool status;
status = bme.begin(0x76);
while (!status) {
Serial.println("BME280 senseorが使えません");
delay(1000);
}
delayTime = 1000;
WiFi.begin(ssid, password); //WiFi AP に接続
while (WiFi.status() != WL_CONNECTED) { //WiFi AP に接続待ち
LED_FLG = !LED_FLG;
digitalWrite(LED_GRN, LED_FLG);
delay(100);
Serial.print(".");
}
digitalWrite(LED_GRN, true);
Serial.print("WiFi connected\r\nIP address: ");
Serial.println( WiFi.localIP());
ambient.begin(channelId, writeKey, &client); //Ambient 初期化
}
void loop() {
// put your main code here, to run repeatedly:
temp=bme.readTemperature();
pressure=bme.readPressure() / 100.0F;
humid=bme.readHumidity();
Serial.print("温度 ;");
Serial.print(temp);
Serial.println(" c");
Serial.print("気圧 ;");
Serial.print(pressure);
Serial.println(" hPa");
Serial.print("湿度 ;");
Serial.print(humid);
Serial.println(" %");
Serial.println();
delay(delayTime);
ambient.set(1, temp);
ambient.set(2, humid);
ambient.set(3, pressure);
ambient.send();
delay(PERIOD * 1000);
}<使い方>
①ALUGYN6th基板のI2CソケットにBME280センサーをつなぎ、USBソケットに5V電源をつなぎます。(バッテリーでも可能です。)
②グリーンのLEDが点滅し、その後点灯したらWiFiの接続は完了です。
③Ambientにログインを行い、作ったチャンネル名を選択しクリックすると、気温、湿度、気圧のグラフが5分ごとに更新されて表示されます。
④スマートフォンからAmbientにアクセスすると外出中でも、部屋の温度や湿度を見ることができます。
<終わりに>
プログラムは、Interface誌2021年7月号の第1部第3章を参考にさせていただきました。自分で写経をしたので、タイプミスのバグ取りに苦労しました。これによりプログラムの勉強になり、センサーやWiFi、Ambientの事が少し分かりました。
これから、ほかのパーツを追加してさらに発展したいと思います。
投稿者の人気記事


-
nakkyi
さんが
2021/07/20
に
編集
をしました。
(メッセージ: 初版)
-
nakkyi
さんが
2021/07/20
に
編集
をしました。
-
nakkyi
さんが
2021/07/20
に
編集
をしました。
-
nakkyi
さんが
2021/07/20
に
編集
をしました。
-
nakkyi
さんが
2021/07/20
に
編集
をしました。
-
nakkyi
さんが
2021/07/20
に
編集
をしました。
-
nakkyi
さんが
2021/07/21
に
編集
をしました。
-
nakkyi
さんが
2021/07/21
に
編集
をしました。
-
nakkyi
さんが
2021/07/21
に
編集
をしました。
-
nakkyi
さんが
2021/07/21
に
編集
をしました。
-
nakkyi
さんが
2021/07/21
に
編集
をしました。
-
nakkyi
さんが
2021/07/21
に
編集
をしました。
-
nakkyi
さんが
2021/07/21
に
編集
をしました。
ログインしてコメントを投稿する