


写真1枚に環境情報も入れた 家庭菜園タイムラプスシステムの製作(3/3)
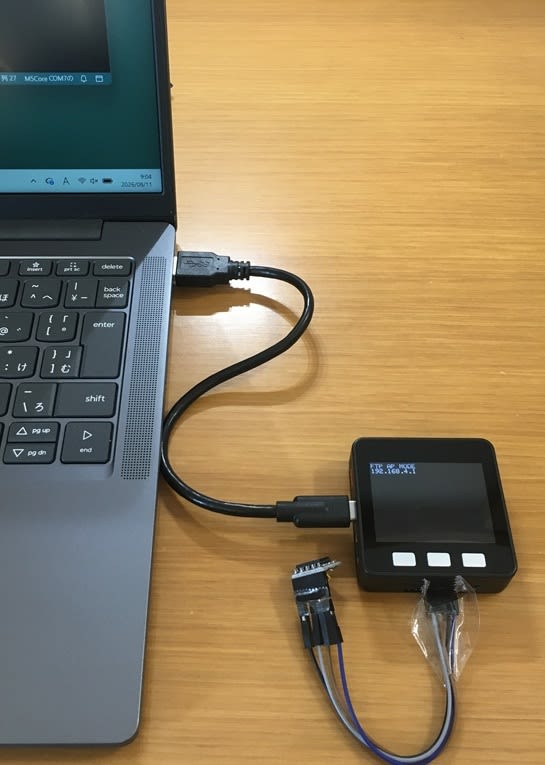
表示保存部(M5Stack CORE BASIC)の詳細です。
表示部概要
M5Stack CORE BASICにRTCを取り付けます。
回路図
Arduino IDE(最新版)の設定
-
ボードマネージャー
M5 → 「M5Core」
最新版のボードマネージャーを使用してください。 -
ライブラリ
- RTC DS3231(I2C接続) → RTClib by Adafruit Ver.2.1.4
- SimpleFTPServer → SimpleFTPServer by Renzo Mischianti Ver.3.0.2
- SdFAT.h → SdFat by Bill Greiman Ver.2.3.0
プログラムの概要
- 各種初期化を行い、待機状態になります。
- FTPで受信したデータはLittleFSに置かれます。
img.jpgは画面表示に使用します。img2.jpgはSDカードの/cam0フォルダ内にあるimg-xxx.jpgのxxx番号+1の値で保存します。sound.wavはSDカードの/cam0フォルダ内にあるsnd-xxx.wavのxxx番号+1の値で保存します。
その他操作:
- ボタン1(左)を長押し:最後に保存された画像を表示します。
- ボタン3(右)を長押し:WiFi接続してRTCの時刻をセットします。
プログラム
M5-RTC-FTP_Server.ino
/*
M5Stack Basic FTP Image Viewer & Auto Rename Saver
Improved & Fixed Version
*/
#include <Wire.h>
#include "RTClib.h"
#include <time.h>
#include <WiFi.h>
#include <SPI.h>
#include <SdFat.h>
SdFat SD; //ここで実際にSDオブジェクトを作成(定義)する ので良い
#include <LittleFS.h>
#include <M5Unified.h>
#include <SimpleFTPServer.h>
#define SD_SPI_SCK 18
#define SD_SPI_MISO 19
#define SD_SPI_MOSI 23
#define SD_SPI_CS 4
//==================================================
// WiFi & NTP
//==================================================
const char* AP_SSID = "M5Stack_FTP";
const char* AP_PASS = "12345678";
const char* STA_SSID = "NTP-Set-WiFi"; // ← Change
const char* STA_PASS = "WiFiPASSWD"; // ← Change
// WiFi & NTP
const char* ntpServer = "ntp.nict.jp";
const long gmtOffset_sec = 9 * 3600; // 日本時間 (JST)
const int daylightOffset_sec = 0;
// NTP同期関数(後述)
RTC_DS3231 Rtc;
//==================================================
// FTP
//==================================================
FtpServer ftpServer;
//==================================================
// File Paths
//==================================================
const char* IMG2_PATH_LITTLEFS = "/img2.jpg";
const char* IMG_PATH_LITTLEFS = "/img.jpg";
const char* WAV_PATH_LITTLEFS = "/sound.wav";
const char* CAM0_DIR = "/cam0";
//==================================================
// Upload Detection (use timestamps or counters for robustness)
//==================================================
struct UploadState {
bool img2 = false;
bool img = false;
bool wav = false;
unsigned long lastUploadMs = 0;
} uploadState;
//==================================================
// RTCの同期をとります
//==================================================
bool syncRTCfromNTP() {
int retry = 0;//
int timeout = 0;//
Serial.println("=== NTP Sync Start (BtnC) ===");
bool success = false;
// 1. APモードを止めてSTAモードに切り替え
WiFi.disconnect(true);
delay(200);
WiFi.mode(WIFI_STA);
delay(200);
WiFi.begin(STA_SSID, STA_PASS);
delay(200);
Serial.printf("Connecting to %s ", STA_SSID);
while (WiFi.status() != WL_CONNECTED && retry < 30) {
delay(1000);
Serial.print(".");
retry++;
M5.Display.fillScreen(TFT_BLACK);
M5.Display.setCursor(0, 0);
M5.Display.setTextSize(2);
M5.Display.printf("WiFi Connecting...\n%d/30", retry);
}
if (WiFi.status() != WL_CONNECTED) {
Serial.println("\nWiFi Connect Failed");
M5.Display.fillScreen(TFT_BLACK);
M5.Display.setCursor(0, 0);
M5.Display.println("WiFi Failed");
delay(2000);
goto restore;
}
Serial.println("\nWiFi Connected!");
M5.Display.fillScreen(TFT_BLACK);
M5.Display.setCursor(0, 0);
M5.Display.println("WiFi OK");
// 2. NTP設定
configTime(gmtOffset_sec, daylightOffset_sec, ntpServer);
// 3. 時刻取得
struct tm timeinfo;
Serial.println("Getting NTP time...");
// int timeout = 0;
while (!getLocalTime(&timeinfo) && timeout < 20) {
delay(500);
timeout++;
Serial.print(".");
}
if (!getLocalTime(&timeinfo)) {
Serial.println("\nNTP Get Failed");
M5.Display.fillScreen(TFT_BLACK);
M5.Display.setCursor(0, 0);
M5.Display.println("NTP Failed");
delay(2000);
} else {
// 成功時のみRTC更新
DateTime ntpTime(
timeinfo.tm_year + 1900,
timeinfo.tm_mon + 1,
timeinfo.tm_mday,
timeinfo.tm_hour,
timeinfo.tm_min,
timeinfo.tm_sec
);
Rtc.adjust(ntpTime);
Serial.println("RTC Updated from NTP!");
Serial.printf("%04d/%02d/%02d %02d:%02d:%02d\n",
ntpTime.year(), ntpTime.month(), ntpTime.day(),
ntpTime.hour(), ntpTime.minute(), ntpTime.second());
M5.Display.fillScreen(TFT_BLACK);
M5.Display.setCursor(0, 0);
M5.Display.setTextSize(2);
M5.Display.println("RTC Synced!");
M5.Display.printf("%04d/%02d/%02d\n%02d:%02d:%02d",
ntpTime.year(), ntpTime.month(), ntpTime.day(),
ntpTime.hour(), ntpTime.minute(), ntpTime.second());
delay(3000);
success = true;
}
restore:
// 4. 必ずAPモードに戻す
WiFi.disconnect(true);
delay(1000);
WiFi.mode(WIFI_AP);
delay(1000);
WiFi.softAP(AP_SSID, AP_PASS, 6, 0, 4);
delay(1000);
Serial.println("Restored AP Mode");
M5.Display.fillScreen(TFT_BLACK);
M5.Display.setCursor(0, 0);
M5.Display.setTextSize(2);
M5.Display.println("FTP AP MODE");
M5.Display.println(WiFi.softAPIP());
return success;
}
//==================================================
// SdFat alias
//==================================================
// Get next sequential number (more robust)
int getNextFileNumber(const char* prefix, const char* extension) {
int maxNum = 0;
FsFile dir, file;
if (!dir.open(CAM0_DIR)) {
Serial.println("Cannot open /cam0");
return 1;
}
while (file.openNext(&dir, O_RDONLY)) {
if (file.isDirectory()) {
file.close();
continue;
}
char name[64];
file.getName(name, sizeof(name));
String nameStr = name;
String fullPrefix = String(prefix) + "-";
if (nameStr.startsWith(fullPrefix) && nameStr.endsWith(extension)) {
String numStr = nameStr.substring(fullPrefix.length(),
nameStr.length() - strlen(extension));
int num = numStr.toInt();
if (num > maxNum) maxNum = num;
}
file.close();
}
dir.close();
maxNum = min(maxNum + 1, 999);
Serial.printf("Next %s%s → %03d\n", prefix, extension, maxNum);
return maxNum;
}
//==================================================
// Save with timestamp
//==================================================
bool saveRenamedFileFromLittleFS(const char* srcPath, const char* prefix, const char* extension) {
if (!LittleFS.exists(srcPath)) {
Serial.printf("Source %s not found\n", srcPath);
return false;
}
DateTime now = Rtc.now();
int nextNum = getNextFileNumber(prefix, extension);
char newPath[64];
snprintf(newPath, sizeof(newPath), "%s/%s-%03d%s", CAM0_DIR, prefix, nextNum, extension);
Serial.printf("Copy: %s → %s\n", srcPath, newPath);
File source = LittleFS.open(srcPath, FILE_READ);
FsFile dest;
if (!source || !dest.open(newPath, O_WRONLY | O_CREAT | O_TRUNC)) {
Serial.println("Open failed");
if (source) source.close();
return false;
}
const size_t bufSize = 512;
uint8_t buffer[bufSize];
size_t bytesRead;
while ((bytesRead = source.read(buffer, bufSize)) > 0) {
dest.write(buffer, bytesRead);
}
source.close();
// Set timestamps
uint16_t year = now.year();
uint8_t mon = now.month();
uint8_t day = now.day();
uint8_t hour = now.hour();
uint8_t min = now.minute();
uint8_t sec = now.second();
dest.timestamp(T_ACCESS, year, mon, day, hour, min, sec);
dest.timestamp(T_CREATE, year, mon, day, hour, min, sec);
dest.timestamp(T_WRITE, year, mon, day, hour, min, sec);
dest.close();
LittleFS.remove(srcPath);
Serial.println("Saved with RTC timestamp");
return true;
}
//==================================================
// Display
//==================================================
void displayImage() {
if (!LittleFS.exists(IMG2_PATH_LITTLEFS)) {
M5.Display.fillScreen(TFT_BLACK);
M5.Display.setTextColor(TFT_RED);
M5.Display.setCursor(0, 0);
M5.Display.println("No img2.jpg");
return;
}
M5.Display.fillScreen(TFT_BLACK);
M5.Display.drawJpgFile(LittleFS, IMG2_PATH_LITTLEFS, 0, 0);
}
//==================================================
// FTP Callback
//==================================================
void ftpCallback(FtpOperation operation, uint32_t freeSpace, uint32_t totalSpace) {
if (operation == FTP_UPLOAD) {
uploadState.lastUploadMs = millis();
if (LittleFS.exists(IMG2_PATH_LITTLEFS)) uploadState.img2 = true;
if (LittleFS.exists(IMG_PATH_LITTLEFS)) uploadState.img = true;
if (LittleFS.exists(WAV_PATH_LITTLEFS)) uploadState.wav = true;
}
}
//==================================================
// Setup
//==================================================
void setup() {
auto cfg = M5.config();
M5.begin(cfg);
Serial.begin(9600);
M5.Display.setRotation(1);
M5.Display.fillScreen(TFT_BLACK);
M5.Display.setTextSize(2);
M5.Display.setTextColor(TFT_WHITE);
delay(1000);
// LittleFS
if (!LittleFS.begin()) {
LittleFS.format();
}
// SD
if (!SD.begin(SdSpiConfig(SD_SPI_CS, SHARED_SPI, SD_SCK_MHZ(25)))) {
M5.Display.println("SD MOUNT FAILED");
while (1) delay(1000);
}
if (!SD.exists(CAM0_DIR)) SD.mkdir(CAM0_DIR);
delay(1000);
// RTC
Wire.begin(21, 22); //M5のGroveポートではない場所を使うときは直す
if (!Rtc.begin()) {
M5.Display.println("RTC NOT FOUND!");
while (1) delay(100);
}
Rtc.adjust(DateTime(F(__DATE__), F(__TIME__))); // fallback
// WiFi AP
WiFi.mode(WIFI_AP);
WiFi.softAP(AP_SSID, AP_PASS, 6, 0, 4);
IPAddress ip = WiFi.softAPIP();
M5.Display.println("FTP AP MODE");
M5.Display.println(ip);
// FTP
ftpServer.setCallback(ftpCallback);
ftpServer.begin("M5", "M5pass");
Serial.println("System Ready");
}
//==================================================
// Loop
//==================================================
void loop() {
M5.update();
ftpServer.handleFTP();
// ================== BtnC 長押しでNTP同期 ==================
if (M5.BtnC.wasHold()) { // 500ms以上押し続けると発火
syncRTCfromNTP();
}
unsigned long nowMs = millis();
// Process uploads with small delay to let FTP finish writing
if (uploadState.img && (nowMs - uploadState.lastUploadMs > 800)) {
uploadState.img = false;
saveRenamedFileFromLittleFS(IMG_PATH_LITTLEFS, "img", ".jpg");
}
if (uploadState.wav && (nowMs - uploadState.lastUploadMs > 800)) {
uploadState.wav = false;
saveRenamedFileFromLittleFS(WAV_PATH_LITTLEFS, "sound", ".wav");
}
if (uploadState.img2 && (nowMs - uploadState.lastUploadMs > 800)) {
uploadState.img2 = false;
displayImage();
}
// Button A - manual display
if (M5.BtnA.wasPressed()) {
displayImage();
}
delay(10);
}※テストのため3分毎に撮影しています。
注意点
- ボタン3長押しでRTC時刻セットは、必ずそのWiFi電波の届く場所で実施してください。
- PC接続しない場合、シリアルプリントを残しておくと動作が止まることがあります。
簡単な使い方
- M5の電源を入れます。
- ESP32S3の電源を入れます。
- しばらくしてM5が画像表示すれば成功です。
屋外で温度湿度を測定し記録するので、壊れやすいと思い大量にDHT11とESP-WROOM-02を購入したのですが思いのほか壊れなかったので、何にでもDHT11をくっつけています。
投稿者の人気記事




-
Makato-kan
さんが
2026/08/11
に
編集
をしました。
(メッセージ: 初版)
-
Makato-kan
さんが
2026/08/13
に
編集
をしました。
(メッセージ: タグを追加しました)
ログインしてコメントを投稿する